Fast|Easy: How to Backup Picasa to External Hard Drive
This article tells how to backup Picasa to external hard drive. Finally, it is recommended that you use free backup software to backup Picasa files to prevent data loss.
By Miya Updated on January 10, 2024
User Case: How Do I Backup My Picasa Database?
“Hey folks, I've got Picasa installed on my Windows 10 PC, and I want to back it up to my external hard drive. So how to transfer photos from Picasa to external hard drive? Can someone help me out with a step-by-step guide? I'm not very tech-savvy, so please keep it simple. Thanks in advance.”
Are you like this user looking for how to backup Picasa to external hard drive? This article will give you a step-by-step guide! Backup can be completed in just a few simple steps. Lastly, we recommend that you develop a good habit of backing up your data and use free backup software to automatically back up your Picasa database such as auto backup files to external hard drive. Never worry about data loss again! Read on for the complete guide!
How to Backup Picasa to External Hard Drive
Picasa was a popular image management and editing software developed by Google. However, as of May 1, 2016, Google has discontinued support for Picasa and it is no longer available for download or use. Consequently, there is no official method to back up Picasa to an external hard drive.
If you have Picasa installed on your computer and want to back up your Picasa library, you can manually locate the Picasa folder on your computer and copy it to your external hard drive. Here are the general steps to perform Picasa backup:
Step 1. Open File Explorer (Windows) or Finder (Mac).

Step 2. Navigate to the location where Picasa stores its library. The default location for the Picasa library is typically:
- Windows: C:\Users\YourUsername\AppData\Local\Google\Picasa2
- Mac: /Users/YourUsername/Library/Application Support/Google/Picasa3
Note: Replace YourUsername with your actual username.
Step 3. Once you've located the Picasa folder, copy it and navigate to your external hard drive.
Step 4. Paste the copied Picasa folder to your desired location on the external hard drive.
By following these steps, you will backup Picasa to external hard drive. However, please note that this backup will only include the library itself, and not the Picasa software or any associated settings.
It's important to remember that Picasa is no longer actively maintained or supported by Google, so it's recommended to transition to an alternative image management software or cloud-based service such as AOMEI cloud for your future photo management needs.
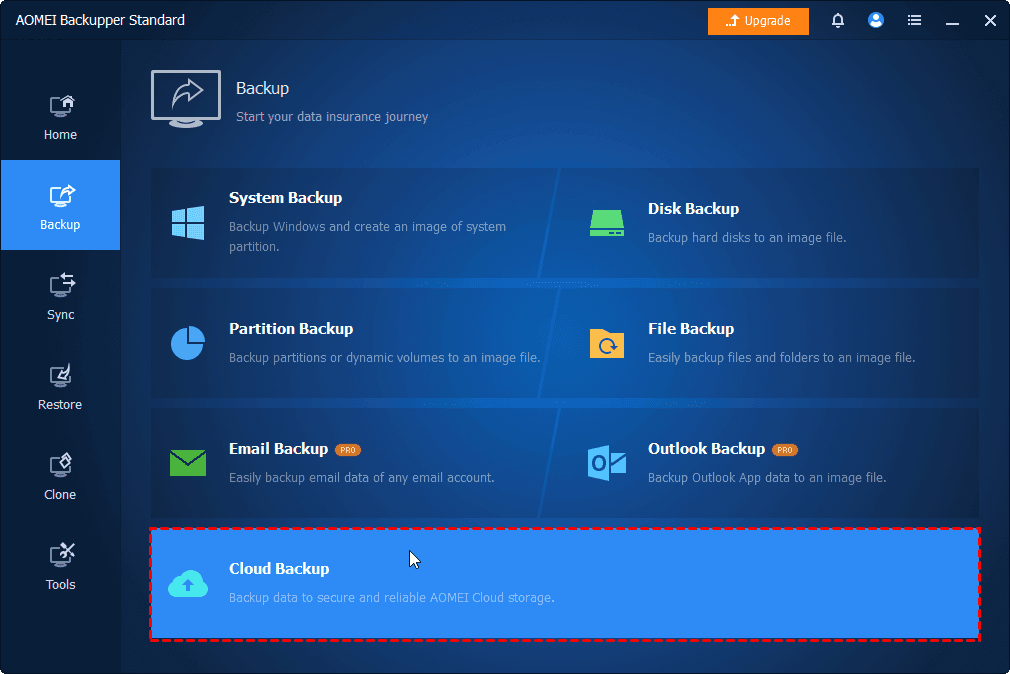
★ Bonus tip: backup photos to AOMEI Cloud
With the rising popularity of cloud storage, AOMEI has introduced its own cloud service called AOMEI Cloud. When you create an AOMEI account, you'll get a generous 1TB of free storage for 15 days.
To easily back up your photos to AOMEI Cloud, simply click on Backup andthen select Cloud Backup in AOMEI Backupper freeware. It's a convenient way to secure your precious memories.
Auto Backup Picasa Files to Prevent Data Loss
Your Picasa files likely contain precious memories, such as family photos, vacations, or special events. Losing these files due to unforeseen circumstances could result in the permanent loss of those memories. By creating backups of your Picasa files, you ensure that your photos and albums are protected against accidental deletion, hardware failures, or computer crashes. If anything were to happen to your original files, having a backup ensures you can recover them.
AOMEI Backupper Standard, known as the top-notch free file backup software, makes backing up files a breeze. With just five straightforward steps, you can efficiently safeguard your data. Simply download and install the software on your computer, and grab an external hard drive to automatically store your precious files. It's that easy! This software streamlines the backup process, ensuring your files are protected without any hassle.
Let me guide you through the step-by-step process of performing a free Picasa files backup on your Windows 10 computer. These instructions are also applicable to Windows 11/8.1/8/7/XP/Vista.
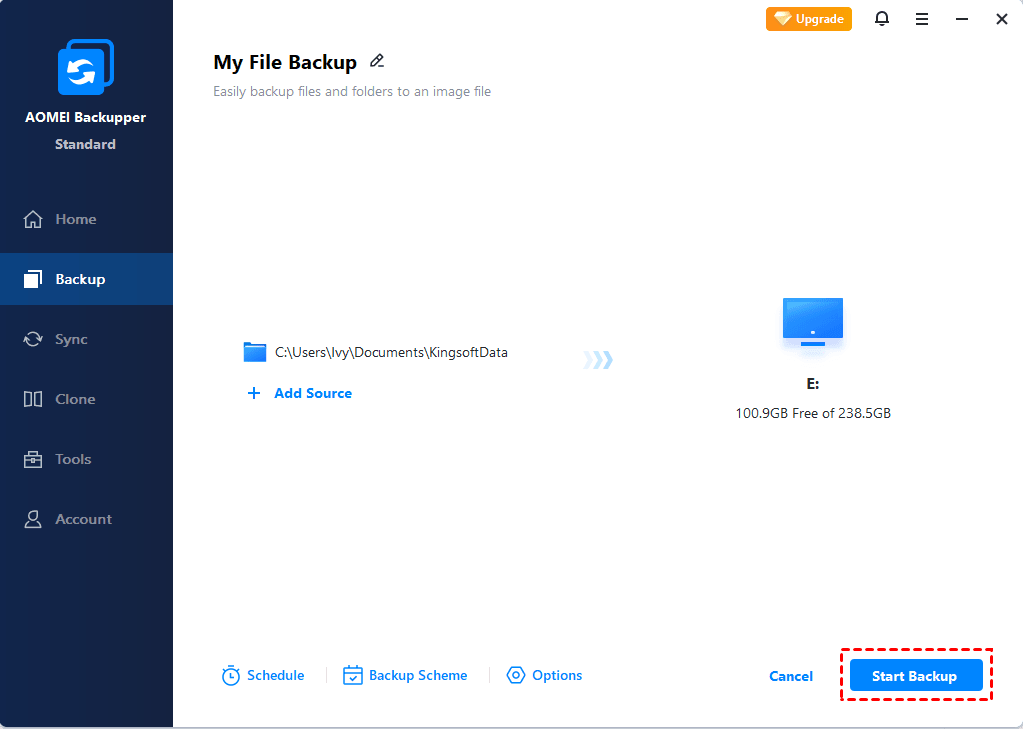
Step 1. Start by launching AOMEI Backupper Standard. Once opened, you'll be greeted by its sleek deep-blue interface. Now, navigate to the Backup tab and click on File Backup.

Step 2. Depending on your requirements, select either Add File or Add Folder. Use the appropriate option to include the specific files or folders that you wish to back up.

Step 3. Now, click on the second box to choose your desired backup destination. Whether it's an external hard drive, a NAS network location, or any other location recognized by Windows, you have the flexibility to select where you want your files to be backed up.

Step 4. To automate your file backup task, simply click on Schedule Backup. This feature allows you to set up a schedule based on your preferences. Whether you prefer daily, weekly, monthly backups, event triggers, or USB plug in, it provides you with the flexibility to customize your backup schedule.

☎Useful features:
Below the main interface, you'll find two additional options: Options and Backup Scheme, allowing you to further customize your file backup task.
✍Options: With this feature, you can add comments, enable email notifications, adjust compression levels, and even create pre/post-command actions, among other settings.
✍Backup Scheme: While this feature is available in AOMEI Backupper Professional(or higher versions), it offers four different backup schemes. These schemes help manage disk space by automatically deleting old backups, while retaining the latest backup versions.
Step 5. Double-check that everything is in order and simply click on Start Backup to initiate the file backup process.
Summary
This article provides you with detailed steps to backup Picasa to external hard drive. However, due to reasons such as Google no longer supports updates of this software. It is recommended that you use a cloud-based service to back up and manage important data such as your photos, such as using AOMEI Cloud.
And develop a good habit of backing up to prevent unnecessary data loss. AOMEI Backupper can help you automatically back up your Picasa data, allowing you to back up your data easily and worry-free. Try it now!