Full Guide: Automatic Backup Synology NAS in Top 3 Ways
To save files from the computer to Synology NAS automatically, you have 3 easy ways here.
By Maggie Updated on November 2, 2023
Best way to backup files from PC to NAS
I have various files on my laptop that I use daily spreadsheets, pictures, text docs etc, what I would like is a 1 click or close to 1 as possible :) to backup these files on my NAS, I want the old files on the NAS overwritten so the latest version/backup is the only version on the NAS.
Do I need to use Synology drive server or do I need to use hyper back up? an idiot guide/video would be appreciated.
Likely, if you have such needs as well, you should really continue to read the below article. Here I will tell you how to automatically backup Synology NAS in 3 ways, you can choose your ideal way to do it. Let’s start to read!
The benefits to auto backup Synology
NAS, which stands for Network Attached Storage, refers to a hard drive connected to your network. Nowadays, an increasing number of computer users are seeking to back up their data on Synology NAS. This practice is gaining popularity due to compelling reasons that cannot be ignored:
1. Protect Valuable Data: Storing data on NAS shields it from computer errors like crashes, viruses, and mistakes, ensuring its safety.
2. Facilitate Sharing: NAS allows multiple users in a company to back up files, enabling easy access for others via the network.
3. Enhance Security: Since NAS stays at home and isn't portable, it prevents data leaks and theft, ensuring enhanced security.
Automatic backup Synology NAS can not only keep your data safee, but also free you up from tedious and complex jobs. This article gives you 3 proven efficient ways to automatic backup Synology NAS. Please follow up to see how it works.
How to backup to Synology NAS
There are three methods to perform auto backup to Synology NAS. You can either opt for the built-in Windows tool, Backup and Restore and File History, or choose third-party reliable tools. Consider your specific situation before deciding on the most suitable method for your needs.
Before you do:
● Ensure that both the software and hardware of your Synology NAS are installed and functioning correctly.
● Create a shared folder on the Synology NAS.
● Ensure that your PC and the Synology NAS are connected to the same local network.
Way 1. Synology auto backup folder via Windows Backup and restore
Backup and restore is the built-in utility for windows users to backup and restore necessary files. Below is the detailed steps to auto backup Synology.
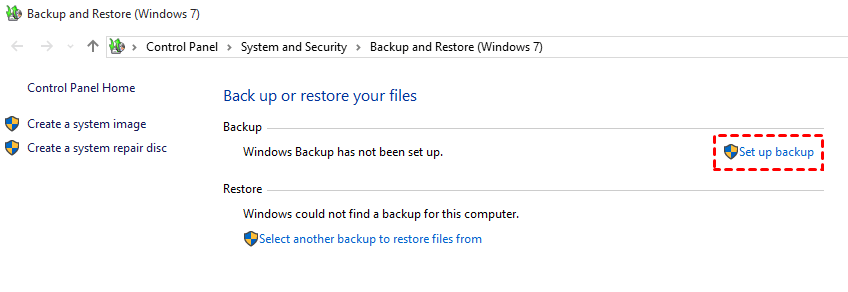
Step 1. Type Backup and Restore in the search box and select it from the result list.
Step 2. Click Set up backup option.
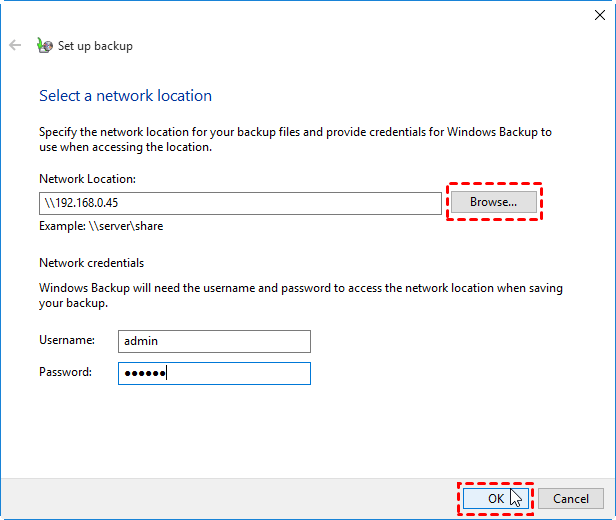
Step 3. Choose Save on network.

Step 4. Click Browse and select Synology NAS by adding its network location. Input the Synology server name or IP address, username, and password. Click OK to continue.
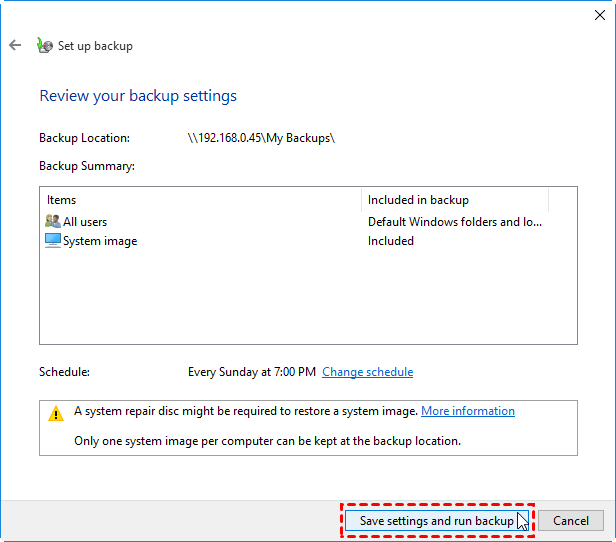
Step 5. Select Let Windows choose (recommended) so that Windows will select the files to be backed up for you. Click Next to go.
Step 6. Then click Change schedule > choose when to backup > Save settings and run backup.
Way 2. Synology auto backup folder via AOMEI Backupper
AOMEI Backupper Standard offers best free backup and restore utilities for Windows users. It’s extremely easy and convenient. This software offers user-friendly interface and settings so that users can manage the backup task hassle-free. If you have advanced and customized needs, you have one choice at hand:
▶Not only files, but you can also backup disks and partitions as well. Also, statistics show that people may be concerned about system backup, which is also completely available in the tool.
▶Besides backing up to NAS, AOMEI Backupper provides many other utilities for you to keep data safe. For example, you can backup files to cloud storage like OneDrive/Google Drive and automatically backup files with a certain file extension.
▶It allows you to use incremental or differential backup to optimize backup efficiency compared with Windows’ built-in tool. (differential backup is available in paid edition)
▶It supports Windows PC operating systems such as Windows 11/10/8.1/8/7/Vista/XP.
Here is the full guide to perform Synology auto backup folder, before you start, please download this software and install it on your PC.
Step 1. Open AOMEI Backupper on your computer, and click Backup > File Backup subsequently.

Step 2. Click Add File or Add Folder to select the data you want to backup to Synology.

Step 3. Click the inverted triangle > Select a network location > Add Network Location, then fill in the required information.

Step 4. Back to the main page, click Schedule to enable automatic backup Synology NAS.

Step 5. Then, click Start Backup button to finish.
Options: You can write a note for your task to help you distinguish it from other backup tasks. In unattended operations, a notification can be emailed containing the result of each backup.
Backup Scheme: It can help remove old backup images automatically to free up storage space. (available in the Professional edition)
Way 3. Synology auto backup folder via File History
Finally, there’s also the File History option. It’s another built-in Windows feature similar to Backup and Restore.
However, just like the Backup and Restore option, it only does file and folder backups and has no encryption. Nevertheless, here’s how to set up Synology automatic backup Windows 10/11 with File History:
Step 1. Launch Control Panel on your Windows computer.
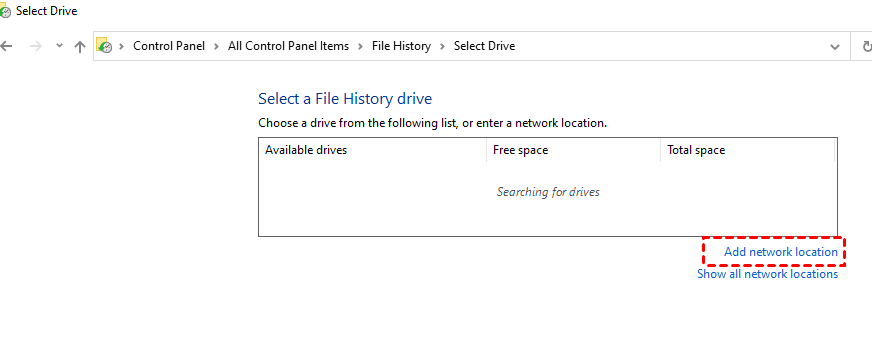
Step 2. Head to All Control Panel Items > File History.
Step 3. Choose Select Drive on the left side.
Step 4. Click on Add network location.
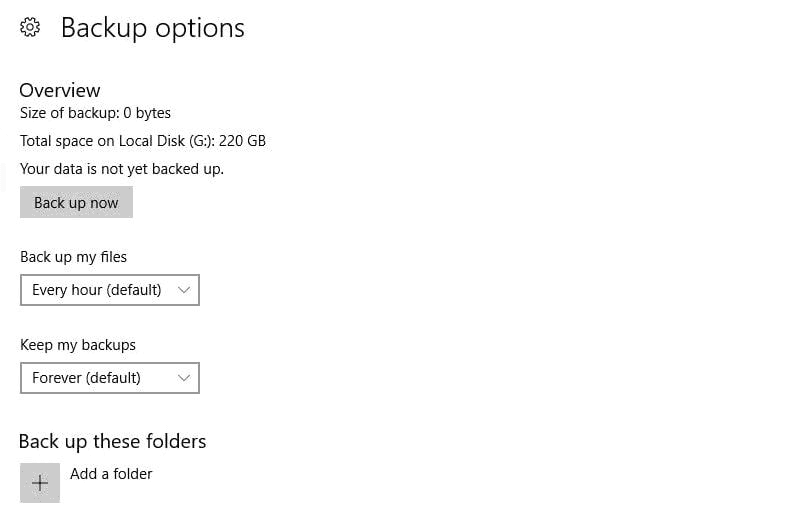
Step 5. Toggle the Automatically back up my files option > More options.

Step 6. Then decide on how often to create backups under Back up my files. Then click on Back up now.
Conclusion
Automatic backup Synology NAS is a wise option for data-sensitivity populations. You have 3 ways, both built-in tools and third-party software, that is Backup and Restore, File History and AOMEI Backuppet.
If you want to customize your backup needs and don’t want to spend much time and energy on backup and restore issues, you can give this task to AOMEI Backupper. This software is completely reliable and professional. Apart from backup and restore, you can sync files to Google Drive automatically to gain large storage locations.