12 Ways to Help You Fix Windows Update not Enough Disk Space
How to fix Windows updates not enough disk space problem? You can try the 12 methods provided in this article to free up enough space on your computer to ensure a successful Windows 10 update.
by Clytze Updated on November 15, 2022
User Case: How to fix not enough disk space in Windows 10
"I have an old laptop that I purchased 6 years ago and it still does some regular work tasks, so I was planning to upgrade it to the latest version of Windows 10 and use it to get work done when I travel. However, when I used the Update Assistant to update, I only received a prompt that the Windows 10 Update Assistant was running low on disk space.
I've tried uninstalling some useless apps, but that still doesn't work for the upgrade. My colleague suggested using an external hard drive, but I really don't want to carry too much stuff. Does anyone have a better idea? Any suggestions are welcome."

Windows Update give your computer higher security as well as new features and fix some common bugs, such as, the November 2022 Patch Tuesday updates, which fixed 69 vulnerability. But sometimes, you may encounter problems, such as, Windows Update not enough disk space.
Uninstalling unwanted apps is a good way to go when Microsft tells you it needs more space to update Windows, but if you don't know the space required for Windows 10 updates for each version, then you will still encounter the same problem. Here we summarize a list of space required for different versions of Windows 10 updates.
- updating to version 1809 (released in November 2018) requires 12GB of free space for 32-bit operating systems and 20GB of free space for 64-bit operating systems
- updating to version 1909 (released in November 2019) or 1903 (released in May 2019) requires both 32-bit and 64-bit operating systems 32GB of available space.
For more vesions, please check official documents in the Microsft.
12 Ways to solve Windows update not enough disk space
So how can you free up that much space for a Windows 10 update? Here are 12 different solutions for you and you are able to maximize your computer storage space and solve the problem of not having enough disk space in Windows 10.
- Clearing disk space on Windows 10
- Uninstall the language pack
- Do not install the latest update
- Formatting the system disk
- Uninstall unwanted applications
- Use Storage Space Sense to clean up your files
- Changing the storage location of the Windows Update folder
- Use OneDrive to free up space
- Reset BITS
- Resetting the Windows Update Component
- Using the Optimize Disk Drive feature
- Extended local disk (C:)
- Upgrade to a larger disk for more space
Method 1. Clear Windows 10 disk space
Disk Cleanup is a utility for Windows 10 that allows you to selectively clean up various contents of your local disk to address the issue of low disk space for Windows 10 updates.
- Use Windows+E to open Windows Explorer and select the disk you want to clean up.
- Right-click it and select Properties in the expanded menu.
- Switch to the General tab and tap on the Disk Cleanup button.
- In the Disk Cleanup window, select the files you want to delete, such as Download Program Files, Windows error reports and feedback, DirectX Shader Cach, etc and tap the OK button at the bottom.
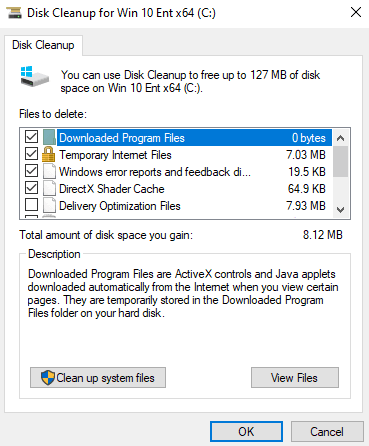
Note: You can also clean up more system files by tapping the Clean up system files button at the bottom left.
Method 2. Uninstall the language pack
For reasons such as work or personal preference, many users install one or more language packs, but in reality, these language packs also take up some disk space and cause the problem of not having enough disk space for updating Windows 10. Therefore, you need to uninstall these extra language packs.
- Use Windows+R to open the Execute window, type Lpksetup /u and press Enter.
- In the Install or uninstall display languages window, check the checkbox for the unwanted language pack and tap the Next button to wait for the selected language pack to be uninstalled.

Method 3. Formatting the system disk
In Windows 10 there exists a folder called Windows.old which contains all the archives and data from previous Windows installations, which will take up a lot of space on the system disk. Although this folder is automatically deleted one month after the Windows update version, if you have updated Windows within a month, it means that the folder still exists and the large amount of occupied storage space in it may cause the problem of running out of Windows update disk space, so it is recommended that you format the system disk. To ensure the data on the system disk is safe, it is recommended to perform a system backup first.
- Right-click and tap the Start button, then tap the Power button, hold down the Shift key and select Restart.
- In the Windows Recovery Environment (Windows RE), tap Troubleshoot > Advanced Options > Command Prompt in sequence.
- Enter the following commands in sequence and press Enter after each entry to execute the command.
- diskpart
- list disk
- select disk 0 (you can replace 0 with any disk number where the system is installed)
- clean all

Method 4. Uninstall unwanted applications
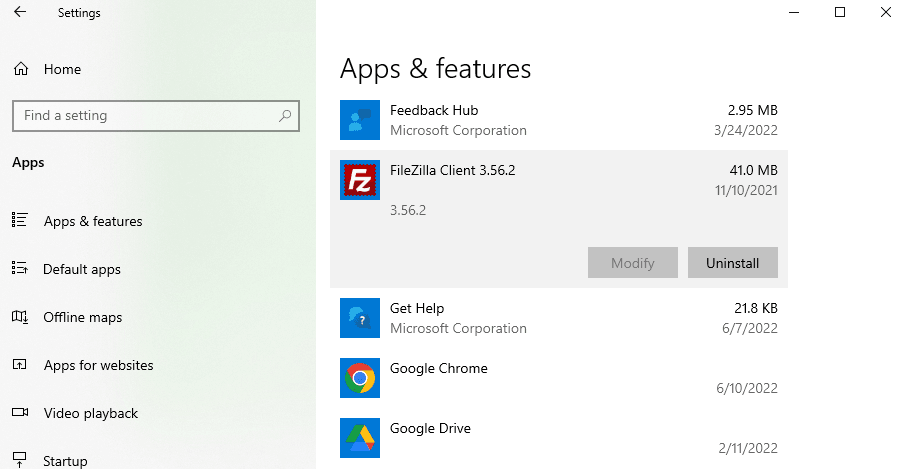
- Use Windows + I to open Windows Settings, find and tap Apps.
- In the Apps &features list, check the apps you no longer need or rarely use, tap the Uninstall button, and tap the Uninstall button again in the confirmation pop-up.
Method 5. Clean up files using Storage Space Aware
Storage Space Sense is a feature in Windows 10 that helps you quickly clean up the installation files and temporary files of Windows updates from your disk to solve the problem of running out of disk space for Windows updates.
- Use Windows + I to open Windows Settings, find and tap System.
- Switch to the Storage tab in the left panel and tap on the Configure Storage Sense or run it now button in the right panel.
- Turn on Storage Sense and select the most appropriate option from the Run Storage Sense drop-down menu, including Every day, Every week, Every month and During low free disk space.
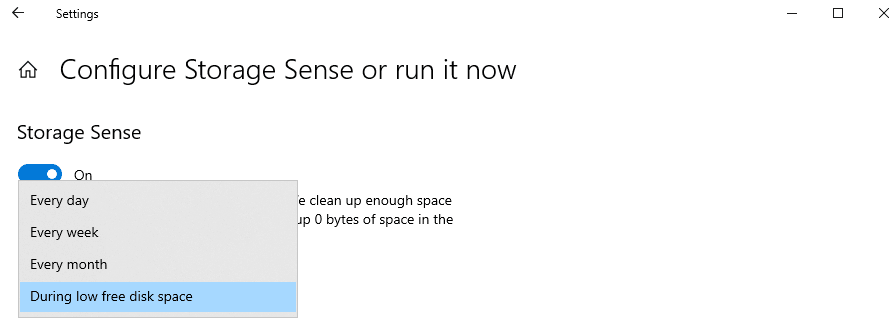
When your computer is running low on storage space, you can find Free up space now at the bottom and tap Clean now.
Note: You can also set how long you want to keep temporary files and set how long OneDrive is accessible online in the Set or Execute Now Storage Space Sense window.
Method 6. Change the storage location of the Windows Update folder
- Use Windows+I to open Windows Settings, find and tap System.
- In the left panel switch to the Storage tab, and in the More storage settings section, select Change where new content is saved.
- You will see different applications. Files. Music and other different genres current storage location, select the genre you want to change and choose another disk from the drop-down menu to store the new content of this genre.

Method 7. Use OneDrive to free up space
Microsoft OneDrive is an application built into Windows 10 that allows you to store your archives to the cloud and free up disk space with the Archive On Demand feature. In addition, you can convert locally available archives in your computer for online use, further saving disk storage space.
Turn on the document-on-demand feature
1. find the OneDrive icon in the notification area on the right side of the taskbar, click to open it, and
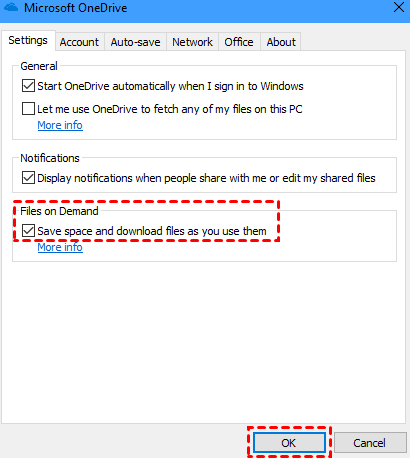
Tap Help and Settings and select Settings from the expanded menu.
At the top of the Microsoft OneDrive window, switch to the Settings tab.
Under Files On Demand, check the Save space and download files as you use them checkbox, and then click the OK button.
Convert local files to be available online
- Use Windows + E to open Windows Explorer and tap on OneDrive in the left panel.
- Locate and check the locally available files. This can be determined by the icon in the status bar table, where the blue cloud means the file is available online only, and the green tick means the file is available locally. This can be determined by the icon in the status bar table, where the blue cloud means the file is available online only, and the green tick means the file is available locally.
- Select Free up space in the expanded menu.
Method 8. Reset BITS
The Background Intelligent Transfer Service (BITS) is one of the important Windows Update components whose main role is to oversee the transfer of data from the Windows server to any computer system. When you encounter problems with Windows Update running out of disk space, you can try to resolve them by resetting BITS.
- Use Windows+R to open the Execute window, type cmd and select Run as administrator.
- In the Command Prompt character window, type the following command and press Enter to execute the command.
wusa C:\FOLDER-PATH\UPDATE-NAME.msu /quiet /norestart

Note: Make sure you change the path as well as the name before executing the command.
Method 9. Reset the Windows Update component
1. Use Windows+R to open the Execute window, type cmd and select Run as administrator.
2. In the Command Prompt window, enter the following commands in sequence and press Enter to execute each of them.
- net stop wuauserv
- net stop cryptSvc
- net stop bits
- net stop msiserver
- Then enter the following commands in sequence and press Enter separately to reset the corresponding folders.
ren C:\Windows\SoftwareDistribution SoftwareDistribution.old
ren C:\Windows\System32\catroot2 Catroot2.old
- Then enter the following commands in sequence and press Enter separately to restart BITS. encryption. MSI Installer and Windows Update Services.
- net stop wuauserv
- net stop cryptSvc
- net stop bits
- net stop msiserver

Method 10. Using the Optimize Disk Drive feature
When you save the files on your disk. When you move or delete them, you will leave some fragments behind, which will accumulate over a long period of time, which will take up disk storage space and cause Windows Update to run out of disk space. In this case, you need to use the Optimize Disk Drive feature to deal with it. Please note that the tool will cause the life of the drive to decrease and should not be used regularly. In addition, the tool may have an impact on the performance of the solid-state drive and it is recommended to use it with caution.
1. Use Windows+R to open the Execute window, type control and press Enter.
2. Tap System and Security and select Reorganize and optimize disk drives under System Management Tools.
3. In the Optimize Drives window, select the disc you want to defragment and tap the Optimize button.

Method 11. Extending the local disk (C:)
If you are unable to free up enough space on your computer for Windows 10 updates, then you can find a way to extend the local disk (C:), which will also solve the problem of insufficient disk space for Windows updates. However, it is important to Note that you can use this method only if you have unallocated space on your local disk.
Note: Disk Management allows the local disk (C:) to use the free space of other partitions, and you can get unallocated space by deleting partitions. However, if the local disk (C:) and the unallocated space are separated by multiple partitions, then there is no way to extend the partition through disk management.
- Use Windows+R to open the Execute window, type Diskmgmt.msc and press Enter.
- In the Disk Management window, on the disk where the local disk (C:) is located, check if there is unallocated space. If you confirm that unallocated space exists, right-click on the local disk (C:) and select Extend Volume... from the expanded menu. .

- In the Extended Disk Area Wizard window, tap Next and then adjust the size of the unallocated space you want to add to the partition being extended.
- Finally tap on the Finish button to see the successfully expanded drive in the Disk Management window.
Method 12: Upgrade to a larger disk for more space
If you still have the problem of running out of space on your Windows Update disk after trying all 11 methods mentioned above, then you have no choice but to replace it with a disk that has more space. However, how to migrate all the contents of the source disk becomes another headache, because the speed of regular disk migration is too slow to be satisfactory. If you share this concern, it is recommended to use AOMEI Backupper Standard for disk cloning in order to quickly migrate all the contents of the source disk.
AOMEI Backupper Standard provides you with a free and professional disk cloning service that allows you to quickly clone applications from source disks with just a few clicks. Files. Folders, etc. to the target disk, and if the source disk has system files, you can clone the system files to the target disk as well. Next, you will be given a detailed procedure for disk cloning, but before that, you need to do the following things.
- The software uses Intelligent Clone feature by default which will only clone the used sectors, so you can clone a large drive to a small one if you need.
- Since the process of performing disk cloning overwrites or deletes existing partitions on the destination disk, it is recommended to perform a partition backup first.
- Download and install AOMEI Backupper Standard.
Step 1. Open AOMEI Backupper Standard, click Clone > Disk Clone.
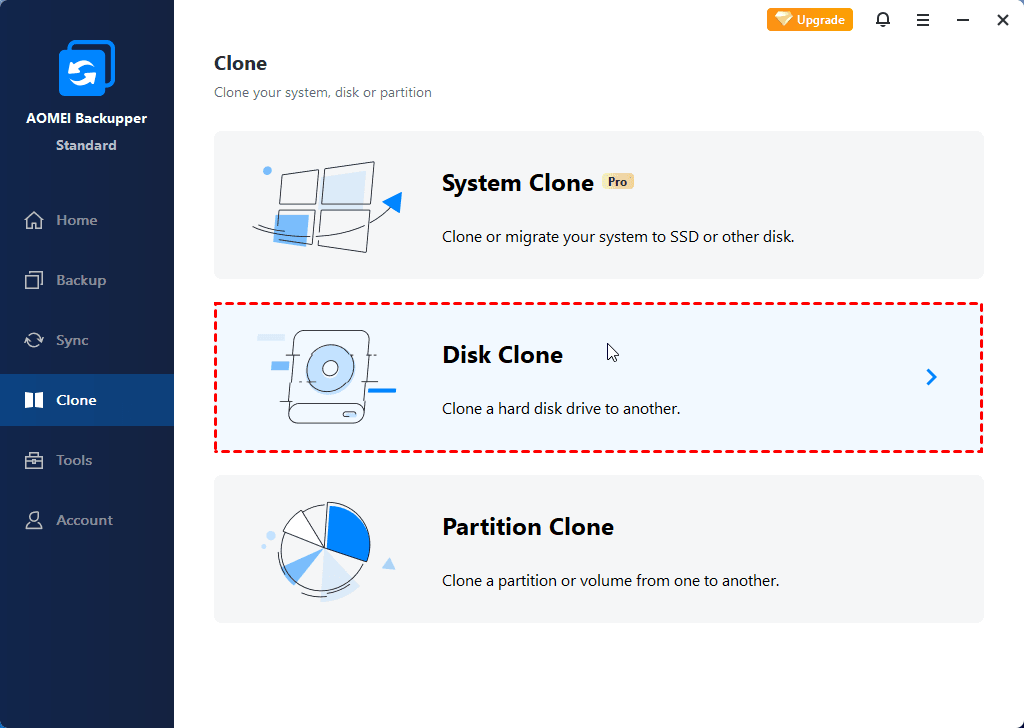
Note:
The standard version supports cloning MBR to MBR (system disks) and data disk. To clone GPT to GPT, or clone disks between GPT and MBR, you can upgrade to AOMEI Backupper Pro version.
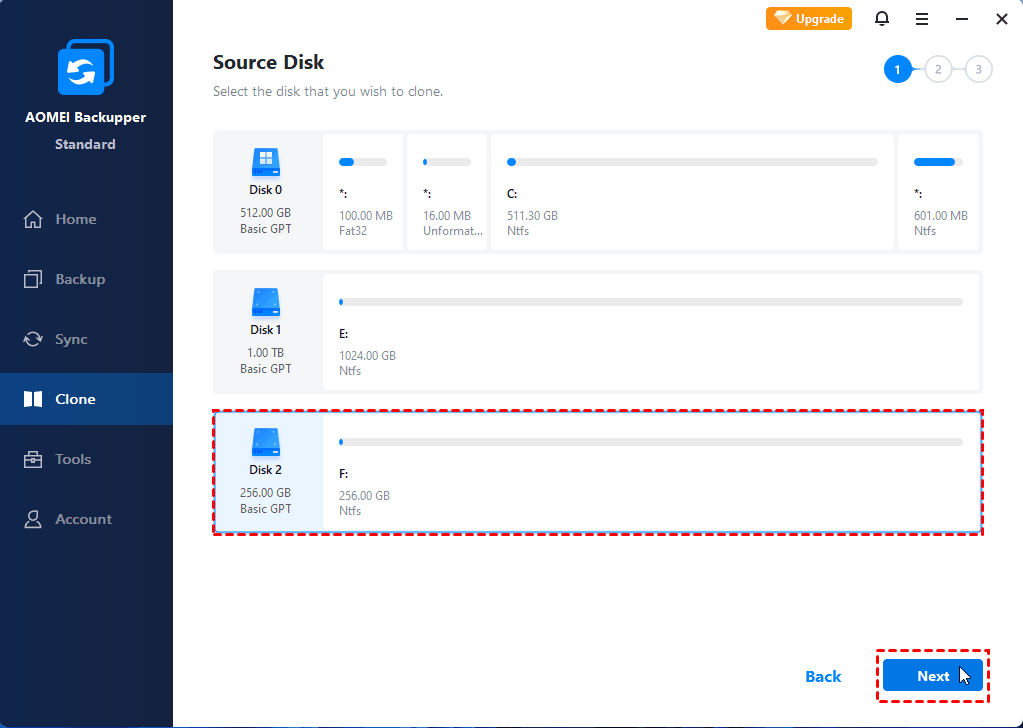
Step 2. Choose the disk you want to clone as the source disk and click Next.
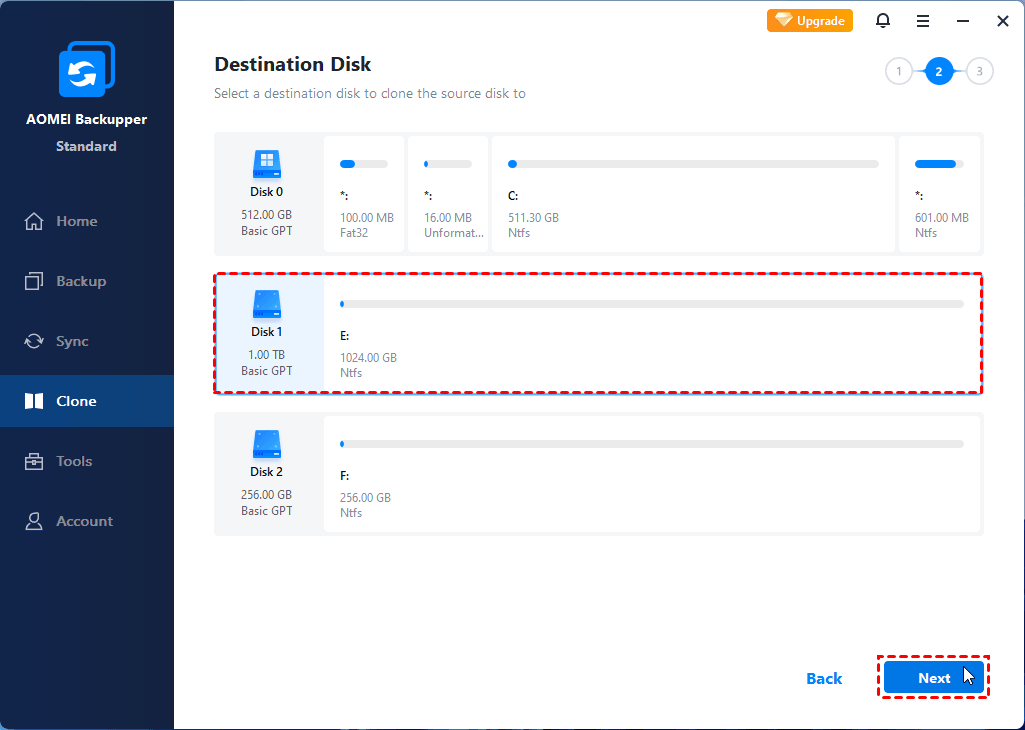
Step 3. Choose a disk as the destination disk and click Next.
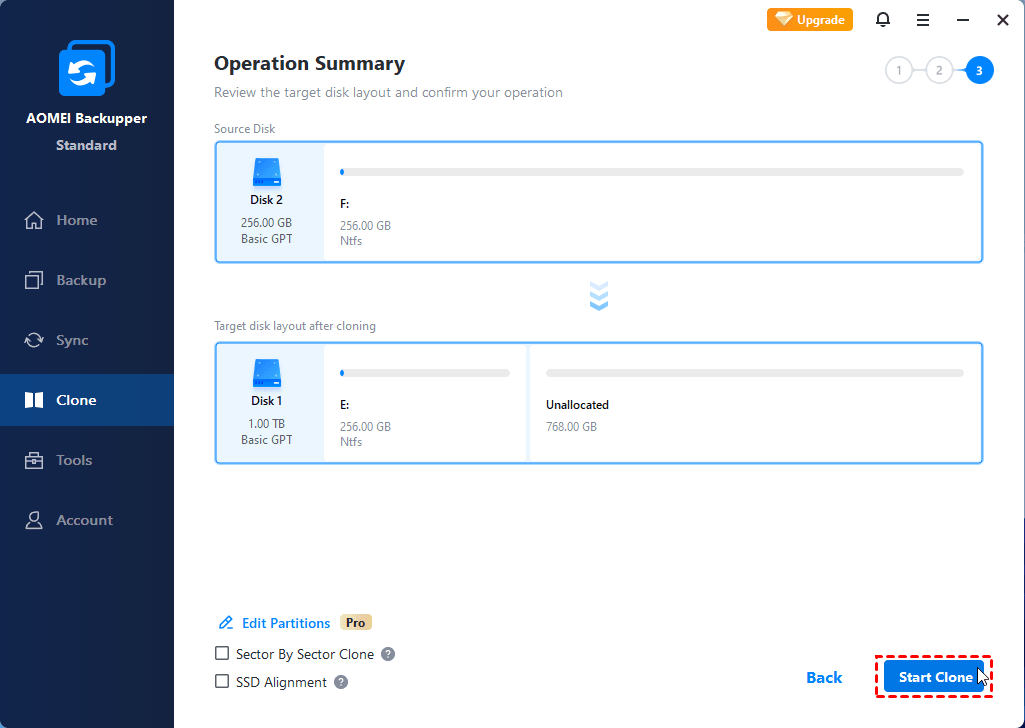
Step 4. Confirm all your operations and click Start Clone. After cloning, you can change the boot order in the BIOS and directly boot your computer from After cloning, you can change the boot order in the BIOS and directly boot your computer from cloned disk.
Notes:
- Edit Partitions: This feature can help you to add unused space to all partitions or manually adjust the partition size if you need. professional version to enjoy it.
- Sector By Sector Clone: If your target disk has the same size or larger than the source disk, you can use this feature to clone all sectors, whether they are It's very convenient for you to clone a disk to a larger one.
Summary
If you are struggling with a lack of disk space for Windows updates, you can try the 12 methods provided in this article in turn, detailing them to free up more space on your computer and update Windows 10 smoothly. If you want to upgrade to a larger disk, it is recommended to use AOMEI Backupper Standard for disk cloning in order to quickly migrate everything on the source disk to the new one.
AOMEI Backupper Standard has a clear and easy-to-use interface, so even a computer novice can easily master how to operate disk cloning and free up more free space for your computer. Besides, the software also provides you with other functions that may be of interest, such as System Backup, File Backup, Partition Backup, etc to provide stronger security for your computer data.

