Fix Windows Cannot Access the Specified Device Path or File Easily - 10 Ways
How to fix Windows cannot access the specified device path or file? You can understand the cause of this problem and 10 solutions in this article. There is another way to keep your files safe.
by Yuka Updated on November 1, 2022
User case: Windows cannot access the specified device path
Can someone help me with Windows cannot access the specified device path?
“When I installed CoppeliaSim Edu on my laptop, it worked without any issues. The app also works fine when I click the Start the program now button in the installation complete window. However, as soon as I close the app and reopen it, I get the error: Windows cannot access the specified device, path, or file. You may not have the appropriate permission to access the item. I can't open this app in any form unless I reinstall it. Does anyone know how to fix it? I desperately need help!”
- Question from Windows 10 Forums

Although Windows 10 has gradually stabilized after years of improvement, some users still encounter various problems during use. The "Windows cannot access the specified device path" described in the above case is a common problem. Although this problem will not affect the operation of the Windows system, it will still cause trouble to users. So, how to solve this problem? First, you need to understand the cause of the problem.
What causes the “Windows cannot access the specified device path or file” error?
Judging from the extensive user feedback collected, this issue may occur when you install, update, launch an application or file. This problem is mainly caused by the following reasons:
- You do not have permissions to the file.
- File path is not accessible or does not exist.
- The file has been moved or deleted.
- The file may be blocked by Windows.
- Your antivirus software may be blocking the file.
- The file or shortcut is corrupt.
How to fix the “Windows cannot access the specified device path” error
How to fix the “Windows cannot access the specified device path or file” error? You can try the following 10 methods in turn, I believe these methods can help you solve this problem.
Method 1. Check and enable file or folder permissions
When encountering the problem that Windows cannot access the specified device path or file, you first need to check whether you have permission to the file or folder. So, how to change permissions in Windows 10? Please refer to the following method.
- Find the file in question, right-click it, and select Properties from the expanded menu.
- Select the Security tab. Under Group or user names, click your name to see the permissions you have. Then click Edit to change permissions.

- Then select to check the boxes for the permissions that you need. Then click Apply and OK.

Method 2. Check the file location (insert an external hard drive)
Windows cannot access the specified device path when you try to access the files from an external hard drive or a shortcut on a network location that is no longer connected to the computer. To do this, you need to check that the destination file is in the correct path. And if it is an external hard drive, make sure it is properly connected to the computer.
- Find the file in question, right-click it, and select Properties from the expanded menu.
- In the Location section of the General tab, select the file location, right-click the location, and select Copy from the expanded menu.

- Press Windows + E to open the Windows File Explorer. Paste the path you copied in the address bar and press Enter to navigate to the location of the file.

- Check to see if the desired file can be found at this location. If not, the file may have been moved or deleted. If the file path is on an external hard drive, you will need to plug the external hard drive into the computer again to resolve this issue.
Method 3. Check the file and restore
Windows cannot find the file that has been moved or deleted. If you check and confirm that the file has been moved or deleted, you can go to the recycle bin to restore the file, or use third-party software to restore the file. If it is an application, you can choose to reinstall it.
Method 4. Verify the file shortcut and recreate it
If you cannot open the shortcut to the file, the file may have been moved or deleted. Therefore, you need to verify the existence of the file through the shortcut. If the file still exists, it means that there is a problem with the shortcut. You can recreate the shortcut and point to the file.
- Right-click the file shortcut on the desktop and select Properties from the expanded menu.
- On the General tab, select the location, and right-click to copy the location (do not copy the actual file name).
- Press Windows + E to open the Windows File Explorer, paste the location in the address bar, and see if the file can be found. If the file cannot be found, it means that the file has been moved or deleted. If the file can be found, there is a problem with the shortcut and you need to recreate the shortcut.
- Right-click the file, select Send to in the expanded menu, and then select Desktop (create shortcut).

Method 5. Temporarily disable antivirus software
According to user feedback, third-party antivirus software may cause Windows cannot access the specified device path, so you need to temporarily disable this software.
✎ Note: Please make sure Windows Defender Firewall is turned on when disabling third-party antivirus software. It provides the necessary security protection for your computer to prevent viruses or malware from getting in.
- Open Task Manager with Ctrl + Shift + Esc. If a thumbnail view is displayed, click the More details option in the lower left corner.
- Switch to the Startup tab at the top of the Task Manager window, and find the third-party antivirus program in the list below. Select it and click Disable in the lower right corner, then restart your computer.

Method 6. Unblock the file
Windows sometimes prevents you from accessing certain files to protect your computer. When you try to open the file, you get the error that “Windows cannot access the specified device path”. To do this, you need to check the properties of the file to see if it is blocked by Windows.
- Find the file in question, right-click it, and select Properties from the expanded menu.
- At the bottom of the General tab, if you see the message "This file came from another computer and might be blocked to help protect this computer", check the Unblock checkbox on the right.

Method 7. Repair corrupted system files
When you don't use an application for an extended period of time, it can result in the loss or corruption of system files required to run the application. To do this, you can run the SFC (System File Checker) and the DISM (Deployment Image Servicing and Management) to repair corrupt or missing system files.
- Press Windows + S to open the search box. Type command prompt and choose to run as administrator.
- In the Command Prompt window, type sfc /scannow and press Enter to execute this command.
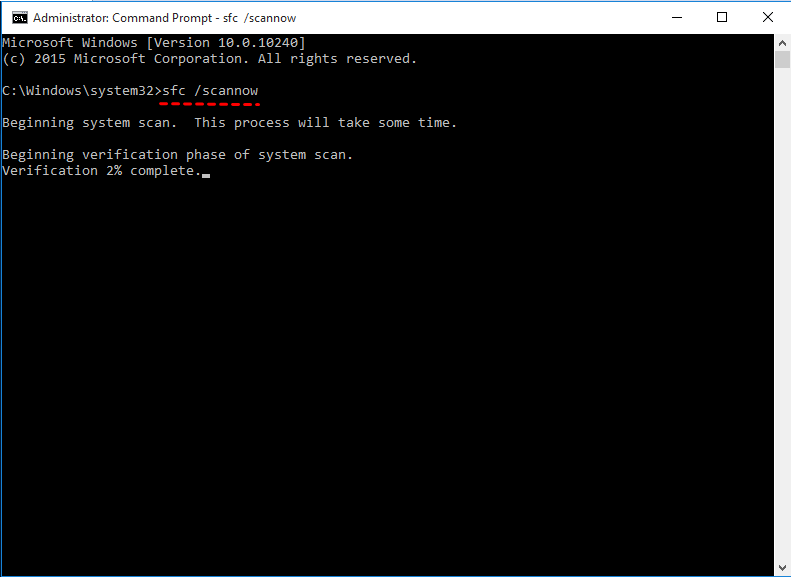
- After the system scan is completed, enter the following three commands in sequence, and press the Enter key to execute:
- Dism /Online /Cleanup-Image /CheckHealth
- Dism /Online /Cleanup-Image /ScanHealth
- Dism /Online /Cleanup-Image /RestoreHealth
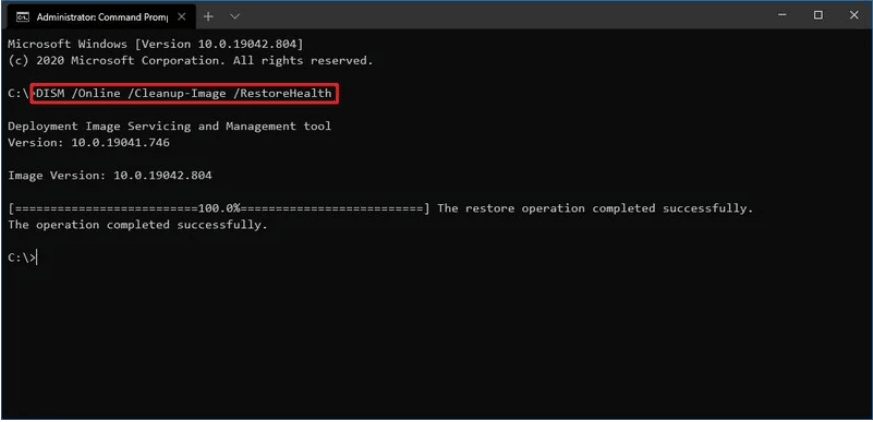
- Wait for these commands to execute successfully before restarting your computer
Method 8. Connect your computer or NAS to the network
When your files are stored on a network computer or network attached storage (NAS) device, there may be a problem that Windows cannot access the specified device path if the device is not connected to the network.
To do this, you need to connect another computer where the file is stored to your network. As long as the other computer is connected to the network and can be accessed by the other device, the file can be opened normally.
Method 9. Change file or folder permissions to administrator
When Windows Server 2019 cannot access the specified device path or file, you can solve it by changing the file or folder permissions to administrator. Here are two ways to change file permissions to administrator, the second of which is only available for Windows 10 Professional and Enterprise editions.
#1. Grant administrator privileges through file security settings
- Right-click the file in question and select Properties from the expanded menu.
- Switch to the Security tab at the top of the Properties window, find the account you are using under the Group or usernames, and then click the Edit button.
- In the Permissions window, switch to SYSTEM and check that the permission you want is in the allow list. If the permission you want is not selected in the allow list, you need to grant the permission.
- Press OK to return to the Properties window. At the bottom of the Security tab, click the Advanced button.

- In the Advanced Security Settings window, click the Change button on the right side of the owner.

- In the Select User or Group window, click the Advanced button in the lower left corner.

- In the new window, click the Find Now button, select the administrator account in the search results below, and click OK.

- Return to the Advanced Security Settings window, and in the Permissions tab, click the Disable inheritance button in the lower left corner.
- In the Block Inheritance pop-up window, choose to Convert inherited permissions into explicit permissions on this object.

- Below the Permissions entries, if you see Denied next to Authenticated users, double-click to open it.
- In the Permission entries window, set the Type to Allow and press OK to save the changes.
- Go back to the Advanced Security Settings window and click Apply and then OK to save the changes and exit.
#2. Grant administrator privileges through the Local Group Policy Editor
- Press Windows + R to open the Run window and enter gpedit.msc.
- Navigate to: Computer Configuration -> Windows Settings -> Security Settings -> Local Policies -> Security Options, and in the right panel find User Account Control: Admin Approval Mode for the Built-in Administrator account.

- Double-click to open this option, in the Local Security Settings tab, set this option to Enabled, then click OK to save the changes, and restart your computer.
Method 10. Enable hidden administrator account
From the feedback results of some users, enabling the hidden administrator account and granting administrator privileges can help solve the problem that Windows cannot access the specified device path.
- Click the Start button, click Power Options in the expanded menu, press the Shift key and click the Restart option to enter Windows Safe Mode.
- In Safe Mode, open Command Prompt, type net user administrator /active:yes, and press Enter to enable the hidden administrator account.

- Restart the computer and enter Windows Safe Mode.
- Press Windows + R to open the Run window, enter control and click OK to open the Control Panel.
- Find and open the User Accounts, and click the Manage another account option.
- Select the previously enabled hidden administrator account, and select Change Account Type in the menu on the left side of the new window.
- Change the account type to system Administrator, and then click the Change Account Type button to save the changes.

- Restart your computer, log in with your account, and try to see if the file in question can be opened.
Backup Windows 10 Files to Avoid Data Loss
You can try the above 10 methods in turn to solve the problem that Windows cannot access the specified device path. After the problem is resolved, it is recommended that you use AOMEI Backupper Standard to back up the files on Windows 10. So that if you encounter similar problems again, you can quickly restore these files to avoid any possible loss.
AOMEI Backupper Standard can provide you with free and professional file backup service. It allows you to easily backup files on systems like Windows 11/10/8.1/8/7, and backup files to cloud, NAS devices, external hard drives, etc. In addition, the software has the following advantages:
✩ Automatically back up files: In order to prevent the loss of important data caused by forgetting to back up, it is recommended that you use the scheduled backup function to perform automatic backups at daily, weekly, and monthly, which will fully protect your data security.
✩ Back up only changed files: Doing a full backup every time a file changes, not only wastes a lot of time but also takes up a lot of disk space. Therefore, it is recommended that you use the incremental or differential backup function to back up only the files that have changed.
✩ Provide security protection for the system: For the sake of system security, it is recommended that you create a bootable USB or CD/DVD for safe booting in case of system problems.
Next, the detailed steps of AOMEI Backupper Standard file backup will be introduced for you. If you are a Windows Server user, please turn to AOMEI Backupper Server. Download and install this software on your computer:
- Run AOMEI Backupper Standard, select Backup in the left menu, and select File Backup in the right panel.

Tip: Except for File Backup, this software still supports backing up files with Cloud Backup feature. It comes along with a cloud drive named AOMEI Cloud and offers you 1 TB free storage after you registry an AOMEI account.
- You can choose Add Folder or Add File to select the folders or files you want to back up. In addition, you can click the pencil icon in the upper left corner to name this backup task.

- Select the destination path of the backup, and click the Start Backup button.

✍ Tips: In addition, you can also click Options, Schedule and Scheme at the bottom left to customize the settings.
>>> Options: This includes backup comments, backup encryption, email notifications. The encrypted backup function needs to be upgraded to the professional version before it can be used.
>>> Schedule Backup: It allows you to turn on the scheduled backup function, including daily, weekly, monthly, event triggers and USB plug in.
>>> Backkup Scheme: It includes backup method and automatic cleanup backup function. You can choose full backup, incremental backup or differential backup, among which differential backup and enable cleanup function need to be upgraded to the professional version to use.
In addition to file backup, AOMEI Backupper has other features that you may use:
- When you encounter file loss or corruption, you can use the file restore function to restore previously created file backup images.
- You can use the file sync function to synchronize the changed files in the source directory to the target directory, which saves time compared to file backup.
- If you want to further protect your computer data, you can use the disk backup and partition backup functions.
Conclusion
If you are troubled by the problem that Windows cannot access the specified device path, you can try the above 10 methods in turn after understanding the cause of the problem to restore the file in question to normal. However, it is still recommended that you use AOMEI Backupper Standard for file backup, so that you can quickly restore these files if you encounter similar problems again.
In addition to the backup function, AOMEI Backupper can also provide you with System Clone, Disk Clone, Partition Clone and other functions to meet more needs. Try it now!