7 Quick Fixes: Windows 11 Not Showing Up in Windows Update
You may encounter Windows 11 not showing up in Windows Update even if your computer meets the system requirements. If so, learn more about it in this article and fix it with 7 practical solutions.
by Ivy Updated on October 17, 2022
Windows 11 not showing up in Windows Update
Windows 11 has been released at Oct 5, 2021 and Microsoft says you can free upgrade to Windows 11 from Windows 10 as long as your computer meet the minimum system requirement for Windows 11. But some users report that even then Windows 11 not showing up in Windows Update settings.
“I've done everything correctly, and I have updated to the latest Windows 10 insider build. For some reason Windows 11 won't pop up, it just keeps saying I'm up to date. Whenever I check for updates, the windows 11 update does not show up in the Windows Update.
Can anyone tell me how do I see it and install Windows 11??? Any help?
- Question from Reddit
Don't worry about it too much! In fact, Windows 11 is being rolled out in phases, so if your computer says it's up to date, wait until mid-2022. Or you can make it ready soon based on some possible reasons and practical solutions below.
Possible reasons for Windows 11 not showing up
In general, you can download and install Windows 11 in the Windows Update setting, but sometimes you cannot see Windows 11 Update. This may be caused by many reasons, and we summarize the most common possible reasons in the following:
- Not running Windows 10. Windows 11 upgrade is only free for Windows 10 computer or you have a eligible Windows 10 license. For previous systems, such as, Windows 8.1, 8, 7, XP, or Vista, you need to upgrade to Windows 10 first.
- Unsupported hardware. Windows 11 upgrade requires your Windows 10 system meet the minimum system requirements, including 4GB RAM, 64GB storage, secure boot, TPM 2.0, 720P display, DirectX 12 or WDDM 2.0 driver.
- Conflict or damaged temporary files. If you receive error while downloading Windows 11, it's likely your computer has damaged temporary files.
- Broken Windows Update service. If you recently used a debloater or registry cleaner, the Windows update services may be disabled or broken.
- You are not in the proper Channel of the Windows Insider Program.
As you can see, the reasons for Windows 11 Update not showing in Windows 10 are different. Some of them are related to system compatibility while others are to temporary files or Windows Update services. So, there is no doubt that the first thing to check for compatibility in Windows 11.
However, immediately after that, you may want to start fixing Windows 11 not showing up in Windows Update settings and then upgrade to Windows 11 quickly. If you do so, you may regret not creating a system image in Windows 10 before fixing this issue. Since any incorrect operation may cause irreversible losses, such as system crashes, data loss, etc.
Does my PC compatible with Windows 11?
Although Microsoft showed users the minimum system requirements for Windows 11, still many users don't know if their computers meet them. So it releases the PC health Check app to help you check all of the requirements and tells you the result.
And usually, if your computer meets system requirements, you will receive a message like This PC meets Windows 11 requirements. But if it says This PC doesn’t currently meet the Windows 11 system requirements, you need to upgrade the hardware or directly install Windows 11 on unsupported hardware through bypass secure boot and TPM 2.0.

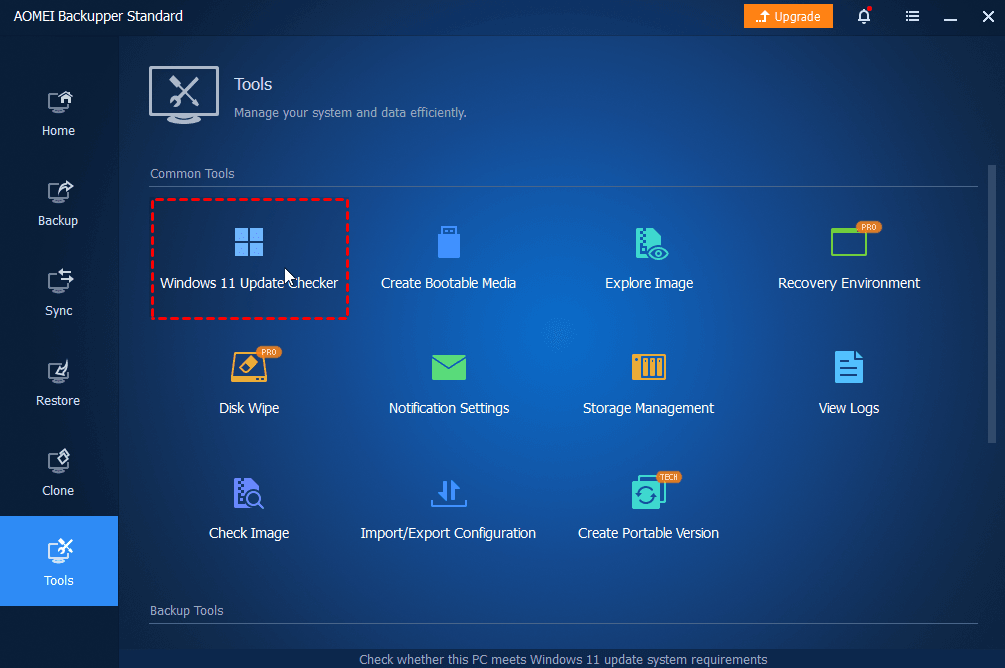
Besides, you still can try Windows 11 Update Checker in a third-party software, such as, AOMEI Backupper Standard. It will check all the Windows 11 system requirements and tell you which ones are met and which ones are not, and provide you with the corresponding policies.
Just download it on your computer and open it after installation, click Tools > Windows 11 Update Checker and click Start Check.
Always backup your system before you make major operations
When updating to Windows 10 21H2/22H2 update or Windows 11 22H2 update, you don't know what will happen. Backing up Windows 10 system is necessary if you don't want to see any unexpected error and data loss due to it, and at the same time, you can protect your system as well. AOMEI Backupper Standard is one of the best free backup software for Windows 10, not only backup before majoy operation, but also for long-term data protection.
So before fixing Windows 11 Update not showing up issues, you can backup system, disk, partition or files at a time. And you can also run them after it on a regular basis, such as daily, weekly, or monthly, and always keep changes to stay up to date. Besides, it is able to alleviate disk usage with different features, such as automatic splitting, normal compression, incremental backup, even without configuring it manually.
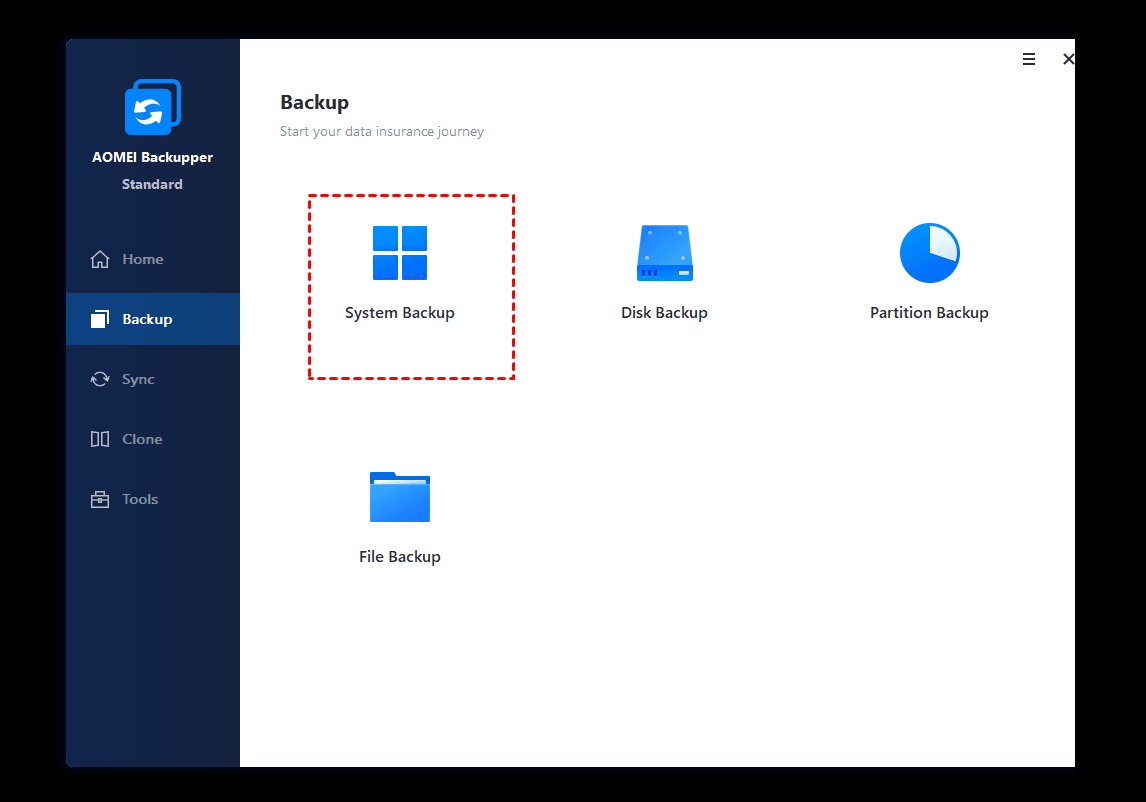
👉 To create a system image, launch AOMEI Backupper Standard and select Backup > System Backup. Then, select a destination path, you can choose to backup Windows 10 to external hard drive, USB drive, network drive, etc, and click Start Backup to backup Windows 10 OS.
👉 To run the backup task automatically, click Schedule Backup and enable it in the lower left corner. You can select Daily, Weekly, Monthly, and among them, the fastest frequency is every 1 hour in a day.

Tips:
✔ Except for daily, weekly, and monthly backup, you still can enjoy Event trigger or USB plug in on the premium version. For long-term data protections, the last one is recommended if you want to backup Windows 10 to USB drive automatically when it's connected.
✔ With the Pro version, you can alleviate or completely resolve backup disk full issues with advanced features, such as, differential backup, automatic backup cleanup, etc. And the latter breaks the limitation of only increasing and not decreasing.
Fix Windows 11 Update not showing up (7 methods)
After checking if your computer is compatible and ensure it's safe, you can fix Windows 11 update not showing up without any worry. It's said that the corrupted temporary update files is one of reasons for Windows Update disappeared, try to restart your computer first and check if Windows 11 Update showing up.
If not, please check the following solustions and follow the steps carefully.
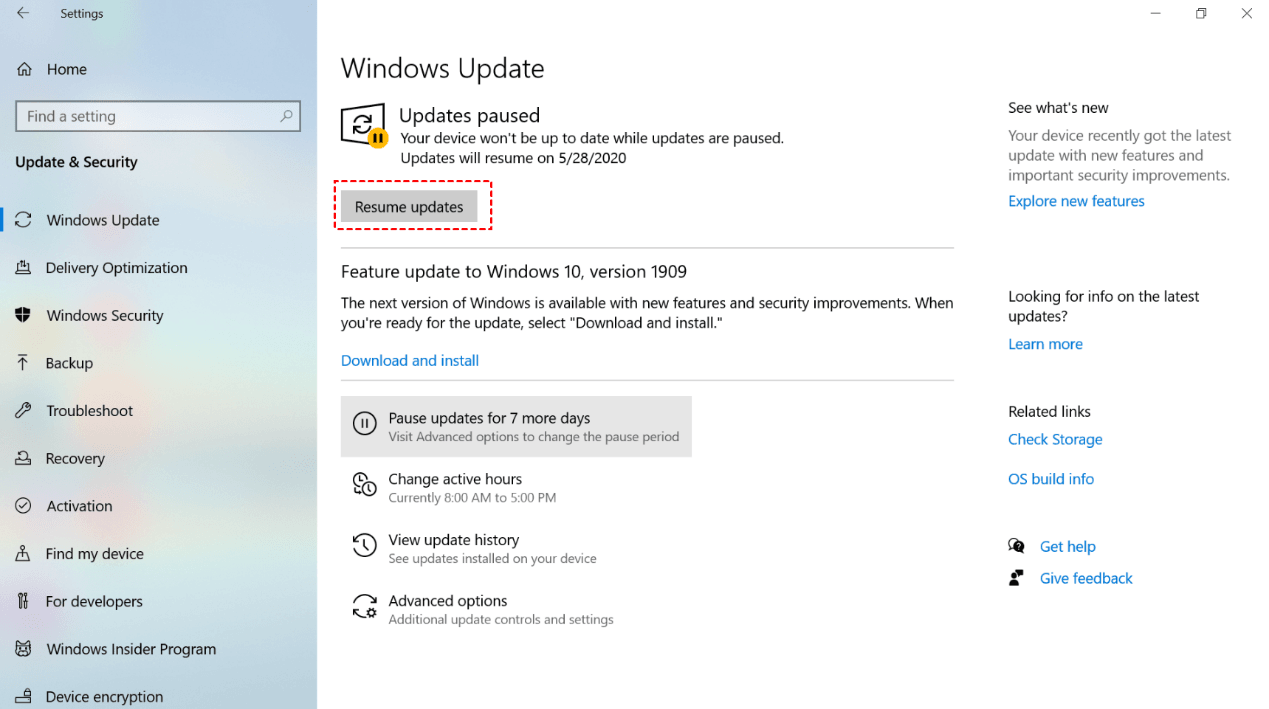
Method 1. Resume Windows Update
If you have paused Windows Updates in the past, you will not receive an update message. So you can choose to resume updates if it is not running.
Step 1. Type Settings in the search box and click Windows Update Settings to open it.
Step 2. Check if the Windows Updates say Updates paused, and click Resume updates if it does. And then it will start scanning for newer update automatically.
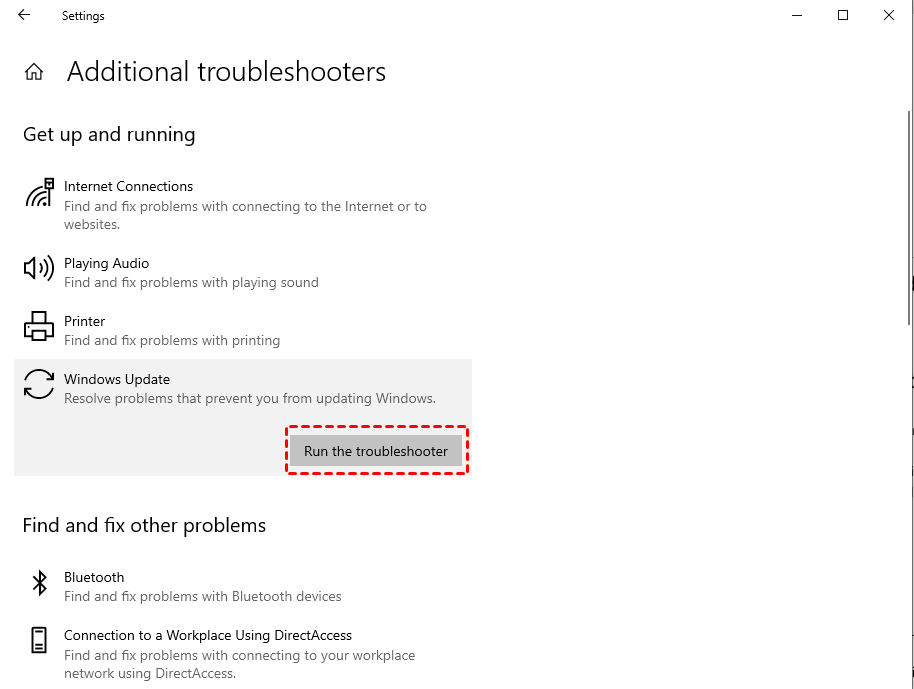
Method 2. Run Windows Update troubleshooter
If there are any misconfigure settings, small bugs, and other update issues, you can try Windows update troubleshooter. And then check if Windows 11 is now showing up in Windows Update.
Step 1. Select Start > Settings > Update & security > Troubleshoot.
Step 2. Click Additional troubleshooters and select Windows Update > Run the troubleshooter.
Method 3: Restart Windows Update services
You can also restart Windows Update services and see if it fixes Windows 11 update is not showing up in Windows Update settings.
Step 1. Press Win + R and type services.msc in the Run box. Then, click OK.
Step 2. Find Windows Update service and double-click it. Then, set its startup type as Disabled and click Apply > OK.
Step 3. Close the Services app and restart your computer.
Step 4. Press Win + E to open Windows Explorer, navigate to C:\Windows\SoftwareDistribution and delete all files in it.
Step 5. Open the Services app again, double-click Windows Update service and set its startup type as Automatic. Then, click Apply > Start (service status) > OK to restart Windows Update service.
Method 4. Modify Registry settings
If the above ways not working, you still can modify related settings in the Registry. However, improper operation can cause system problems, so you need to backup system or files before we get started.
Step 1. Press Win+R and type regedit in the Run dialogue.
Step 2. Navigate to the following path and bes sure the following three values are matched.
HKEY_LOCAL_MACHINE\SOFTWARE\Microsoft\WindowsSelfHost\Applicability
- BranchName (Type REG_SZ) = Beta
- ContentType (Type REG_SZ) = Mainline
- Ring (Type REG_SZ) = External

Method 5. Change the Telemetry Settings
If you use Windows 10 Pro or other advanced edition, you can change the telemetry settings via Local Group Policy Editor. Also, you need to create a backup before making any change.
Step 1. Press Windows + R and type gpedit.msc in the Run box. Then, press OK to open Group Policy Editor.
Step 2. Go to the following path and change everything to allow as much telemetry as possible.
Computer configuration > Administrative templates > Windows components > Datacollection and Preview Builds.
Method 6. Sign up for Windows insider program
Sometimes Windows Update not showing because you are not in the correct Channel of the Windows Insider Program. You can choose to sign up for it.
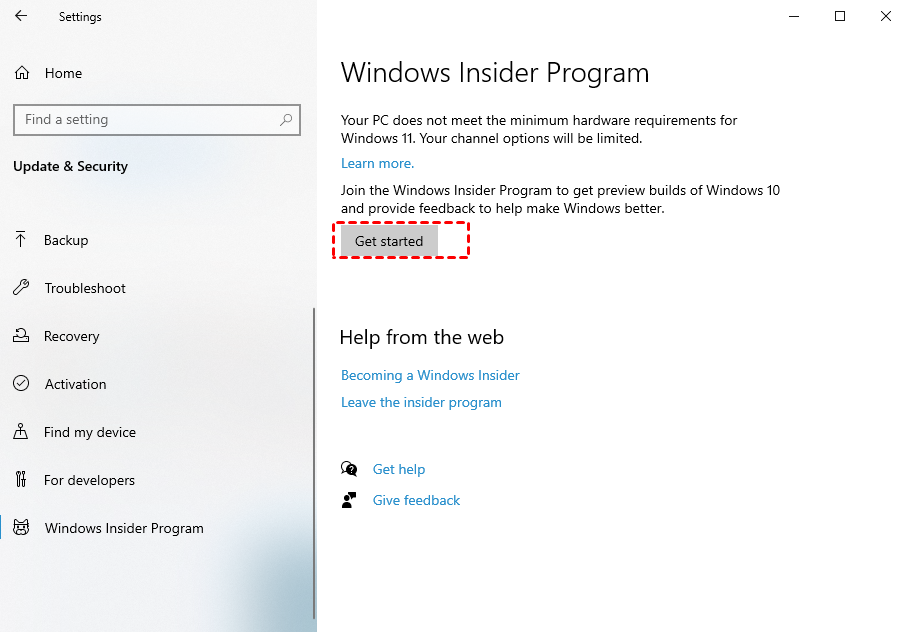
Step 1. Type Settings and select Update & Security. Then, click Windows Insider Program and Get started.
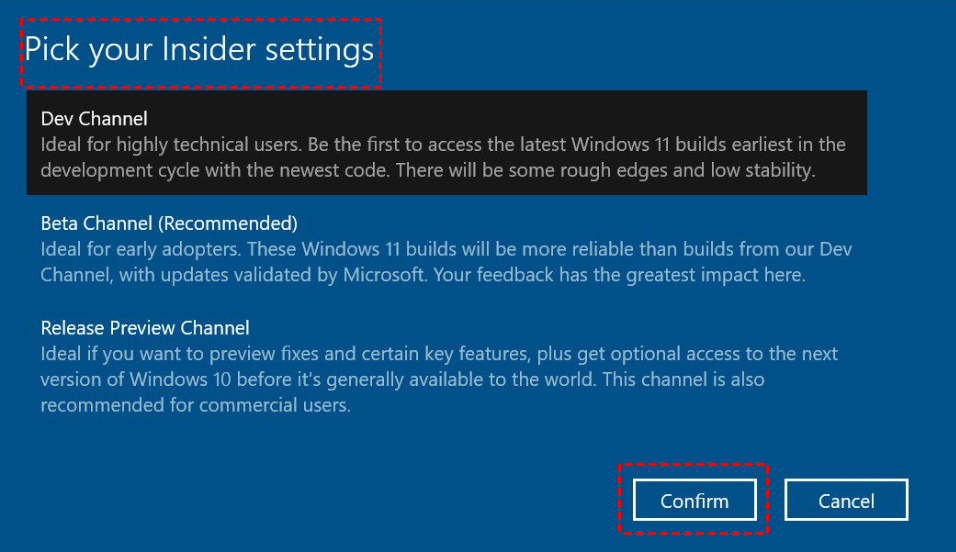
Step 2. It will ask you to link an account and then pick your Insider settings. And then restart your compute to apply your settings.
Method 7. Install Windows 11 manually
You can also upgrade to Windows 11 using ISO image if you try the above 6 methods but Windows 11 still does not showing up in Windows Update.
Step 1. Download the Windows 11 ISO on the official site and mount it. Then, open the ISO file and launch the setup.exe file.

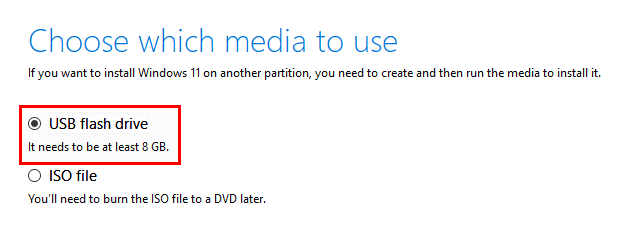
Step 2. Accept the license terms in the initial Windows 11 Setup window. And then, select language and edition, USB flash drive and detected drive, click Next to create Windows 11 bootable USB drive.
Step 3. Insert the bootable drive into your Windows 10 and boot from it.
Step 4. You will see the Windows Setup window after loading. Select computer preferences, click Next and then Install Now.

Step 5. Click I don’t have a product key.
Step 6. Select the operating system, you need to use the same edition as Windows 10, otherwise, you have to purchase license key for activation.
Step 7. Accept the license terms and click Next.
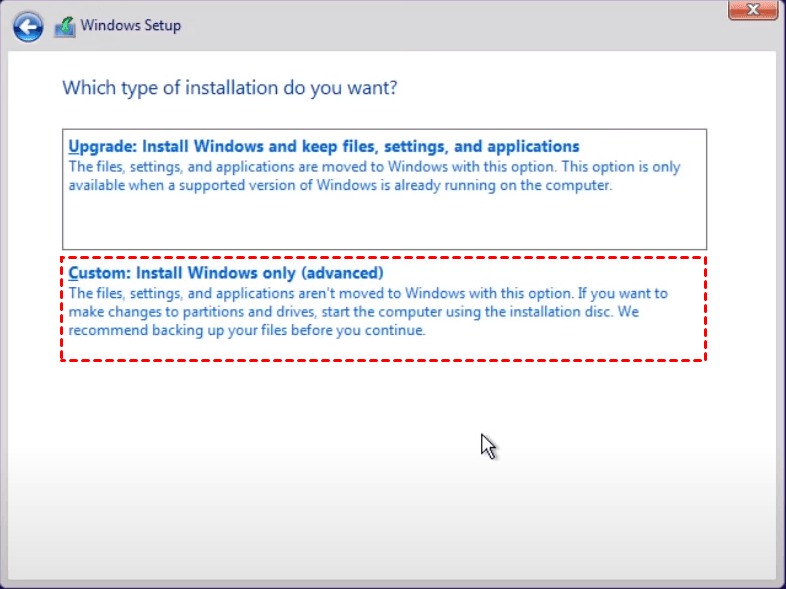
Step 8. Select Custom installation type, it will install Windows only and not include files, settings, and applications currently on Windows 10.
Step 9. Select the drive you want to install Windows 11 and click Next. It will start the installation automatically, just wait and set preferences settings later.
Install Windows 11 on unsupported hardware
Installing Windows 11 on an unsupported device is quite difficult, but you can still do it. In fact, except for TPM 2.0 and Secure Boot, you can choose to upgrade hardware if it does not meet the system requirement.
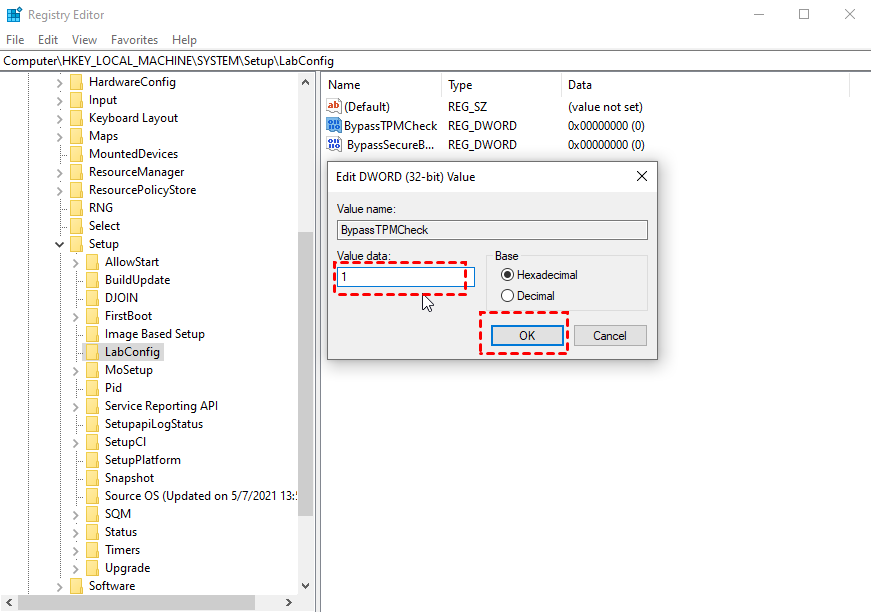
Thus, the biggest problem to install Windows 11 on unsupported hardware is how to bypass TPM 2.0 and secure boot during the installation process. If your CPU is low, you still need to bypass it as well. You need to create the following new registry keys and set their value to 1.
- BypassTPMCheck
- BypassSecureBootCheck
- AllowUpgradesWithUnsupportedTPMOrCPU
Also, there are different ways to install Windows 11 on unsupported PC and I have introduced them in my previous article. Please check this page: install Windows 11 on unsupported hardware and follow the detailed steps.
Summary
You can try the above 7 methods to fix Windows 11 not showing up in Windows Update after you know the reasons. However, some methods will cause system issues or data loss, so you need to backup Windows 10 before trying the above methods. AOMEI Backupper Standard is the best tool for you to protect your system and data on it.
In addition, you can also use this software to backup your system, disks, and partitions regularly to protect your data safety. It can support schedule backup, and incremental or differential backup all Windows PCs. With so many backup images, you can enable automatic backup cleanup to delete old images and save your disk space. Some of them are available in a higher version.