14 Solutions to Fix Windows 10 Black Screen with Cursor
To fix the Windows 10 black screen with cursor problem, you need to first understand the cause and try 14 different solutions in turn, while mastering another way to secure your system.
by Clytze Updated on October 27, 2022
User Case: The Windows 10 black screen with cursor after login
"I have a Windows 10 computer that I haven't used in a long time, and when I turned it on again two days ago, it entered the system correctly, but every time I enter my password, I get a black screen with just the cursor. I can't access anything on the computer other than the task manager, even Windows Explorer won't open. I don't know much about computers, so I'm hoping someone can help with this problem."
Why is my computer screen black, but I can see the mouse? In fact, that's exactly what the black screen problem with Windows 10 with cursor is.
Why does the black screen of Windows 10 with cursor appear?
When you are updating your Windows system. Installing Windows. Connecting multiple monitors. This problem may occur when you have not used the computer for a long time and have not updated the device drivers.
There are many reasons for this problem, the following are common.
- Windows Update is corrupted
- Windows installation is incomplete
- Computer power supply failure
- Problem with driver
- Software problems
- Multiple monitor connection problems
- Screen display anomaly
14 Solutions for Windows 10 Black Screen with Cursor
How to fix black screen with cursor in Windows 10? You can try the following 14 options in order, and I am sure one of them will help you solve the problem.
Method 1. Switching the display
From the results of some user feedback, the method of toggling the display helps to fix the Windows 10 black screen with cursor issue, you can try to use this method to fix the problem.
Use the Windows+P key combination, then press the up arrow key or down arrow key several times in a row, and then press Enter until the Project menu opens. At this point, the black screen problem should be solved, if you still can't solve the black screen problem, please continue to try the next option.

Note: If your Windows account is password protected, you will need to press the space bar, enter your password and then press Enter to perform the above actions, you may need to try a few more times.
Method 2. Uninstall or update graphics card drivers
If your computer's graphics card drivers are incorrect, it may also cause the Windows 10 with cursor black screen issue, at this point, you can try uninstalling or updating the graphics card drivers to fix the problem.
Update graphics card drivers
- When the Windows logo appears on your computer, press and hold the power button to turn off the electricity and repeat this operation 3 times to enter the Windows Recovery Environment (Windows RE).
- In the Windows Options menu, go to Troubleshoot> Advanced options> Startup Settings in order, and click Restart in the bottom right corner.
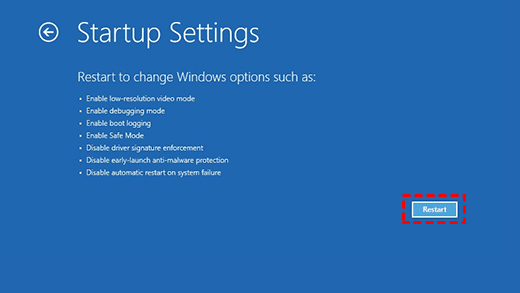
- In the Startup Settings window, press F4 to enter Safe Mode.
- Use the Windows+R key combination to open the Run window, type devmgmt.msc, and press Enter to open Device Manager.
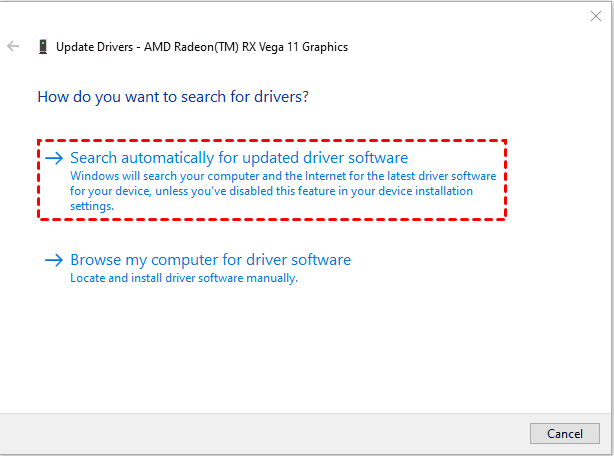
- Locate and expand Display adapters, right-click on your graphics card, select Update driver in the expanded menu, then click on the Search automatically for updated driver software option.
Uninstall the graphics card driver
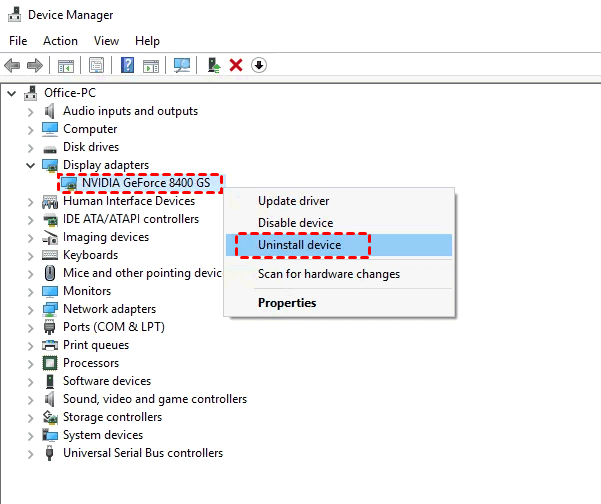
Open Device Manager in the same way, find and expand Display adapters, right-click on your card, click on Uninstall device option in the expanded menu and wait for its uninstallation to complete.
Method 3. disable fast startup
The Quick Start feature allows your computer to quickly recover from hibernation and can significantly increase the system startup speed, but in some cases, this feature can cause some other problems, for example, a black screen of Windows 10 with cursor. For this reason, you need to disable this feature.
- Repeat booting and shutting down the computer 3 times to enter the Windows recovery environment, then refer to the above steps and press F4 to enter Windows Safe Mode.
- Use the Windows+R key combination to open the Run window, type control and press Enter to open the Control Panel.
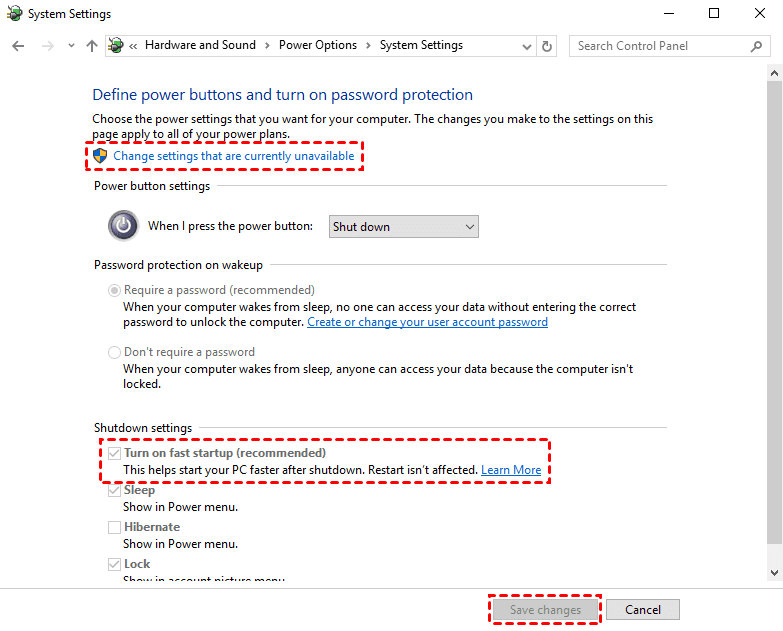
- Find and open Hardware and Sound, then click on Power Options, then click on the Choose what the power buttons does option from the left sidebar.
- Click the Change settings that are currently unavailable option, uncheck the Turn on fast startup option, and then click Save and change.
Method 4. Activate the built-in Windows Administrator account
The built-in administrator account can access your computer without any restrictions, but usually, it is inactive, so you need to activate the built-in Windows administrator account to lift the relevant restrictions, which will help to fix the problem of Windows 10 black screen with cursor.
1. In the Windows recovery environment, press F5 to enter Safe Mode with Command Prompt.
2. Type cmd in the taskbar search box and open the command prompt.
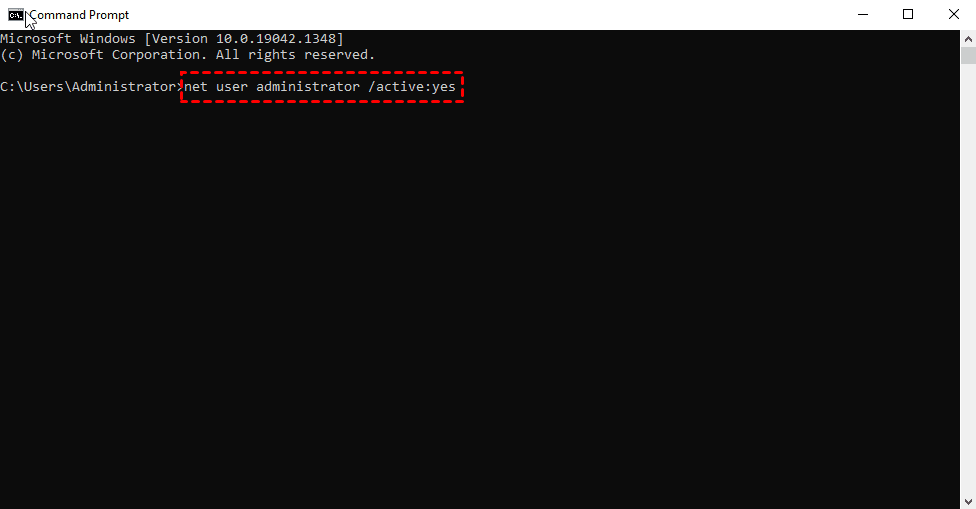
3. In a command prompt window, type net user administrator /active:yes and press Enter to execute this command, then restart your computer.
- If you need to use a password to activate the built-in Windows administrator account, then use the net user administrator password /active:yes command, where password needs to be replaced with the built-in administrator password.
- If you want to disable the built-in administrator account, you can use the net user administrator /active:no command from the command prompt.
Method 5: Update BIOS
A BIOS version that is too old may cause the issue of Windows 10 black screen with cursor, for this reason, you need to update the BIOS to fix the issue. It is important to Note that there are some risks involved in performing BIOS updates and it is recommended to do so with the assistance of a professional.
1. In the Windows recovery environment, press F6 to enter Safe Mode with a network connection.
2. Use the Windows+R key combination to open the Run window, type msinfo32 and press Enter to open System Information.
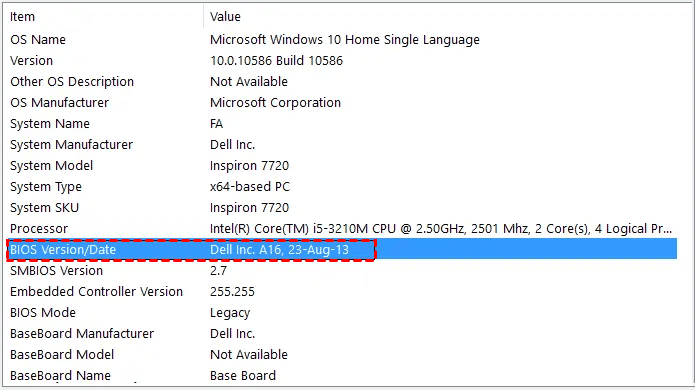
3. In the System Information window, you can find the BIOS Version. Date and Manufacturer, make a note of this information and visit the manufacturer's website in your browser to find and download the latest BIOS version to your USB drive.
4. Insert the USB flash drive with the latest BIOS file into your computer, reboot and enter the BIOS again, find the downloaded BIOS update file, and execute the update.
Note: Do not turn off your computer or disconnect the power during the BIOS update process, as this may damage your computer.
Method 6. Reset your computer
If you are having the issue of Windows 10 black screen with cursor after updating Windows, you can try resetting your PC to fix the issue.
1. In the Windows recovery environment, press F4 to enter Safe Mode.
2. Use the Windows+I key combination to open Windows Settings, find and click Update & Security.
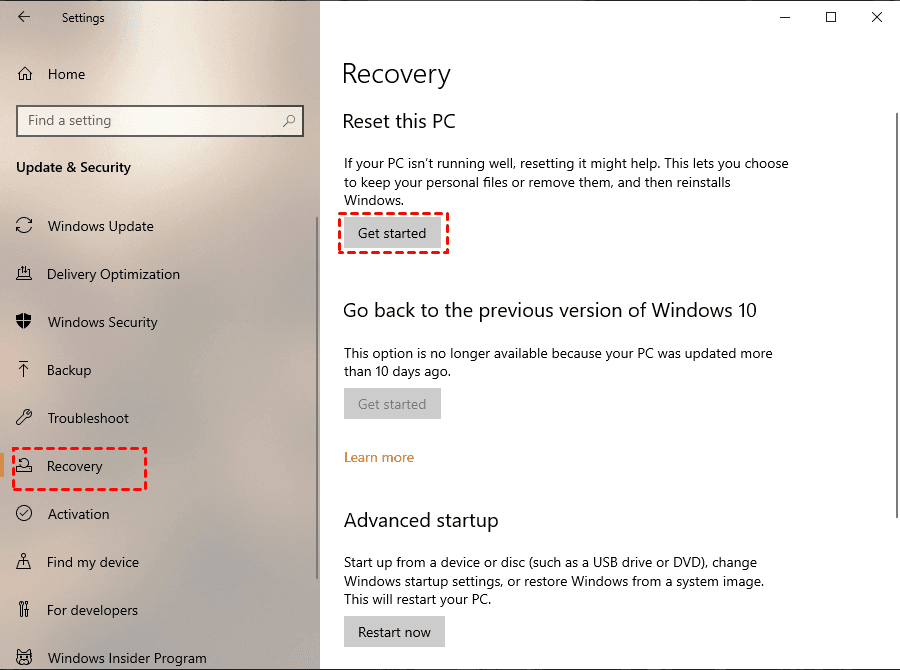
3. In the left menu, select Recovery and under Reset this PC, click on the Get Started option.
4. Select the Keep my files option in the pop-up window and wait for your computer reset to complete.
Method 7. Open Windows Explorer via Task Manager
If you can open Task Manager, then you can try to open Windows Explorer from Task Manager to fix the Windows 10 black screen with cursor after login.
1. Use the Ctrl+Alt+Delete key combination to open the Task Manager.
2. Click File in the upper left corner, click Run new task option in the expanded menu, type explorer.exe in the pop-up window and click OK button, wait for Windows Explorer to pop up automatically. At this point, you will be able to resume normal operation of Windows.
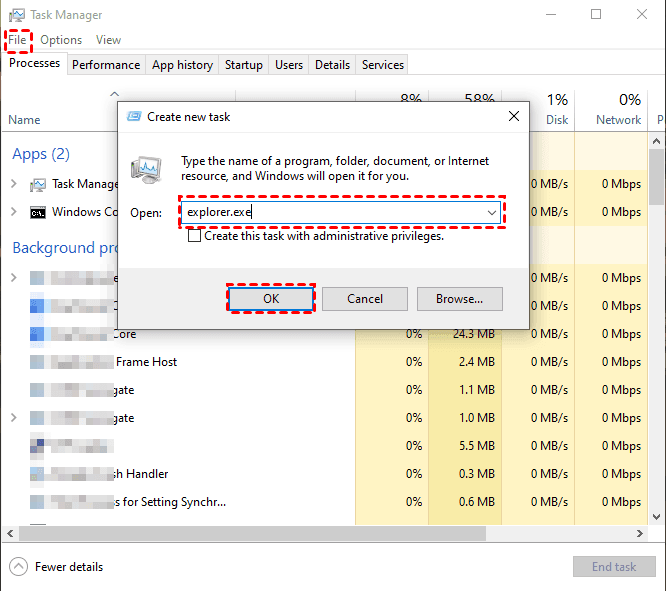
Note: If you are an administrator account, you can check the Create this task with administrative privileges checkbox below.
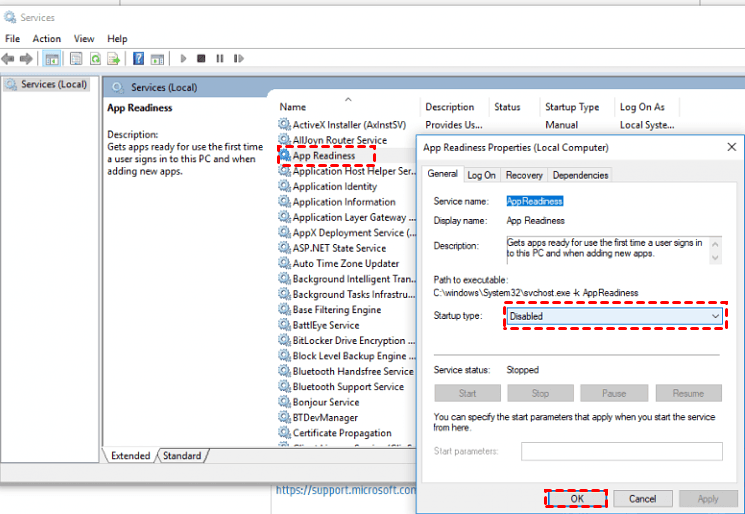
Disable the App Readiness service
If you can open Task Manager, then you can try to open Windows Services from Task Manager and disable App Readiness service in it to fix Windows 10 black screen with cursor issue.
1. In the Windows recovery environment, press F4 to enter Safe Mode.
2. Use the Ctrl+Alt+Delete key combination to open the Task Manager.
3. Click File in the upper left corner, click Run new task option in the expanded menu, type services.msc in the pop-up window and click OK button.
4. In the Windows Services list, locate and double-click to open the App Readiness service.
5. Change the Startup type to Disabled and click the OK button at the bottom to save the changes and restart your computer.
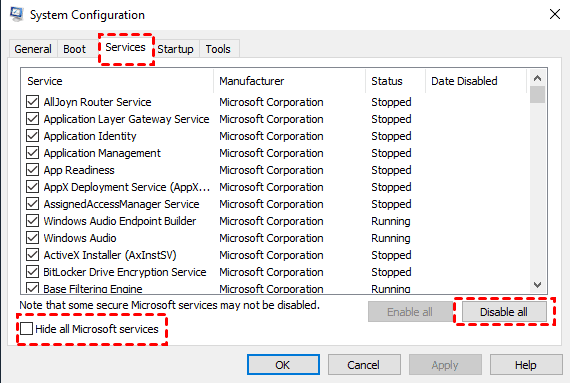
Method 9: Disable all third-party services
1. In the Windows recovery environment, press F4 to enter Safe Mode.
2. Use the Ctrl+Alt+Delete key combination to open the Task Manager.
3. Click File in the upper left corner, click Run new task option in the expanded menu, type msconfig in the pop-up window and click OK button.
4. Switch to the Services tab at the top of the window, check the Hide all Microsoft services checkbox in the bottom left corner, then click the Disable All button at the bottom right, then click the OK button and restart your computer.
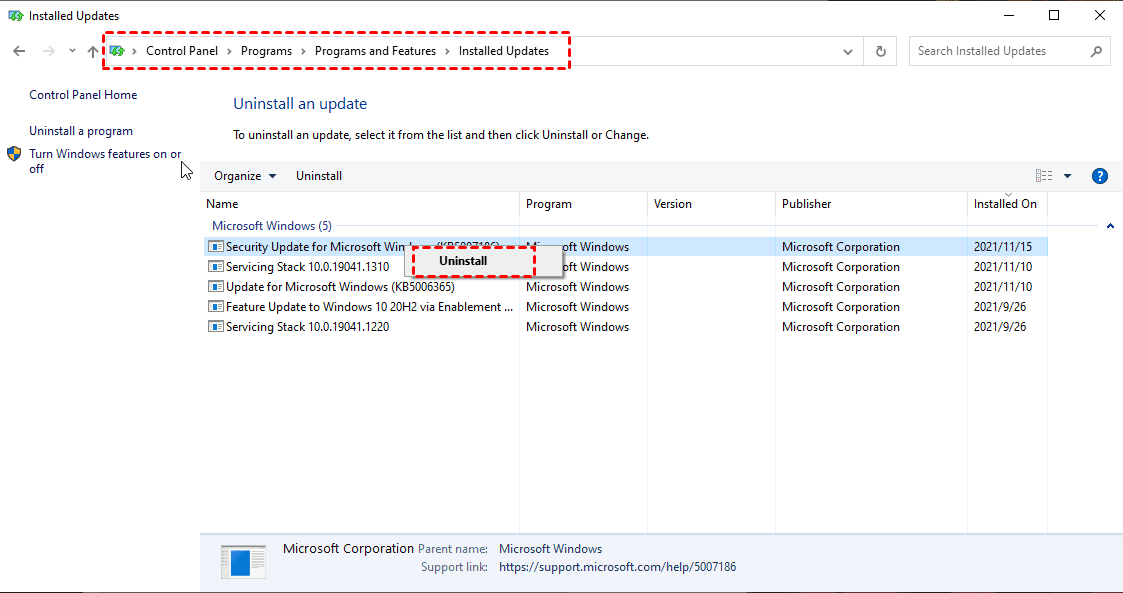
Method 10. Uninstall the latest installed application in safe mode
1. In Safe Mode, you can find Procedures and functions in the Control Panel.
2. Click on view installed updates in the left menu, right-click on these newly installed applications in the right window in turn, and click on Uninstall in the expanded menu.
Method 11. Restore Windows to its previous state
1. In safe mode, type restore in the taskbar search box, find and click Create a restore point.
2. Click System Restore... in the System Protection tab of the System Properties window. button.
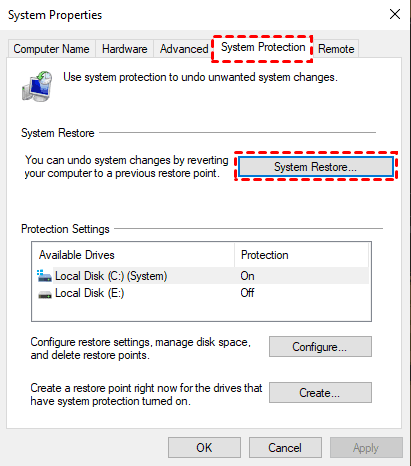
3. In the System Restore window, click on the Choose a different restore point option and then select the restore point before the problem appeared, click Next and wait for the system restore to complete.
Method 12: Modifying user shell values through the registry
1. In Safe Mode, use the Ctrl+Alt+Delete key combination to open Task Manager.
2. Click File in the upper left corner, click Run new task option in the expanded menu, type regedit in the pop-up window and check the Create this task with administrative privileges checkbox below, click OK.
3. Navigate to the following path.
HKEY_Local_MACHINE\Software\Microsoft\WindowsNT\CurrentVersion\Winlogon
4. In the right window find and double click to open the Shell file, confirm whether the pop-up window below Value data is explorer.exe, if not, you need to change it, save the changes and exit, restart your computer.
![]()
Method 13: Turn on low-resolution video
1. After confirming the removal of all external devices, reboot your computer, holding F8 during the process to display the advanced boot options.
2. Restart your computer again and use the appropriate keys to enter the BIOS settings (different brands of motherboards have different methods of entry).
3. Change the BIOS settings to boot from CD/DVD, then insert the Windows 10 bootable installation DVD and restart your computer.
4. Select your language preferences, click Next, and then click the Repair your computer option in the lower left corner.
5. Click Troubleshoot > Advanced options >Command Prompt in turn.
6. When the command prompt opens, type C: and press Enter, then type BCDEDIT /SET {DEFAULT} BOOTMENUPOLICY LEGACY and press Enter to execute this command.
7. Close the command prompt and restart your computer, then remove your Windows 10 bootable installation DVD and go to the Advanced Boot Options screen.
8. You need to find and select the Enable low-resolution video option in Advanced Boot Options and press Enter.
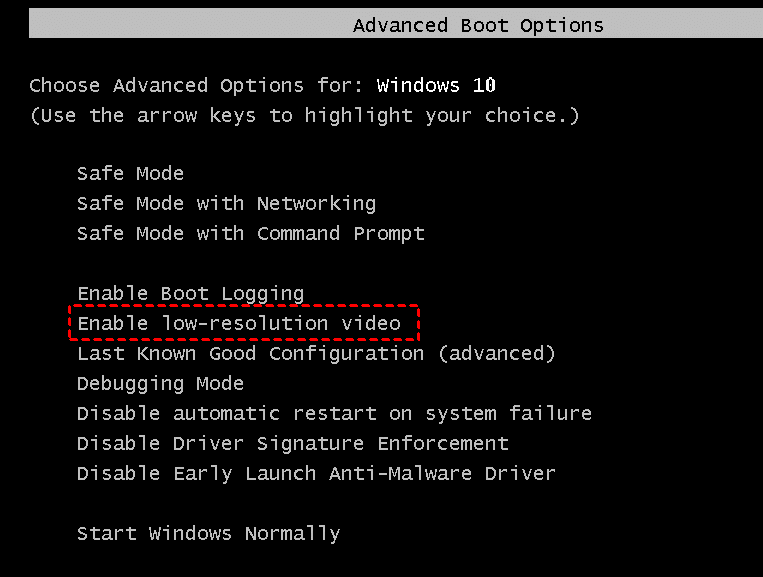
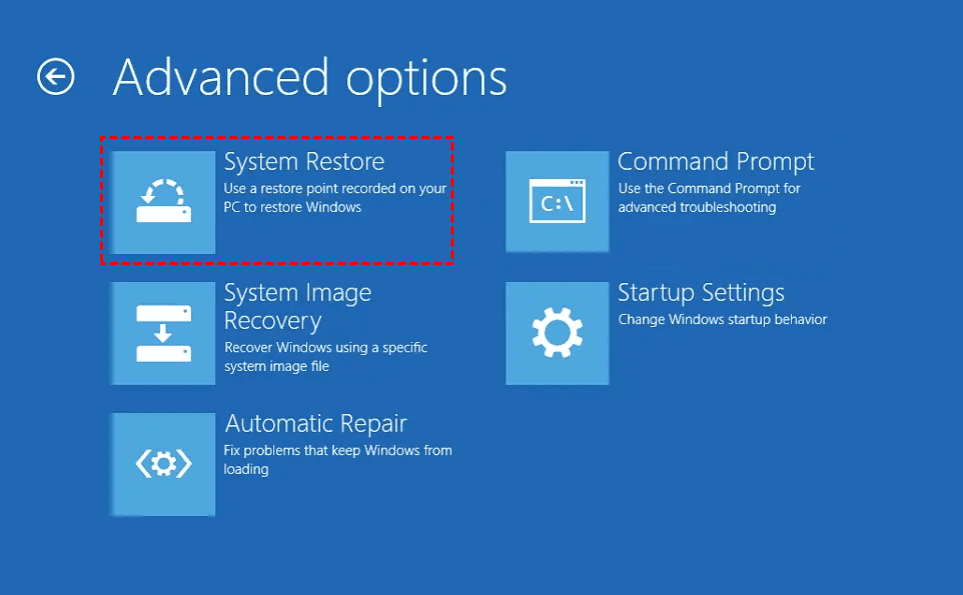
Method 14: Run System Restore
1. Use the Windows 10 bootable installation DVD in the same way, then select your language preferences and click on the Repair your computer option in the bottom left corner.
2. Click Troubleshoot > Advanced options > System Restore in turn, follow the prompts to perform a system restore, and restart your computer.
Easily backup your system and prevent system crashes
As mentioned above, you may encounter system crashes during the use of your computer, to make sure your Windows system is safe, it is recommended that you use AOMEI Backupper Standard to perform a system backup after solving the Windows 10 black screen with cursor issue, so that you can deal with system crashes comfortably and prepare for system restore.
AOMEI Backupper Standard is a free and professional system backup software to backup your Windows 11/10/8.1/8/8/7/Vista/XP system in just a few simple steps. First, you need to download the software and follow these steps.
Step 1. Open the software and click Backup > System Backup.

Step 2. It will select system partition and boot-related partitions automatically. And you just need to select a destination.

Step 3. Click Start Backup to backup the Windows system.

Notes:
- Options: You can write comments, choose the compression level for your system backup or set email notifications.
- Schedule Backup: This feature allows you to set the frequency of your backup, such as Daily, Weekly, Monthly, Event trigger and USB plug in. The professional version supports the last two features.
- Backup Scheme: You can select different backup methods. And you can upgrade to AOMEI Backupper Professional to enjoy the differential backup method which can easily restore your scheduled backup. After the upgrade, you can also enable automatic backup cleanup feature to save disk space.
Conclusion
If you are struggling with Windows 10 black screen with cursor issue, you can refer to the above 14 options to fix it after understanding the common causes. If you have fixed this issue and your Windows system is back to normal, it is recommended to use AOMEI Backupper Standard to perform a system backup.
As a free and professional system backup software, AOMEI Backupper Standard can help you backup your Windows system easily and prepare for possible system crashes to safeguard your computer system.

