How to Create and Boot from Toshiba Satellite Recovery USB
You could use Toshiba Recovery Media Creator to create a Toshiba Satellite recovery USB for Windows 7 or 8. Then, boot from it and recover your computer. Or use a more advanced way.
By Ivy Updated on January 3, 2023
Why Create Toshiba Satellite Recovery USB?
Your Toshiba Satellite works well when you get it the first time, but a few years ago, you may not find it is not booting from the operating system, the system partition is damaged, etc. These upsetting things may be caused by virus attacks, disk errors, bad sectors, or other hardware and software issues.
So you need to factory reset Toshiba Satellite from the recovery partition, CD/DVD, or USB drive. But not all computers comes with a recovery partition or CD/DVD containing files to factory reset it. The created meadia is specific to your machine and cannot recover other computers. So the best way is to create Toshiba Satellite recovery USB in Windows 7, 8, 10, or 11.

How Toshiba Satellite Recovery USB Works?
The Toshiba Satellite recovery disk contains files to factory reset a laptop or desktop and it allows you to boot from the USB recovery disk. The methods may be different in different systems. And you can also perform Toshiba satellite recovery disk download for Windows 7 or 8 on the official site and pay for it.
- In Windows 7 or 8, you could use the Toshiba Recovery Media Creator.
- In Windows 10 or 11, you need to use another built-in tool - Recovery Drive or more compatible media creator.
All the data including the applications will be deleted when you restore your computer to its original factory settings. In order not to lose any data, you need to backup files to external hard drive before booting from USB and recovering your computer.
✎... How Is Toshiba Satellite activated?
If your computer was originally Windows 7, or Windows 8, or you upgrade during the free upgrade period, your computer will activate automatically. If not, you need to activate the system with your previous product key.
✎... Which edition should be installed?
The product key only activates the original edition of the Windows system, so please select the right option.
Create Toshiba Satellite Recovery Disk for System Recovery
Here we will take Toshiba Recovery Media Creator as an example and show you how to create Toshiba Satellite recovery disk. To create Toshiba Satellite Windows 10 recovery USB or Windows 11, refer to part 3 in create Windows 10 recovery disk or more advanced way.
Step 1. Open Toshiba Recovery Media Creator on Windows 7 or 8 and click Yes to continue.
- In Windows 7: Click Start > All Programs > My Toshiba folder and click Toshiba Recovery Media.
- In Windows 8: Press Windows + C key to open the search charms bar and select Search, type recovery and select Recovery Media Creator.
Tips:
- This media creator can also be found under Toshiba Utilities, CD& DVD Applications or search for Toshiba recovery.
- This media creator on some machines is called Toshiba Recovery Disk Creator.
Step 2. In the Media Selection section, select System Recovery Media and select USB flash under the Media Set.
Notes:
- The default Media Set is DVD and you can also select CD or USB flash drive.
- In some models, you will also see Application Disks, which allow you to reinstall apps originally shipped with your Toshiba computer. Check it if your computer has.
Step 3. Insert your USB drive into Toshiba Satellite. It is suggested to use a blank media because all data on the USB drive will be deleted finally. If there are any important data, please backup files in advance.
Note: The information indicates the disk type (CD, DVD or USB) you need to create Toshiba Satellite recovery dosl. For the previous two options, you may need 3 or more of them.
Step 4. Check the Verify box, and this media creator will check the data when it is being written to the disks. This option make sure the recovery work is in a good state when completed and it takes a long time.
Step 5. Click Create and wait until you see the “Creating process has been completed ”. Close the Toshiba Recovery Media Creator.
How to Make Toshiba Satellite Boot from USB Recovery
Step 1. Connect the Toshiba Satellite recovery disk. If your computer is powered on, hold the Power button for 10 seconds to shut it down and turn it on again.
Step 2. Press the F12 key repeatedly to access the Boot Menu screen and select your USB flash drive.
Step 3. Click Yes to confirm you know all data will be deleted and continue.
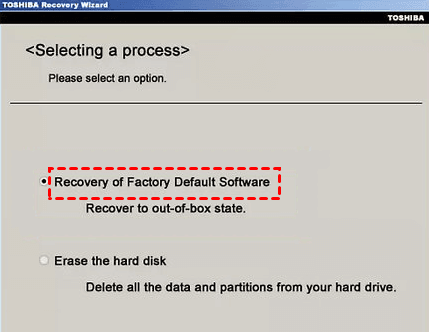
Step 4. Select Recovery of Factory Default Software and click Next to access the Toshiba recovery wizard in Windows 7, or 8.
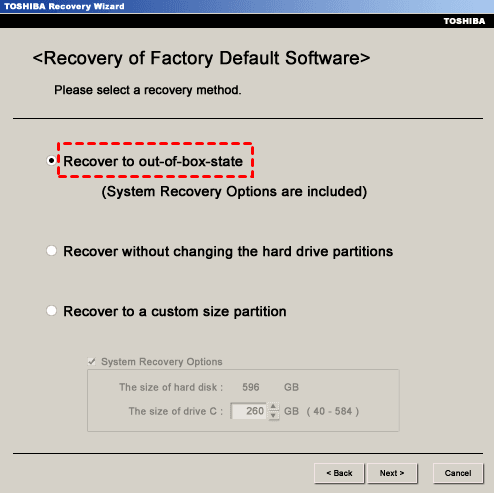
Step 5. Select one of the following recovery options and click Next to perform Toshiba system recovery.
- Recover to out-of-box state (System Recovery Options are included): It is the default option to factory reset Toshiba Satellite.
- Recover without changing the hard drive partitions: It formats the system partition but keeps other partitions intact.
- Recover to a custom size partition: As the name suggests, it allows you to specify a custom size for C: drive. Note that this option will delete all partitions on the disk.
More Advanced Way to Create Toshiba Satellite Recovery USB and Recover
The Toshiba Recovery Media Creator is only available on Windows 7 and Windows 8. So you cannot use it on Windows 10 or 11. And there are limitations on this utility:
- You may fail to create Toshiba recovery disk with it and receive error message like No HDD Recovery Area!
- The recovery media created by this utility can only be used on the current machine.
- The recovery media only works for Toshiba computer.
- This utility will be deleted if you hard drive is formatted or repartition.
- ...
Thus, if you are in these situations or use Windows 10 or 11, you may need a more advanced way to create Toshiba Satellite recovery USB and recover your computer. AOMEI Backupper Standard comes to help you. You can create a more compatible recovery disk for Windows 7, 8, 10, or 11. To be specific:
- Boot from Legacy and UEFI mode.
- Compatible with all the Windows systems like Windows 7, 8, 10 or 11. And you can also create bootable disc for Linux system.
- Work well with all brands of computers, such as, Toshiba, Lenovo, HP, Acer, etc.
- Restore everything on the hard disk including the operating system, installed program, personal data, customized settings, etc. You need to create a system image for recovery needs.
Please download this media creator, install and open it. For server users, try AOMEI Backupper Server.
Part 1: Create Toshiba Satellite recovery USB for Windows Systems
Step 1. In the main interface, click Tools and Create Bootable Media.

Step 2. Select the bootable disc type - Windows PE (Recommended) and click Next. It supports all features of this software and offers more flexible and convenient operations than the Linux system.

Step 3. Select USB Boot Device and click Next to create a Toshiba Satellite recovery USB.

Part 2: Restore Toshiba Satellite from Recovery USB
Step 1. Insert your Toshiba Satellite recovery USB and boot from it. You need to change it to the first boot option in BIOS. And connect the disk containing the system image as well. A disk image is also feasible.
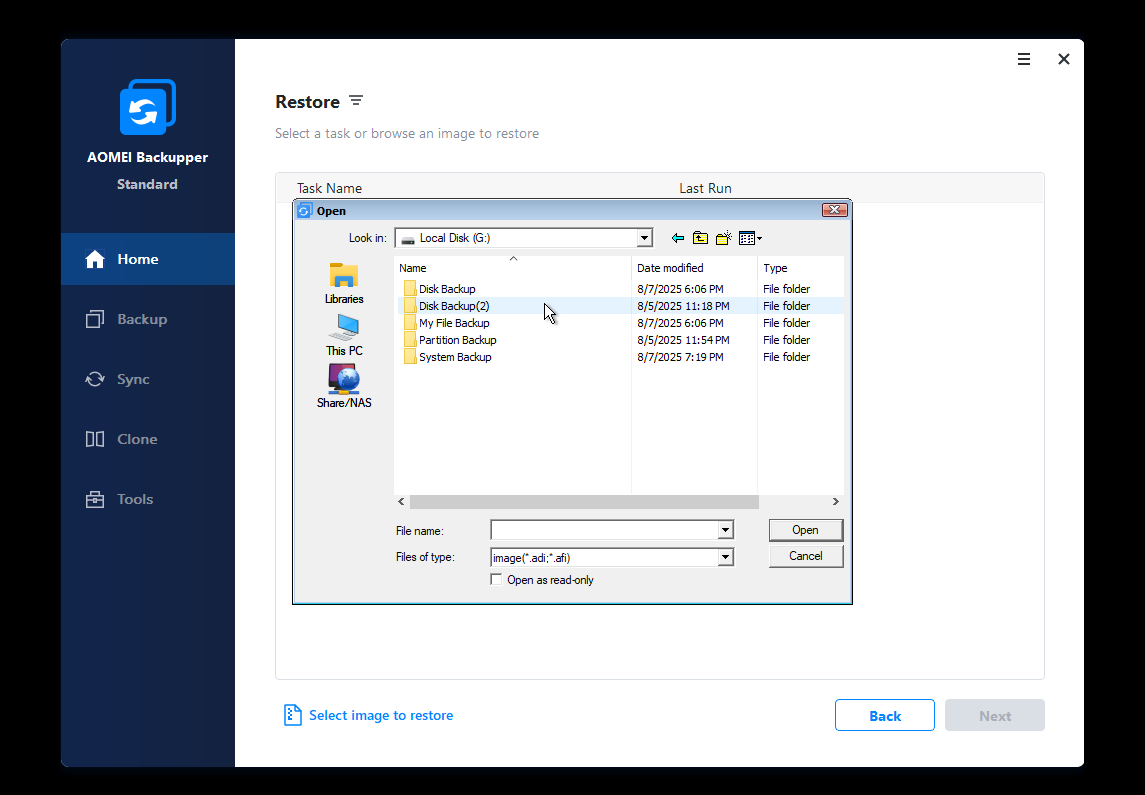
Step 2. After loading, you will see the main page of AOMEI Backupper Standard. Click Restore and Select Image File to locate your backup image and restore Toshiba Satellite to earlier date.
Step 3. Tick Restore this system backup and click Next. If you want to restore system image to new hard drive, tick Restore system to other location at the lower location.
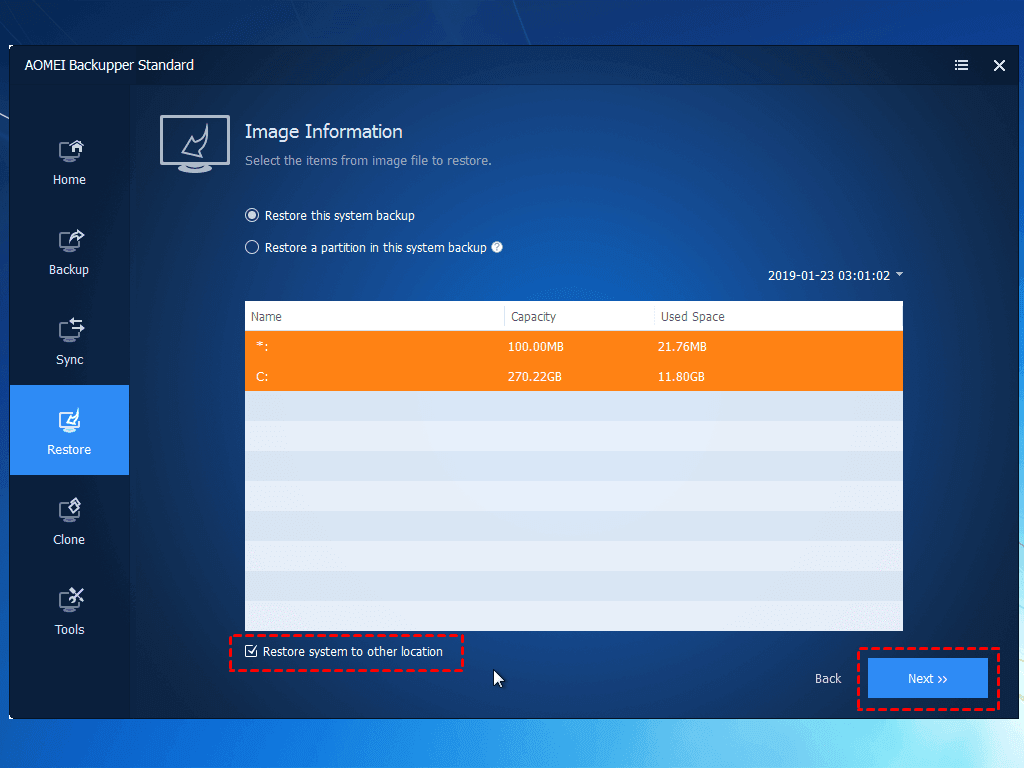
Note: You may have more options if you create a scheduled system backup task. Click the inverted triangle and you can choose from full backup, incremental backup or differential backup at a specific time point.
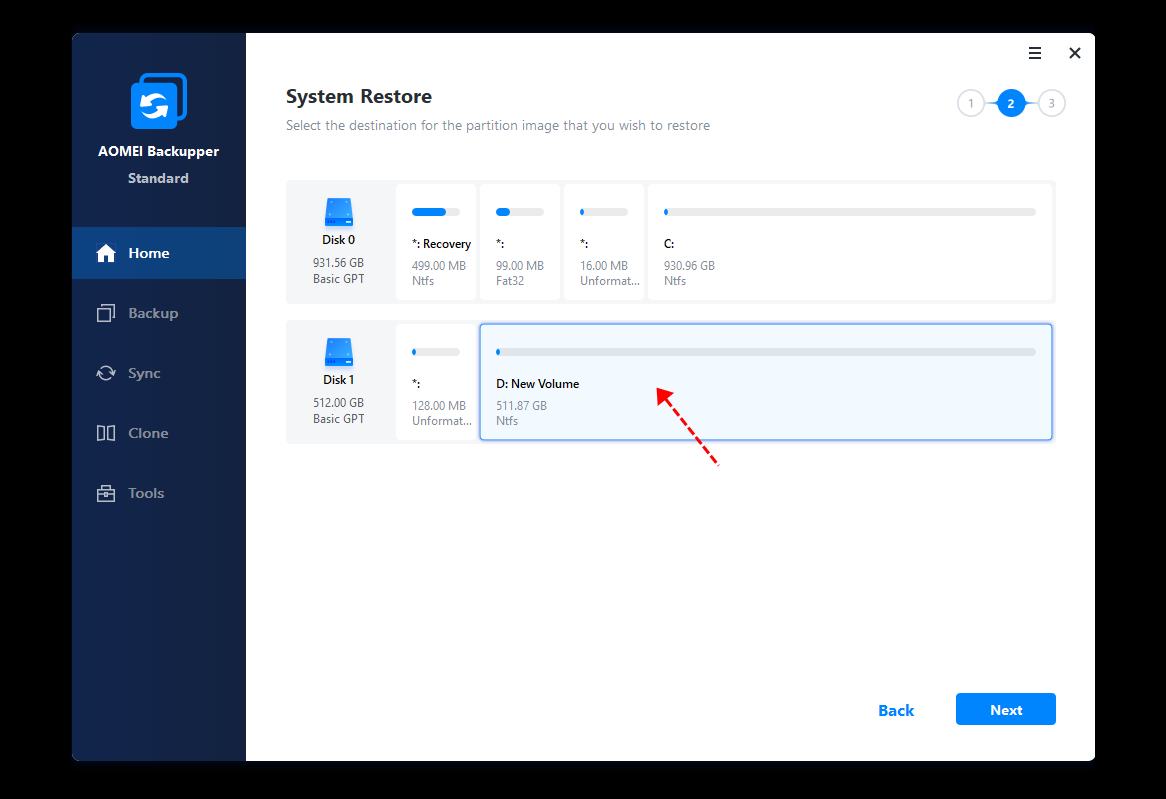
Step 4. Select your new hard drive as the destination to restore the selected system image and click Next.
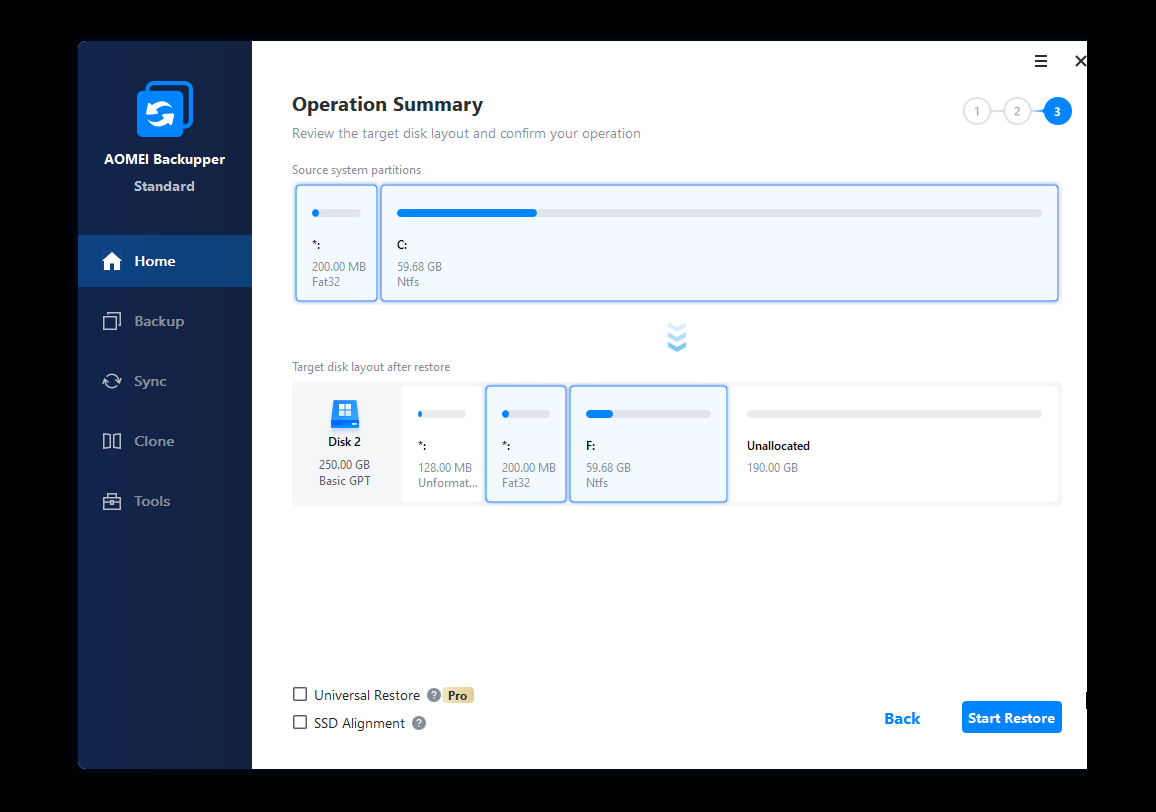
Step 5. Confirm you select the right disk and click Start Restore to restore Toshiba Satellite to a previous good state.
Tips:
- SSD Alignment: It helps to accelerate writing and reading speed of SSDs with 4k alignment technology. Select it if you restore system to new SSD.
- Universal Restore: It will install all drivers required to boot Windows and be checked by default if you restore Windows 10 to new computer. And you will be asked to upgrade to professional version of this software after clicking Start Restore.
That's the entire process to create Toshiba Satellite recovery USB and restore Windows image backup to another drive. It's not difficult to understand. But what if you want to restore system image on different computers without installing this software?
You could upgrade to AOMEI Backupper Technician or TechPlus edition and create a portable version of this software on a USB drive with the "Create Portable Version" feature. Then, you can run this software from a USB flash drive on any computer and use all its features of it.

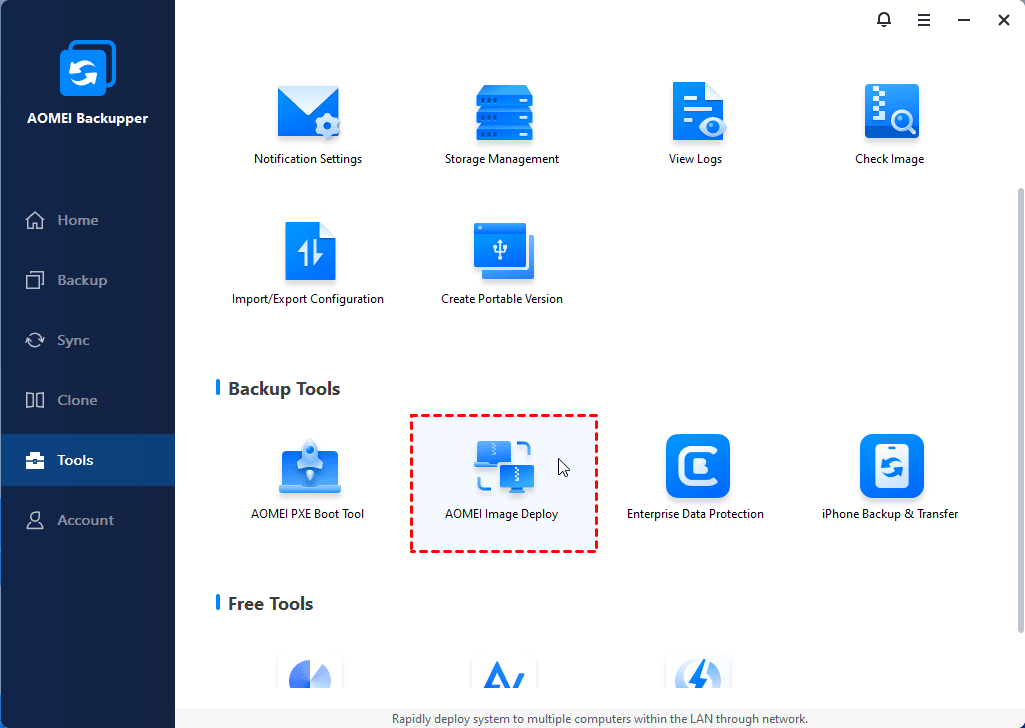
To restore system to multiple computers, go to Tools and click AOMEI Image Deploy. You need to create a bootable WinPE ISO or WIM to boot a computer over networks, select the backup image as well as set up backup settings, then you can deploy image to specified computers.
Summary
You can easily create Toshiba Satellite recovery USB in Windows 7 or 8 and use it to recover your computer if it does not work or stop responding. But sometimes you need a more advanced way to make it, such as, you cannot launch Toshiba Recovery Media Creator.
AOMEI Backupper Standard is a free bootable media creator, which allows you to create a recovery disk for all Windows systems and branded computers and boot from both BIOS and UEFI modes.
At the same time, it also offers users backup features to include Windows as well as installed programs, personal data, etc on the system partition. So you can quickly recover your computer in an emergency.