(FIXED) Toshiba Satellite Boot Menu not Working
This article introduce you to 3 effective methods to fix Toshiba Satellite boot menu not working as well as the way to open boot menu in Windows 8, 10, or 11. Creating a recovery USB is worth trying.
By Ivy Updated on January 4, 2023
Toshiba Satellite Boot Menu Not Working
"I have an issue with not being able to boot my Toshiba Laptop to a repair DVD or a USB recovery drive. I have recently created both from the laptop and am trying to test them. But I am unable to get the laptop to boot into the BIOS menu. Any suggestions?"

Why Toshiba Satellite Laptop won’t Boot Past Toshiba Screen?
Toshiba Satellite boot menu not working may be different, for example, some users say they are unable to boot to BIOS menu, others say Toshiba laptop stuck at boot menu or cannot exit from it. Here are some reasons for these situations:
- The remapped keyboard keys interfere with the startup process.
- You use the wrong BIOS or boot menu keys. In general, the F2 for BIOS, F12 for boot menu is for Windows 7. For Windows 8 and new systems, it may be different. And some Satellite laptop use hardware utilities to help, such as HWSetup.
- You resume Satellite PC from hibernation mode. In hibernation mode, the BIOS skips the "F2 for bios, F12 for boot menu" screen. And Fast startup is a form of hibernation in Windows 8, 10, and 11.
How to Open Boot Menu on Toshiba Satellite
You can use F2 or F12 to access BIOS or boot menu as long as you see prompts on the startup screen in Windows 7. But if you use Windows 8 or newer systems, it may not work. Try the following methods to open boot menu on Toshiba Satellite first.
Your Toshiba Satellite PC Boots Normally
Step 1(optional). Remove the lost password using the Windows password key (when you are locked out of Windows or fail to enter the system) and boot your computer.
Step 2. Press Windows + C key to open the Charm bar. Then, select Settings and Change PC settings.
Step 3. Select General under the PC settings section and scroll down to Advanced startup, select Restart now.
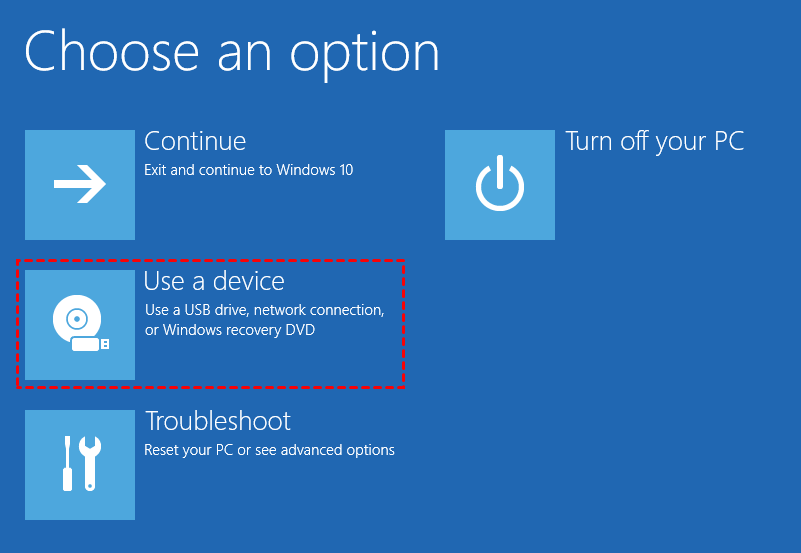
Step 4. Click Use a Device and Boot Menu to open it.
Your Toshiba Satellite PC Not Bootable
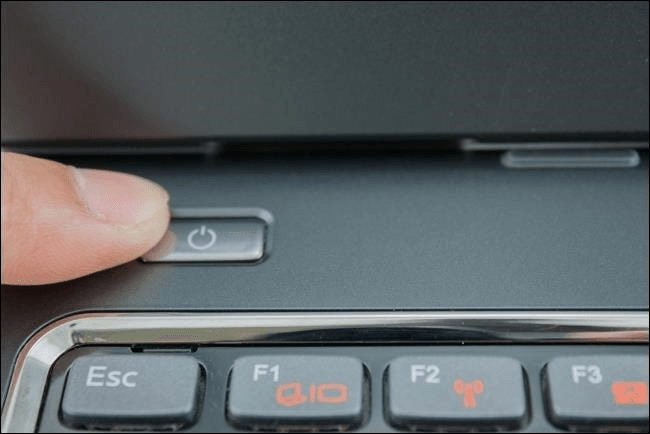
Step 1. Press the Power button to shut down your PC while pressing the Shift key.
Step 2. In general, it only puts your PC into hibernation mode. So after that, you need to restart your PC and tap the F12 key quickly until you can see the Boot Menu screen.
How to Fix Toshiba Satellite won’t Boot to BIOS Menu
Before starting to fix Toshiba Satellite won’t boot to BIOS menu, please try the following simple actions:
- Unplug all the external devices and boot again.
- Completely shut down your computer and try again. Unplug the AC adapter, remove the battery, and hold the Power button for 30 seconds. Then, leave it set for 15-20 plus minutes and plug back only the AC adapter.
If both methods do not work for you, try the following methods based on your situation.
Fix 1: Use Toshiba HWSetup Tool to Configure Your Computer
If you have ever remapped the keyboard keys with Sharpkeys or similar software, it may interfere with the startup process. You need to remove it first and try again.
Step 1. Search Sharpkeys and select it to continue. After the Sharpkeys open, click the Add button.
Step 2. Select the mapped key in Map this key and move it to To this key. And click Turn Key Off (00_00) and OK.
Step 3. It will go back to the Sharpkeys window. Click the Write to registry button at the bottom.
Fix 2: Disable Fast Startup
If your computer resumes from hibernation mode, the BIOS skips the F2 for bios, F12 for boot menu screen, finally resulting Toshiba Satellite boot menu not working.
Note that the Fast startup feature is a form of hibernation in Windows 8 and newer systems. So you need to disable Fast Startup in HWSetup or from Start, or from BIOS.
From Power options:
Step 1. Type power options and select it.
Step 2. Select Choose what the power button does and Change settings that are currently unavailable to access the Shutdown settings.
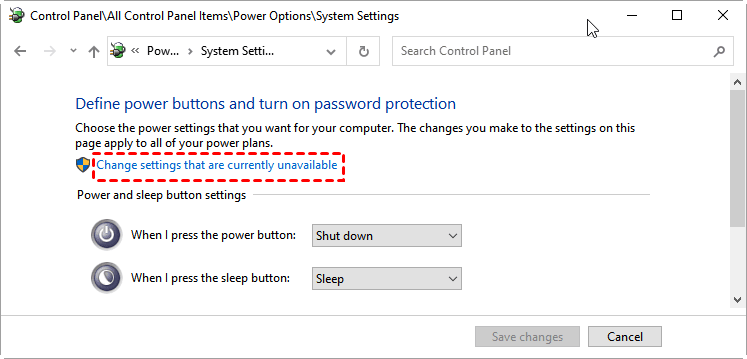
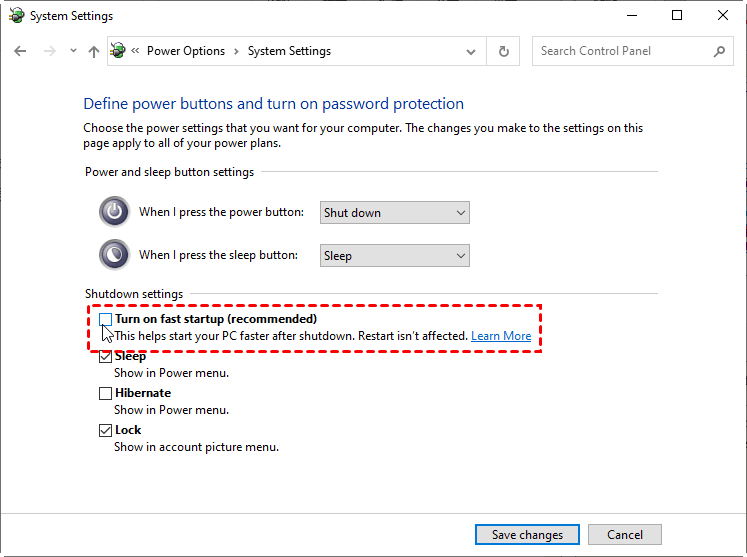
Step 3. Uncheck the Turn on fast startup option and save changes.
From BIOS Setup Utility:
Step 1. Hold down the F2 key and power on your PC.
Step 2. Go to the Advanced tab and change Boot Speed from Fast to Normal.
Step 3. Press F10 to save changes and reboot.
From HWSetup:
Step 1. Click the Start menu, search HWSetup and select it.
Step 2. Click Boot Settings and Check Normal in the Boot Speed box. Then, click OK and Apply to save changes.
Notes:
- The Toshiba HWSetup tool does not come with all Toshiba computers. If you cannot find it, please go to the Toshiba support site, enter your serial number and download the one for your machine.
- The Windows 7 edition still works in Windows 10.
- Besides, some users report their computer does not shut down normally. If you are in this case, try to take off the "Use my sign-in info to automatically finish setting up my device" setting.
Fix 2: Use Toshiba Satellite Zero Key
If you want to factory reset a Toshiba Satellite, you can directly use the 0 key to access the Toshiba recovery wizard.
Step 1. Hold the Power button for 10-30 seconds to shut down your Toshiba computer.
Step 2. Hold the 0 key and press the Power button in the meantime.
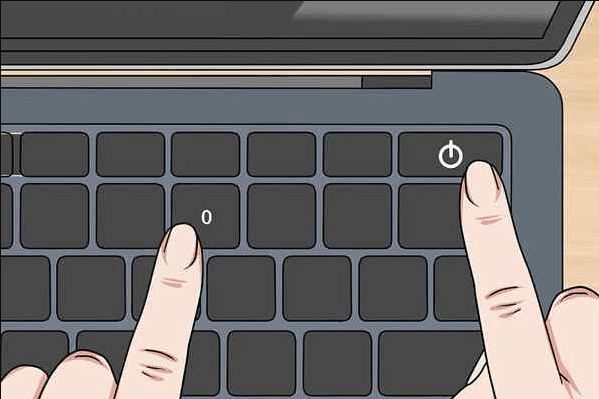
Step 3. Release 0 when your computer starts to beep. It will load the Toshiba recovery wizard in the recovery environment.
More Advanced Way to Boot Toshiba Satellite from USB
Except for the above methods, you can also try to create a recovery USB for Toshiba Satellite. Like other branded computers, Toshiba also offers you a built-in tool named Toshiba Recovery Media Creator, but it is only available on Windows 7 or Windows 8. Please refer to Toshiba Satellite recovery USB.
For Windows 10 or 11 users, it’s suggested to use a free and more compatible media creator. The Create Bootable Media feature in AOMEI Backupper Standard is a good choice. To be specific:
- It is able to create a bootable disc for Windows 7/8/8.1/10/11/XP/Vista or Linux systems.
- It supports 3 bootable media types, such as CD/DVD, USB Boot Device, or ISO file.
- It is compatible with MBR/Legacy and GPT/UEFI. So you don’t need to worry about failure due to boot mode.
- Except for Toshiba, you can also use it on Lenovo, HP, Dell, Acer, etc.
Please download this free media creator, install and launch it.
Step 1. In the main interface, click Tools and Create Bootable Media.

Step 2. Select the bootable disc type - Windows PE (Recommended) and click Next. It supports all features of this software and offers more flexible and convenient options than the Linux system.

Step 3. Select USB Boot Device or other bootable media types and click Next.

Wait until the process completes and click Finish. You will have a copy of boot files for this PC and are able to access AOMEI Backupper from it. If your computer slows down or stop responding, you can restore system image or disk image to new hard drive with it.
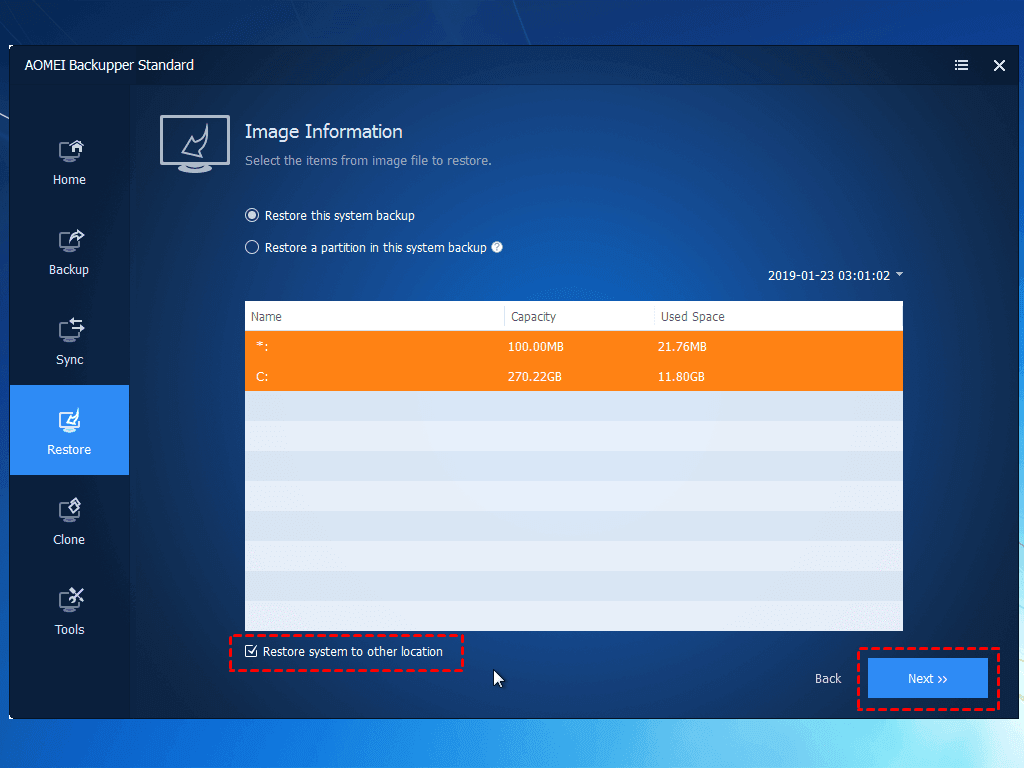
Click Restore and Select Image File to locate the backup image. Then, you will be asked to select the items you want to restore, choose Restore this system image, and select new hard drive to receive it. Finally, click Start Restore.
The steps to restore disk image is very similar, just select the disk backup containing everything on your Toshiba Satellite disk. To restore system to multiple computers, you need to use the AOMEI Image Deploy tool on the Technician or TechPlus edition.
There are other two advanced bootable media:
- Recovery Environment: It will directly add AOMEI Backupper into boot menu, so every time you start your PC, you can access this software. And it does not require any storage device.
- AOMEI PXE Boot Tool: It allows you to boot two or more computers over network without any storage media.
Summary
You can easily fix the Toshiba Satellite boot menu not working as long as you find the reasons for it. This article introduce you to 3 corresponding solutions. It’s suggested to try newer methods to open the boot menu first if you are using Windows 8/10/11.
Besides, you can directly create a Toshiba Satellite recovery USB and boot from it. The Create Bootable Media feature in AOMEI Backupper Standard helps you and it is more compatible. So you can use it to boot any Windows PC, whether it uses BIOS or UEFI mode.