Stepwise Guide: The Best Way to Sync Synology to SharePoint
You can learn why sync Synology to SharePoint and the best method to achieve the goal easily as well as the stepwise guide for syncing Synology to SharePoint. Keep reading to know more details.
By Clytze Updated on January 11, 2023
Why Sync Synology to SharePoint?
SharePoint Online and Synology NAS are two different cloud storage and file sharing services. Synology NAS can help you easily access all existing files without internet. SharePoint Online can help you more easily access your data from different devices, whether online or offline.
You can enable the SharePoint sync function of your Synology NAS to increase the efficiency of your team while safely storing important data on the NAS hard drive.
- Performing SharePoint NAS synchronization, you and your team can easily access NAS files from SharePoint Online.
- Take full advantage of the collaboration features of SharePoint Online.
- If you edit in SharePoint, the modified content will be automatically synchronized back to the NAS.
How to Sync Synology to SharePoint
Since Synology and SharePoint Online are two different storage and file sharing services, you might have a hard time linking Synology to SharePoint directly without any help. If you manually download files from Synology and upload files to SharePoint, it may fail due to unstable network and large data volume, and the process will be very trivial and complicated.

Therefore, it is recommended that you use professional third-party sync software to help you achieve the goal. You can continue reading this article to know the best way to sync Synology to SharePoint and how to go through the whole process step by step.
The Best Way to Sync Synology to SharePoint
The easiest way to sync Synology to SharePoint is to choose a free third-party sync software which is called AOMEI Backupper Standard to sync files from Synology to SharePoint. It only takes a few steps to help you achieve the goal, and you can set different frequencies to run scheduled syncs automatically.
- Scheduled Sync: It allows you to set fixed intervals such as Daily, Weekly and Monthly to automatically sync Synology to SharePoint.
- Multiple Paths: Besides syncing Synology to SharePoint, you can also choose the source path or destination path as internal disk, external disk, USB disk, cloud device, if needed. This way you can easily synchronize your local disk with a remote device.
- Different Operating Systems: This free file sync software is suitable for various Windows operating systems such as Windows 11, 10, 8.1, 8, 7, Vista and XP.
Stepwise Guide to Sync Synology to SharePoint
After knowing the best way to sync Synology to SharePoint, this article will introduce a step-by-step detailed guide to the complete process of syncing Synology to SharePoint. AOMEI Backupper has a user-friendly interface and easy-to-understand step reminders, even if you are a novice, you can easily master it.
First, you need to download and install this free sync software to your computer, and then follow the steps below. By the way, if you are a Windows Server user, you can try AOMEI Backupper Server.
Step 1. Open AOMEI Backupper Standard, click Sync > Basic Sync.

- Notes: If you want to enjoy more advanced sync features, you can upgrade to the Professional version or higher editions.
- Mirror Sync: always keep the files in the destination directory exactly the same as the source directory.
- Real-Time Sync: sync changed files from the source directory to the destination directory in real-time.
- Two-Way Sync: any changes in the source of the destination directory will be synced to the other side mutually.
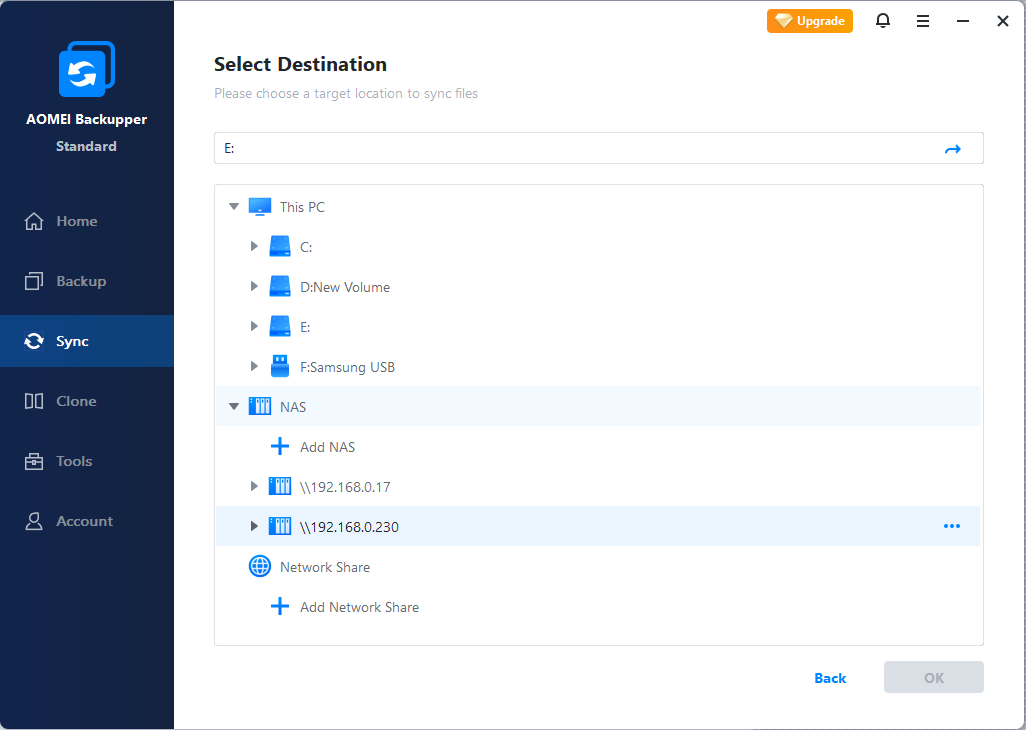
Step 2. To perform Synology to SharePoint, you need to select files or folders on the source Synology NAS first. On the main page of Basic Sync, click + Add Folder and then Share/NAS.
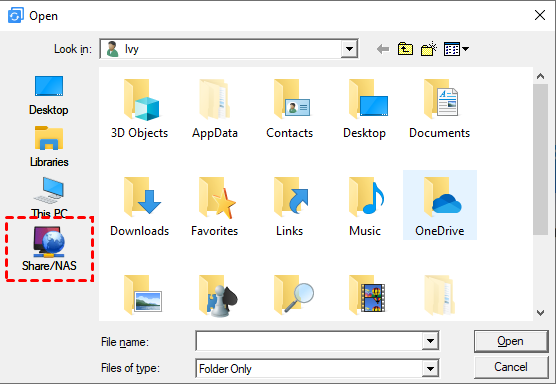
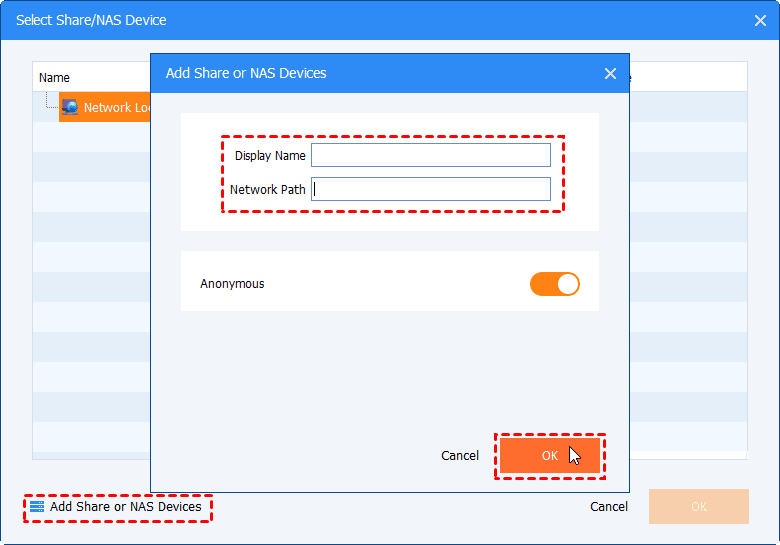
Then, in the new window, click Add Share or NAS Devices> input the Network Path (IP address of the host Synology NAS), and select shared folders containing the files that you would like to sync.
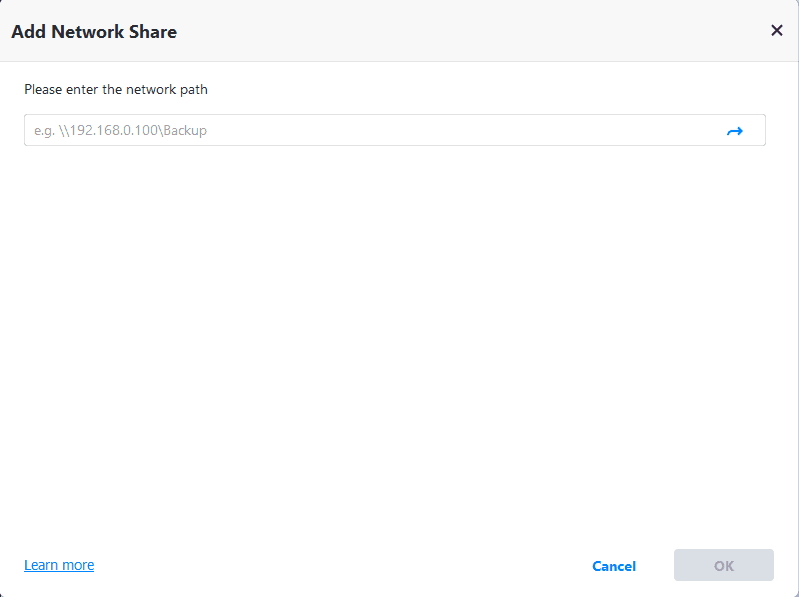
Step 3. Click the inverted triangle icon and Add Share or NAS Devices, then type the network path below and click OK to add the shared folder on the SharePoint.
Step 4. Confirm all the information and click Start Sync to sync data.
- Notes: To sync Synology to SharePoint automatically, click Options and Schedule Sync.
- Options: You could enable email or SMS notification to get an alert after the synchronization is finished, comment on the sync task, run a specified program or script before or after the sync, etc.
- Schedule Sync: You can set an automatic synchronization with daily, weekly, monthly, event triggers or USB plug in. The last two are available in the AOMEI Backupoper Professional.
Summary
This article explains why to sync Synology to SharePoint and how to achieve it. The easiest way is to use the free third-party synchronization software AOMEI Backupper Standard to help you. Not only can it easily help you syn files between two cloud storage devices, but it also supports you to set different sync frequencies to perform tasks automatically. And you can choose different source and destination paths as well as different Windows operating systems.
Apart from that, it is also an excellent backup software that provides functions such as system backup, file backup, partition backup and disk backup. It can help you protect data security in all aspects. You can download this software to explore more useful features.

