Snipping Tool doesn't work? Here are the 18 Solutions You Need!
How to solve the snipping tool not working problem? Learn about the causes of this problem and the 18 ways to fix it, as well as preventive measures for backing up your system in this article.
by Clytze Updated on November 7, 2022
What should I do If the Windows 11 Snipping Tool does not Work?
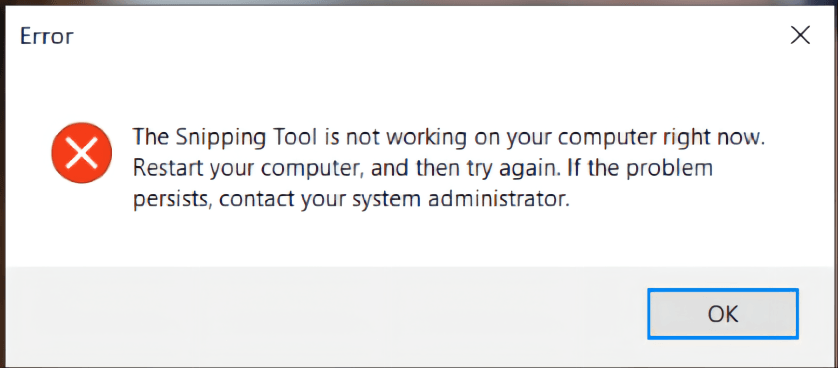
I just upgraded to Windows 11 yesterday and everything is up to date, but I can't open the Snipping Tool using the Windows+Shift+S quick key. I can open the application manually, but when I tap +Add, I get a pop-up message that The Snipping Tool is not working on your computer right now, which means that Windows 11 is preventing me from using the Snipping Tool. I have tried a number of methods on the web such as restarting my computer, uninstalling and reinstalling applications, repairing applications, etc, all to no avail. I am a student and really need this feature, I hope you can help me!
Snipping Tool is a tool built into Windows that allows you to cut and edit any screenshot you want on your computer. However, the application has lacked sufficient stability from the original Windows Vista to the current Windows 11, and many users always receive some strange error messages during use, in addition to the above-mentioned case of the snipping tool not working, as well as the problems described below.
- The snipping tool does not work and the screen is grayed out.
- Restarting the snipping tool in Windows 10.
- The snipping tool in Windows 10 does not save screenshots and sketches.
- Snipping tool does not copy.
- Snipping tool shortcut not working.
- Snip and sketch not working.
The above-mentioned problems can even occur in another related snipping tool, Snip & Sketch, as well. These problems cause a lot of trouble for many users, but thankfully, their solutions are universal. Next, we will introduce 18 effective solutions to the problem, using the example of the snipping tool not working. First, we need to understand the causes of this problem.
Why does the Snipping Tool not Work?
Why does the snipping tool not work? There are common causes of this problem as below.
- Problems with the snipping tool.
- Out-of-date Windows version.
- Corrupted system files.
- Conflicts with third-party applications.
- Blockage of focus assist function.
How to Fix the Snipping Tool not Working
How do you fix the snipping tool not working? How do you get the snipping tool to work? Why can't I copy and paste from the snipping tool? Everything related to the snipping tool, you can find a similar solution in the 18 methods below.
- Restart the snipping tool and reboot the computer
- Authorize the snipping tool background application permissions
- Repair or reset the snipping tool
- Change the shortcut
- Troubleshoot using Windows applications
- Update Windows version
- Change the date and restoring
- Use older versions of applications
- Uninstall Security Update KB5006674
- Enable scrapbook history
- Reinstall the clipping tool
- Run SFC scan and DISM check tool
- Find and remove conflicting applications
- Disable focus assist
- Use the new snipping tool
- Enable the snipping tool in Group Policy
- Restart Windows File Explorer
- Reset your computer
Method 1. Restart the Snipping Tool and Reboot the Computer
Restarting applications and computers can solve many problems. When you encounter problems with snipping tool not working, you can try this method first. The next describes the specific steps, using Windows 11 as an example.
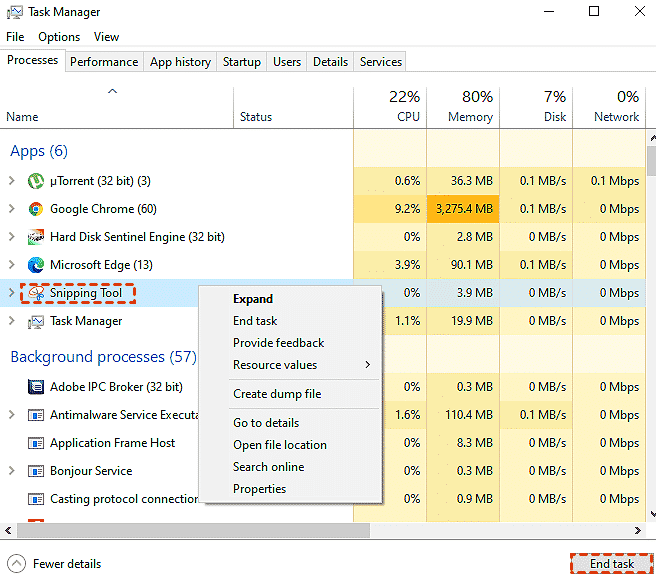
Step 1. Use Ctrl + Shift + Esc to open the Task Manager, find and select the Snipping Tool at the bottom of the Processes tab, and tap the End Task button at the bottom right corner.
Step 2. Then click File in the upper left corner, select Run new task, type SnippingTool.exe in the window, and click OK.
Step 3. Click the Start button, check Restart in the Power option, and wait for your computer to finish restarting. Try to open Snipping Tool again and see if it works, if it still doesn't work, please go to the next method.
Method 2. Authorize the Snipping Tool Background Application Permissions
If you cannot open the Snipping Tool via the Hotkey, it may be because the application has not acquired background application permissions. To do so, you need to grant permission to the application, the next steps are in Windows 11 for example.
Step 1. Use Windows+I to open Windows Settings.
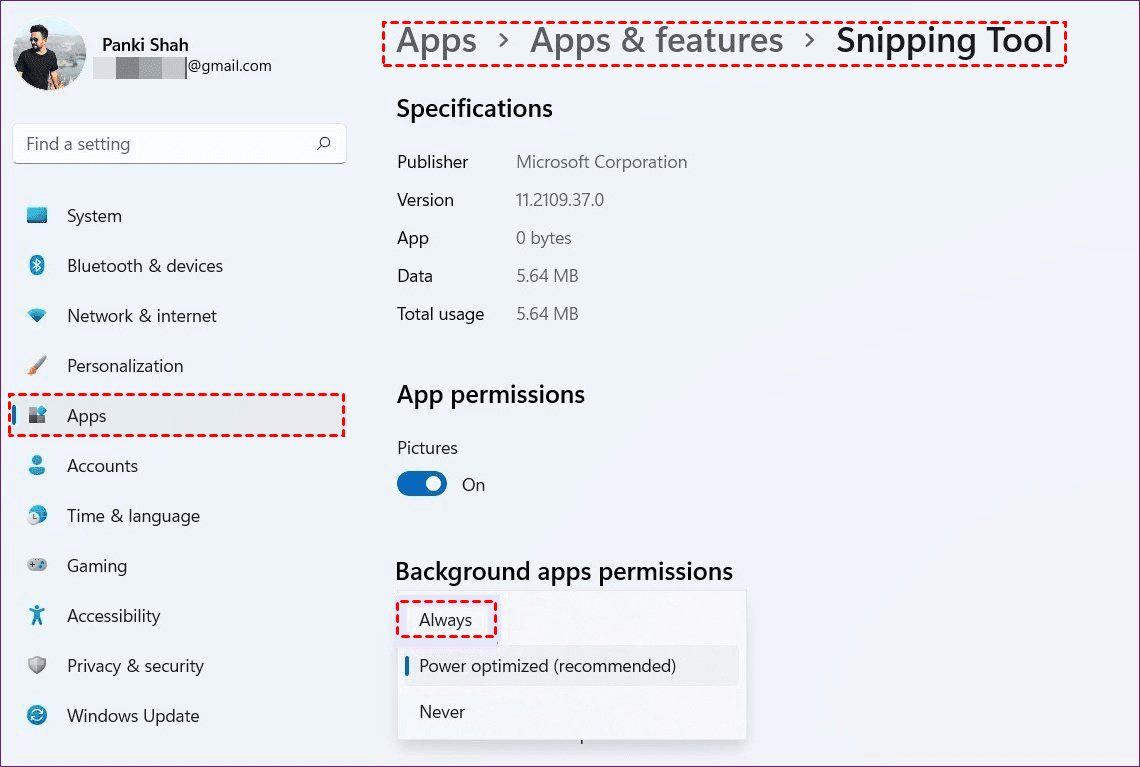
Step 2. Switch to the Apps tab in the left panel and select Apps & Features in the right panel.
Step 3. Find Snipping Tool and click ⋮ on the right side, and select Advanced Options in the expanded menu.
Step 4. In the menu of background application permissions, select the Always option.
Method 3. Repair or Reset the Snipping Tool
Fixing or resetting the Snipping Tool will help resolve the issue of the Snipping Tool not working, the next steps are based on Windows 11 as an example.
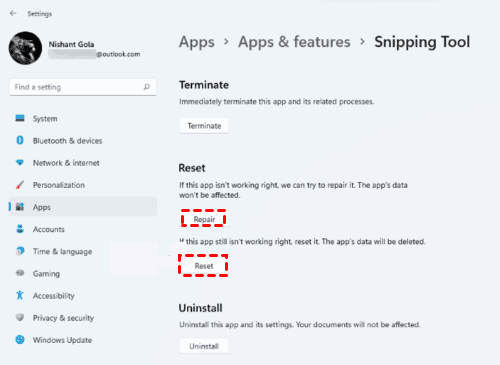
Step 1. Type Snipping Tool in the search box at the bottom and select App settings.
Step 2. In the Reset section, select the Repair or Reset button according to your needs to repair or reset the snipping tool.
Method 4. Change the Shortcut
The default shortcut for Clipping Tool is Windows+Shift+S. If it doesn't work, you can choose to reset the shortcut.
Step 1. Type Snipping Tool in the search box and click on the Open file location option.
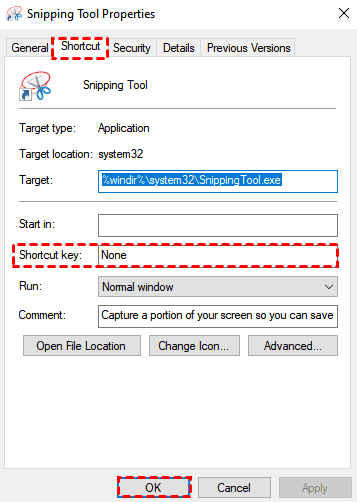
Step 2. Right-click Snipping Tool and select Properties in the expanded menu.
Step 3. Switch to the Shortcut tab and click the Shortcut key option, change "None" to any key (for example F5) on the keyboard to set the shortcut automatically, then click Apply and OK to save the changes.
Method 5. Troubleshoot using Windows Applications
Both Windows 10 and Windows 11 have built-in troubleshooting applications that can help you solve the problem of snipping tool not working, the next steps take Windows 11 as an example.
Step 1. Use the Windows+I key combination on the desktop to open Settings.
Step 2. Switch to the System tab in the left panel and select the Troubleshoot option in the right panel.
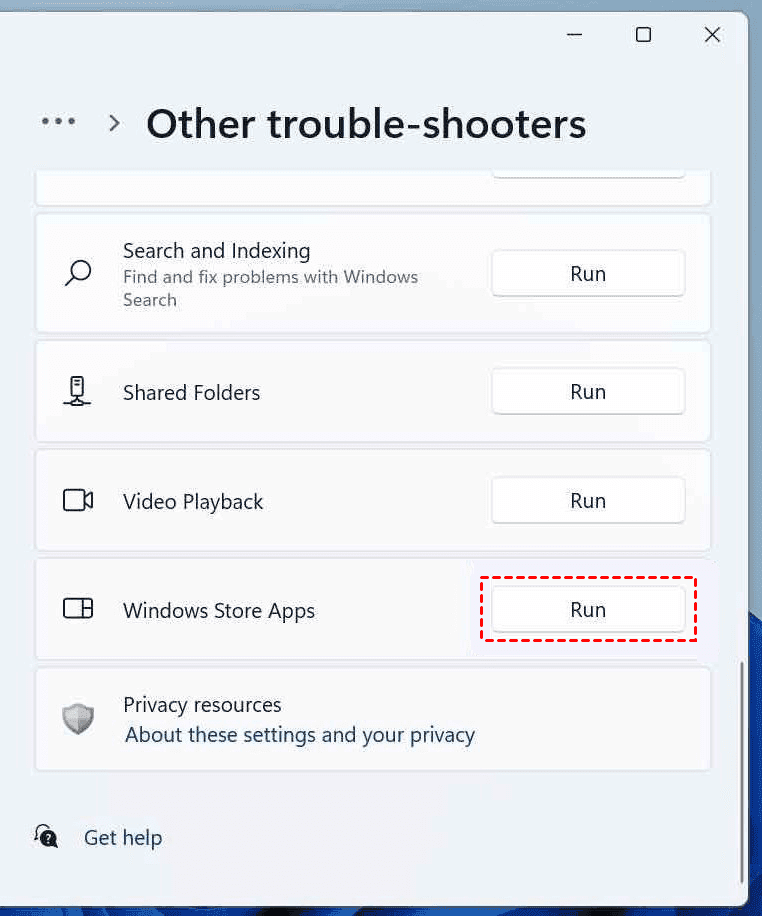
Step 3. then click the Other trouble-shooters option and open the corresponding list.
Step 4. At the bottom of the list, find the Windows Store Apps option and click on the Run button next to it. A diagnostics window will appear next and wait for Windows to finish diagnosing automatically.
Method 6. Update Windows Version
Outdated versions of Windows can cause problems with the snipping tool not working, for this reason, you need to update your Windows system in time. The next steps are based on Windows 11 as an example.
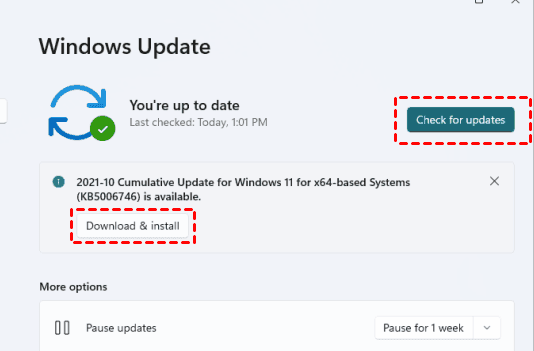
Step 1. Use Windows+I to open Windows Settings and select the Windows Update tab in the left panel.
Step 2. In the right panel, tap the blue Check for updates button, if there is an update, tap the Download and install button, wait for this update to complete, and restart your computer.
Method 7. Change the Date and Restoring
This method is provided by Microsoft technical staff, if you are a user who upgraded to Windows 11 before October 30, 2021, you can try this method to fix the clipping tool not working issue. The next steps are based on Windows 11 as an example.
Step 1. Use Windows+I to open Windows Settings, select the Time & language tab in the left panel, and tap Date & time in the right panel.
Step 2. Turn off the Set time automatically option and tap the Change button in the Manually set date and time option.
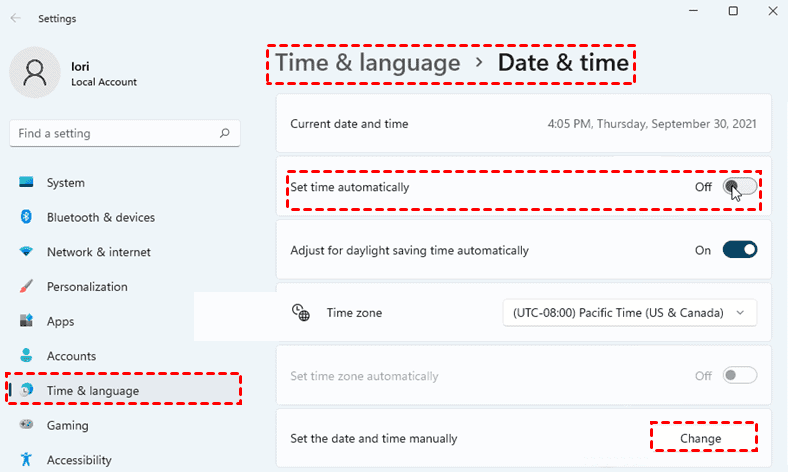
Step 3. Change the date to October 30, 2021, and keep this setting. Please note that you do not need to change the time, if you want to change back to the current date, you can follow the above steps and turn on the Set time automatically option.
Method 8. Use Older Versions of Applications
If you are upgrading from Windows 10 to Windows 11 within the last 10 days, then you can directly use the old version of Windows 10 application.
Step 1. Navigate to the following path and find SnippingTool.exe and copy it to your scrapbook.
C:/Windows.old/Windows/System32/
Step 2. Navigate to the following path and paste the SnippingTool.exe you copied before.
C:/Windows/System32/
Step 3. Follow the same method as above and copy the SnippingTool.exe.mui file from the following path and paste it into the next path.
- C:\Windows.old\Windows\System32\en-US\
- C:\Windows\System32\en-US\
Note: If any file duplication prompt appears during the above copy and paste process, please choose to replace all files.
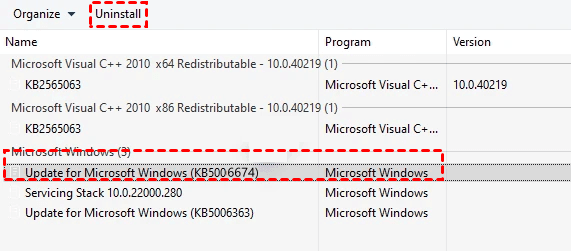
Method 9. Uninstall Security Update KB5006674
If you are using Windows 11, when you update KB5006674, some significant changes will be made to the Snipping Tool, which may cause this application to not work. For this, you will need to uninstall security update KB5006674, the next steps are for Windows 11 as an example.
Note: Uninstalling update KB5006674 will result in the loss of the right-click context menu, Profile Explorer, Display and Personalization menus, so please choose carefully.
Step 1. Use Windows+I to open Windows Settings and select the Windows Update tab in the left panel.
Step 2. Select the Update History option in the right panel. At the bottom of the Update History window, locate and tap the Uninstall Updates option.
Step 3. Find the security update KB5006674 in the update list, tap the Uninstall button at the top, and confirm this action. Restart your computer and see if the problem has been resolved, if not, go to the next method.
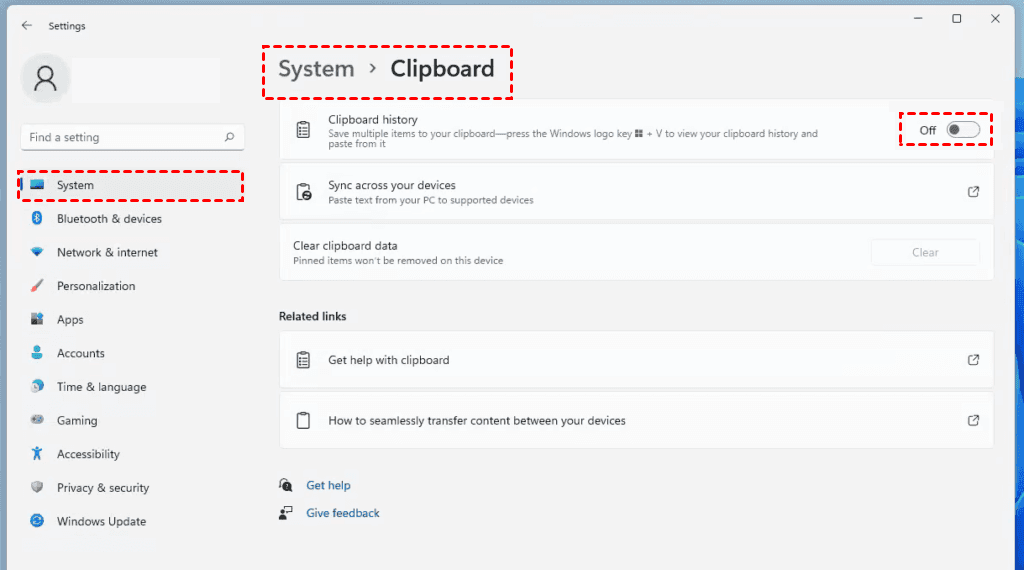
Method 10. Enable Scrapbook History
The snipping tool copies screenshots to the scrapbook mainly by using the quick keys, when history logging is disabled, it may cause errors in this process and lead to the problem that Windows 11 snipping tool not working. For this, you need to enable Scrapbook History, the next steps are in Windows 11 as an example.
Step 1. Use Windows+I to open Windows Settings.
Step 2. Switch to the System tab in the left panel and select Clipboard in the right panel.
Step 3. Turn on the Clipboard history option at the top.
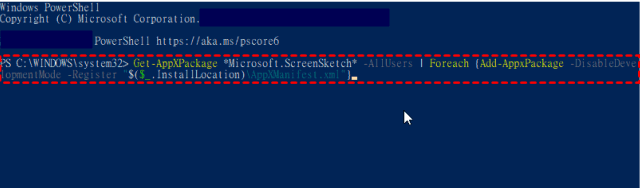
Method 11. Reinstall the Snipping Tool
Reinstall the snipping tool can effectively solve the problem that the snipping tool not working, the next steps take Windows 11 as an example.
Step 1. Right-click on the Start button and select the Windows PowerShell (System Administrator) option from the expanded menu.
Step 2. Enter the following command and press Enter to execute the command.
get-appxpackage *Microsoft.ScreenSketch* | remove-appxpackage
Step 3. Restart your computer and open Windows PowerShell (System Administrator) again.
Step 4. Enter the following command and press Enter to execute the command.
Get-AppXPackage *Microsoft.ScreenSketch* -AllUsers | Foreach {Add-AppxPackage -DisableDevelopmentMode -Register "$($_.InstallLocation)\ AppXManifest.xml"}
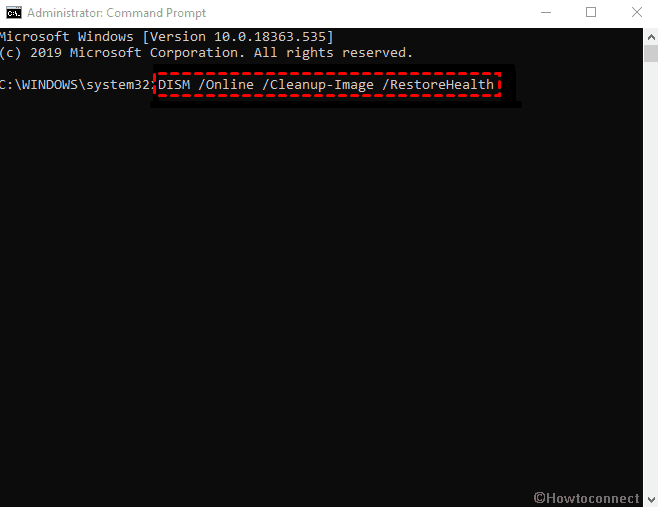
Method 12. Run SFC scan and DISM Check Tool
System File Checker (SFC) is a built-in tool in Windows that scans and repairs corrupted system files in it, while DISM Checker tool checks, and repairs corrupted image system files. These two tools can be used together to solve the problem of the clipping tool not working in Windows 11, the next steps to Windows 11 as an example.
Step 1. Type cmd in the search box and select Run as administrator.
Step 2. In the Command Prompt window, type sfc /scannow and press Enter to execute this command.

Step 3. Wait for the above command to complete, restart your computer, then open the command prompt character window as described above, type DISM.exe /Online /Cleanup-image /Restorehealth, and press Enter to execute this command.
Method 13. Find and Remove Conflicting Applications
When third-party applications conflict with the Clipping Tool, it may cause problems with Windows Snipping Tool not working. For that, you need to find these conflicting applications and uninstall them.
Find conflicting applications
Step 1. Use Windows+R to open the Run window, type MSConfig, and press Enter.
Step 2. Switch to the Services tab at the top of the System Settings window and check the Hide all Microsoft services checkbox in the lower left corner.
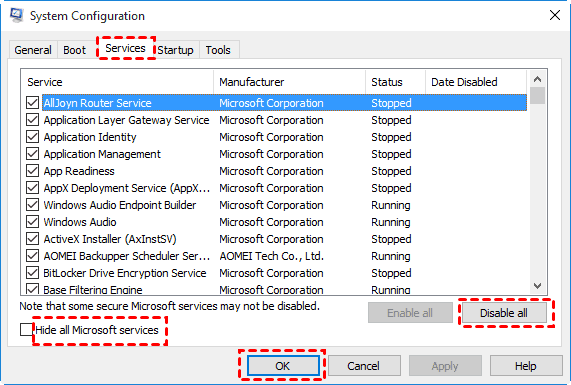
Step 3. Next, you need to find and check the recently installed applications and tap the Disable all button at the bottom right.
Uninstall conflicting applications
After disabling a specific application and Snipping Tool is back to normal, then you can uninstall the application as follows.
Step 1. Use Windows+R to open the Run window, type Appwiz.Cpl and press Enter.
Step 2. Find the conflicting application in the Programs and Features list, select Uninstall, and confirm the uninstallation and restart your computer.
Method 14. Disable Focus Assist
Focus Assist helps you filter unwanted notifications on your computer, but in some cases, it may also block notifications from clipping tools. For that, you need to disable Focused Assist.
Step 1. Type Focused Assist in the search box, find and open it.
Step 2. Tap on the Customize priority list below the Priority only option.
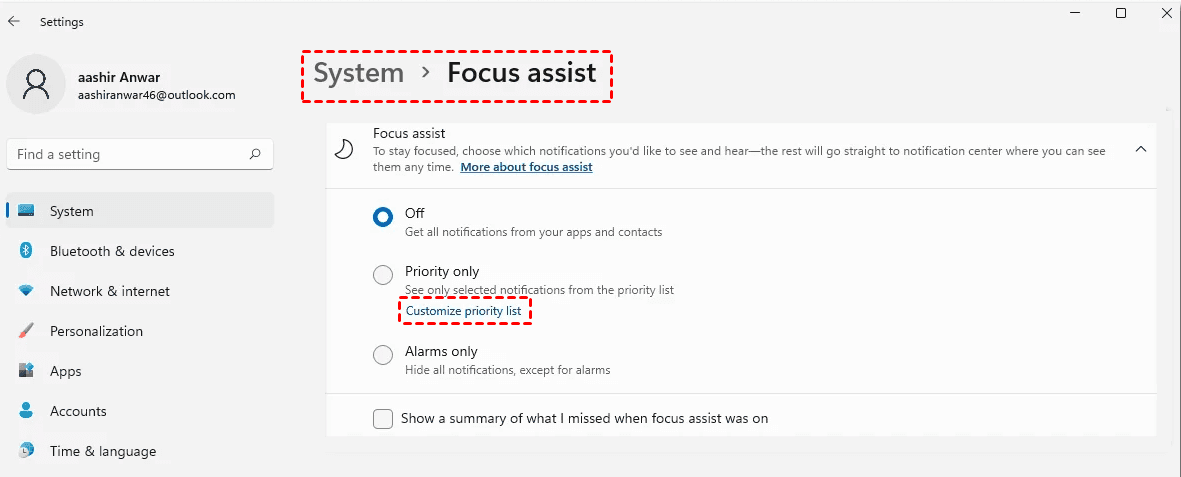
Step 3. In the Apps section, tap the Add Application button to add Snipping Tool to the priority notification list.
Method 15. Use the New Snipping Tool
If none of the above methods help you to solve the problem that the snipping tool does not work, then you can choose to use a new third-party snipping tool, and you can find many similar tools simply by searching the web. Choose one of these free snipping tools as an alternative to Microsoft's built-in snipping tool.
Method 16. Enable the Snipping Tool in Group Policy
From the results of some users' feedback, enabling Snipping Tool in Group Policy can solve the problem of the application not working.
Step 1. Type gpedit.msc in the Run window and press Enter.
Step 2. Navigate to: Computer Configuration > Administrative Templates > Windows Components > Tablet PC > Accessories, and double-click in the right panel to turn on “Do not allow Snipping Tool to run”.
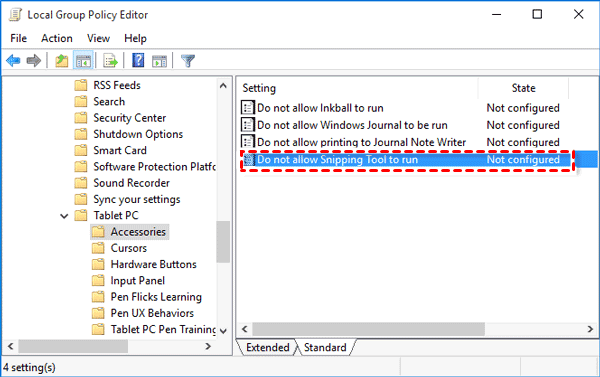
Step 3. In the new window, select the Not yet set button and click Apply and OK in order to save the changes.
Method 17. Restart Windows File Explorer
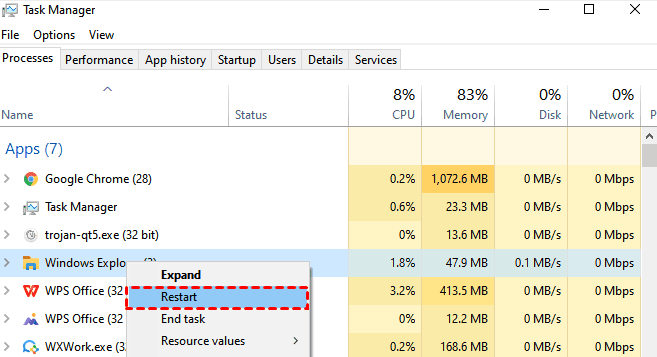
The Snipping Tool is a subset of the File Explorer, and when the File Explorer is unresponsive, the Snipping Tool will also be unresponsive. To do this, you need to restart Windows Explorer.
Use Ctrl + Shift + Esc to open the Task Manager, locate and select Windows Explorer under the Processes tab, right-click on it and select the Restart option in the expanded menu.
Method 18. Reset Your Computer
If none of the 17 methods mentioned above can help you solve the problem of the clipping tool not working, then there remains one last method, resetting your computer, which can have the effect of reinstalling the operating system, which will help solve the problem.
Step 1. Use Windows+R to open Windows Settings and select the Windows Update tab in the left panel and Advanced Options in the right panel.
Step 2. In the Other Options section, find and tap Recovery.
Step 3. Under the Recovery option, find Reset this computer and tap the Reset PC button next to it.
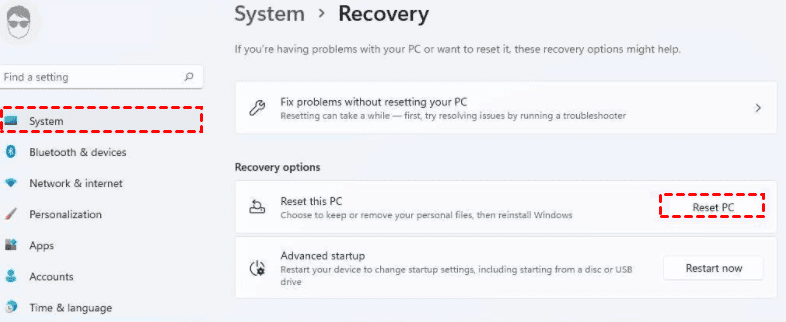
Step 4. Select the Keep my files option and follow the prompts to reset your computer.
Get the Snipping Tool Back to Normal Quickly without Resetting
When you encounter the snipping tool does not work in Windows 11, you can use the above 18 methods in order, which should help you solve the problem. To prevent similar problems from occurring again, it is recommended that you use AOMEI Backupper Standard to back up your system after solving the Clipping Tool not working problem, so that you can quickly restore your system to a normal state through the system image archive after a problem occurs.
AOMEI Backupper Standard provides you free and professional system backup service, and it works well with Windows 11/10/8.1/8/7/Vista/XP, etc. It allows you to set a fixed time, such as Daily, Weekly or Monthly, to run scheduled backups.
After setting up a scheduled backup, the software will run your scheduled backups in incremental backup method by default. This backup method will backup only the changed or new parts, which can effectively improve backup efficiency and help you save more storage space.
Before you start the backup process, you need to download AOMEI Backupper Standard first and install it on your computer. If you are a Windows Server user, you can choose AOMEI Backupper Server. Then you can follow the graphic tutorial below.
Step 1. Open AOMEI Backupper Standard and click Backup > System Backup.

Step 2. You can modify the Task Name to distinguish it from other backup tasks. The software will select the system and boot partitions by default as the source. Please select a destination path for your system.

Notes:
- Schedule Backup: You can set the fixed intervals to run the system backup task automatically such as daily, weekly, monthly event trigger or USB plug in. The last two are available in the Pro version.
- Backup Scheme: You can select different backup methods (Full/Incremental/Differential backup) based on your own needs and enable automatically backup cleanup feature. And Differential backup and cleanup feature are supported by the professional version or higher versions. You can upgrade and enjoy them.
Step 3. Confirm all your operations and click Start Backup to perform the system backup.

If you also want to provide additional security for your computer, you can use AOMEI Backupper Standard's Disk Backup and Partition Backup functions to provide security for all data on disks and partitions.
In addition, you can use the System Clone feature to copy or transfer your system to another disk and make sure it is safe to boot. If you want to secure the data on the disk, you can use the disk cloning feature to securely copy all the data on the disk to another disk.
Summary
When you encounter the problem that the snipping tool not working, you can go through this article to understand the specific cause and try the 18 methods listed in this article in turn, which I believe can help you solve this problem or other similar problems.
In order to prevent you from having similar problems again, we recommend you to use AOMEI Backupper Standard to backup your system so that you can restore your system to normal state quickly when problems occur.
While AOMEI Backupper Standard is free, it is also professional enough to let you complete system backup easily. You have the flexibility to set different frequencies to back up your system on a regular basis. Incremental backup method can help you improve the efficiency of your scheduled backups.
In addition, the software can provide you with features such as file backup and basic sync, providing full protection for your computer.

