How to Solve Secure Boot Status Disabled on Lenovo Laptops
You can know reasons of Secure Boot status disabled and how to check and fix it. Finally, it is recommended to backup your Lenovo system to prevent data loss.
By Miya Updated on September 7, 2023
User Case: Disable Secure Boot on Lenovo IdeaPad Gaming 3
“Hey, folks! So, I was messing around with my Lenovo laptop and stumbled upon this issue Boot status disabled on my Lenovo IdeaPad Gaming 3. I'm not exactly sure what it means or if it's a good or bad thing. Can someone enlighten me? Thanks in advance for any help!.”
If you also have Secure Boot status disabled on Lenovo devices like this user, don't worry. This article will tell you why this error occurs and give you a detailed solution. And finally a complete backup solution for your devices. Make sure that you never lose your data by accident. Read on to find out more!
Why Is Your Secure Boot Status Disabled On Lenovo Devices?
Here are a few reasons why the Secure Boot status might be disabled on Lenovo devices:
- Legacy or incompatible operating systems: Secure Boot requires operating systems to be digitally signed, and sometimes older or unsupported operating systems may not meet this requirement. In such cases, Secure Boot may need to be disabled to install and run these operating systems.
- Driver or hardware compatibility: Occasionally, certain drivers or hardware components may not be digitally signed, which can prevent Secure Boot from functioning properly. Disabling it temporarily might be necessary to ensure compatibility and functionality.
- Troubleshooting or diagnostic purposes: If you're experiencing boot-related issues or need to perform advanced troubleshooting, disabling Secure Boot can help in diagnosing and resolving the problem.
Remember, while disabling Secure Boot may be necessary in some situations, it's generally recommended to keep it enabled to maintain the security of your system.
How to Enable Secure Boot Status on Lenovo?
Secure Boot was initially developed to safeguard against malware attacks. Its primary function is to alert you if your computer's bootloader has been tampered with by a virus, preventing the system from booting and thwarting potential further harm.
Now, let's talk about fixing the Lenovo Secure Boot status disabled error and enabling Secure Boot. Fortunately, below are some methods that can help you address this issue. Keep reading to find out more about each method and their specific details.
☎ Preparations:
Before diving into any further steps, it's a good idea to verify the status of the Secure Boot option in the System information.
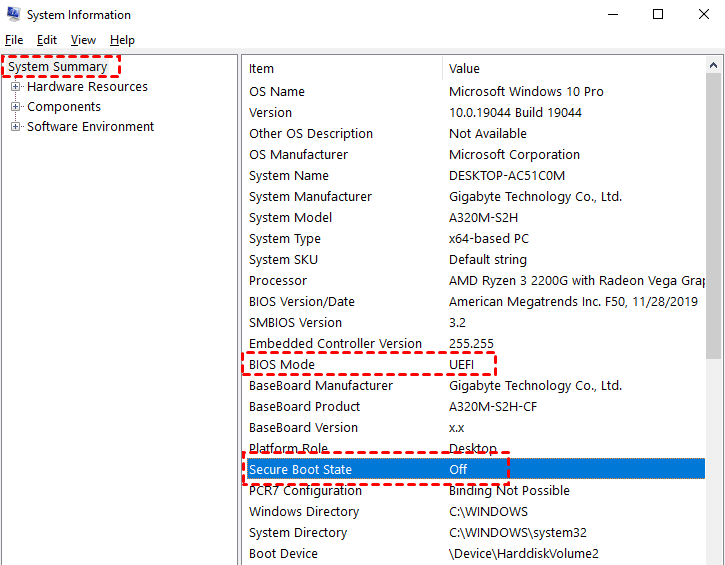
Step 1. Simply go to the Windows search bar and type msinfo32, then hit Enter.
Step 2. This will open the System Information window. Click on System Summary.
Step 3. On the right side of the screen, locate the BIOS Mode and Secure Boot State entries. If the BIOS Mode displays UEFI and the Secure Boot State shows Off, it means that Secure Boot is currently disabled.
☎ Now, you'll need to make Secure Boot status enabled on Lenovo. Here are detailed steps:
Step 1. Remove any graphics cards, hardware components, or operating systems that are not compatible with Secure Boot. Make sure your system only includes compatible elements.
Step 2. Access the PC BIOS menu. Typically, you can enter this menu by pressing a specific key during the boot-up process, such as F1, F2, F12, or Esc. The key to accessing the BIOS menu may vary depending on the brand of your computer.
Step 3. Locate the Secure Boot setting within the BIOS menu and change it to Enabled. This will enable the Secure Boot feature on your system.
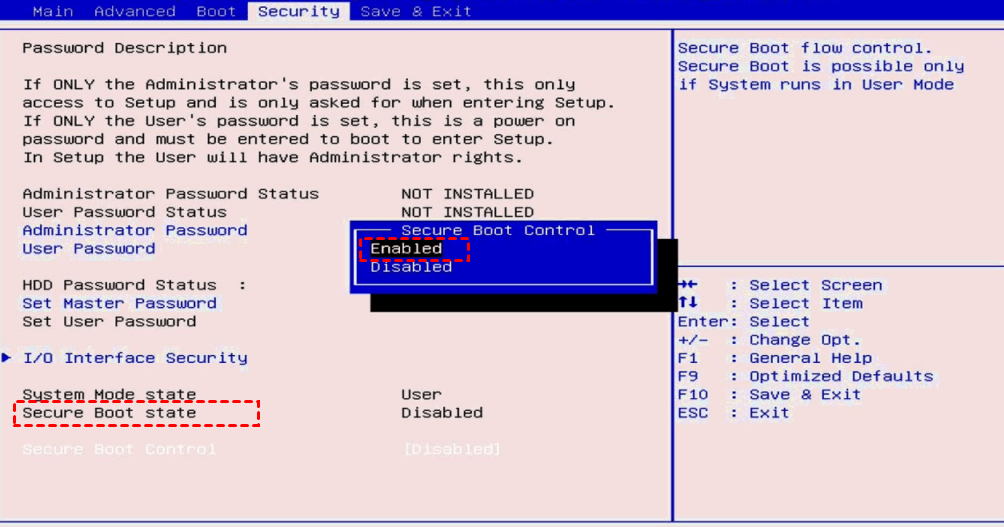
Step 4. Save the changes you made by pressing the F10 key. This will prompt the system to save the updated BIOS settings. Afterward, proceed to restart your PC.
☏ Tip: In case your PC encounters booting issues after enabling Secure Boot, return to the BIOS menus, disable Secure Boot, and attempt to boot the PC once more.
✍ Lenovo Indicates Secure Boot is Disabled Despite Being Enabled (Solved)
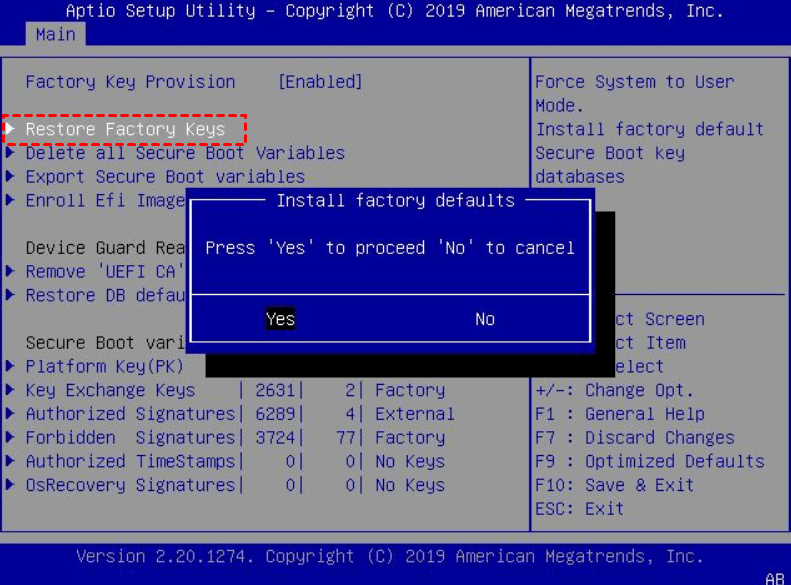
Some Lenovousers have encountered a discrepancy where the system information shows Secure Boot status disabled on Lenovo devices, even though it is actually enabled from the BIOS settings. To address this, you can resolve the issue by restoring the Factory Keys in your BIOS.
Step 1. Begin by accessing the BIOS on your computer. Navigate to the Security tab and locate the Secure Boot option. From there, select Restore Factory keys.
Step 2. In the Install factory defaults window, simply press the Enter key to initiate the process of resetting the factory defaults.
Step 3. After making the necessary changes, save the modifications by selecting the Save option and exit the BIOS window.
Step 4. Return to the BIOS menu and navigate to the Main section. Verify that the UEFI Secure Boot is enabled in the settings.
Backup Your Lenovo OSto Prevent Data Loss
It's important to stay cautious while attempting the repair methods, as a misstep in any step could lead to the failure of your Lenovo computer. Therefore, it is crucial to back up your computer to safeguard your data. When it comes to system backup to protect against hard drive failures or system crashes, it's wise to rely on secure and dependable backup software.
Fortunately, you can rely on the top-notch free backup and restore software called AOMEI Backupper Standard. It not only allows you to back up your system at no cost but also offers a range of backup functions to comprehensively safeguard your data.
✌ Schedule Backup: With this software, you can easily schedule automatic system backups on a daily, weekly, monthly, event triggers or USB plug in basis. This ensures that you always have the most up-to-date version of your system backup.
✌ Flexible Compression Levels and Backup Modes: Choose from different compression levels (High/Normal/Low) or take advantage of the Intelligent sector backupmode. These options help reduce the size of system/disk image files and backup time significantly.
✌ Multiple Target Paths: Back up your Lenovo system to various destinations, including NAS devices, local disks, external disks, HDDs, SSDs, SD cards, and USB flash drives. Enjoy the flexibility of choosing the backup location that suits your needs.
✌ Wide Compatibility: This software smoothly runs on all Windows PC operating systems, including Windows 7/8/8.1/10/11/Vista/XP. If you're running a server system, you can opt for the AOMEI Backupper Serverversion for enhanced capabilities.
To continuously back up your Lenovo computer using AOMEI Backupper, follow these step-by-step instructions:
Step 1. Download the AOMEI Backupper freeware onto your PC. Install the software and launch it. Once launched, click on the Backup option on the main page and select System Backup.

Step 2. To differentiate it from other backup tasks, you have the option to modify the Task Name. By default, the software will automatically select the system and boot partitions as the source. Now, it's essential to choose a destination path for your backup task.

✐ Tip: Backup Scheme: Enabling this feature helps conserve disk space by automatically deleting older backups. Please note that this feature is available in the professional version or higher versions of the software.
Step 3. Double-check all your settings and operations. Once you are satisfied, click on the Start Backup button to initiate the system backup process.

Summary
In this article, you will discover easy solutions to resolve the issue of Secure Boot status disabled on Lenovo computers. Additionally, you will learn how to perform continuous system backups using the best free backup software, AOMEI Backupper Standard.
This software is not only an excellent backup software, it is also a data transfer software that can transfer data from 8.1 to Windows 11. Try it now!