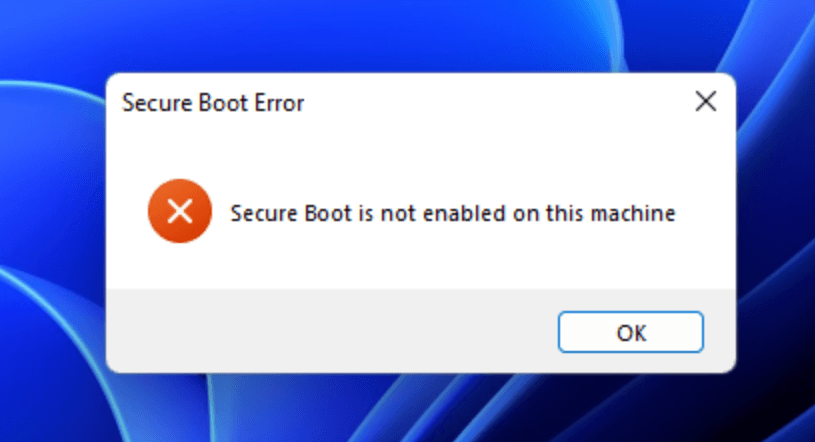
Top Fixes to Secure Boot is Not Enabled on This Machine
Got the Secure Boot is not enabled on this machine error and don't know how to fix it? Don’t worry, you will be provided with effective methods here. And you can master an easy way to continuously protect your computer data.
By Clytze Updated on December 5, 2022
User case
Secure Boot is not enabled on this machine on Windows 11
I recently downloaded FIFA 23 on my Lenovo Legion 5i (Windows 11). When I started the game it said, "Secure Boot is not enabled on this machine". I googled this issue and found instructions that would allow me to check the status of and enable Secure Boot.
I followed the instructions in word, which led me to the BIOS and UEFI Firmware Settings. In the security tab, I found the toggle to enable/disable Secure Boot and enabled it. After the system restarted, having applied the setting, I checked System Information again only to find that Secure Boot is still off. What should I do? Any suggestions would be appreciated!
- Question from Microsoft Community
About Secure Boot is not enabled on this machine error
Secure Boot was originally designed to prevent malware intrusion. In fact, what it can do is to warn you when your computer’s bootloader has been modified by a virus and refuse to boot, avoiding any further damage that may be caused.
How to fix this error? How to enable Secure Boot? Luckily, there are some methods listed below for you to fix Secure Boot is not enabled on this machine error. Just continue reading to learn more details.
Steps to check Secure Boot status
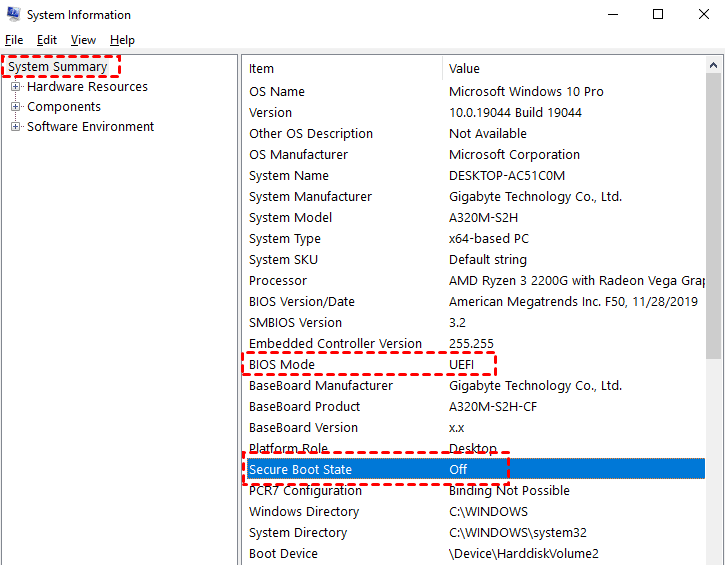
Before all the action starts, you could check whether the Secure Boot option is enabled or disabled in System information.
1. Go to Windows search bar, type msinfo32 and press Enter.
2. Then the System Information window will open. Tap System Summary.
3. On the right side of the screen, navigate to BIOS Mode and Secure Boot State. If BIOS Mode shows UEFI, and Secure Boot State shows Off, then Secure Boot is disabled. Then you’ll need to switch to the next method to enable it.
How to Enable secure boot on Windows 11
1. Uninstall any graphics cards, hardware, or operating systems that aren’t compatible with Secure Boot.
2. Open the PC BIOS menu. You can often access this menu by pressing a key during the boot up sequence, such as F1, F2, F12, or Esc. (Each brand of computer has different hotkeys).
3. Find the Secure Boot setting, and set it to Enabled.
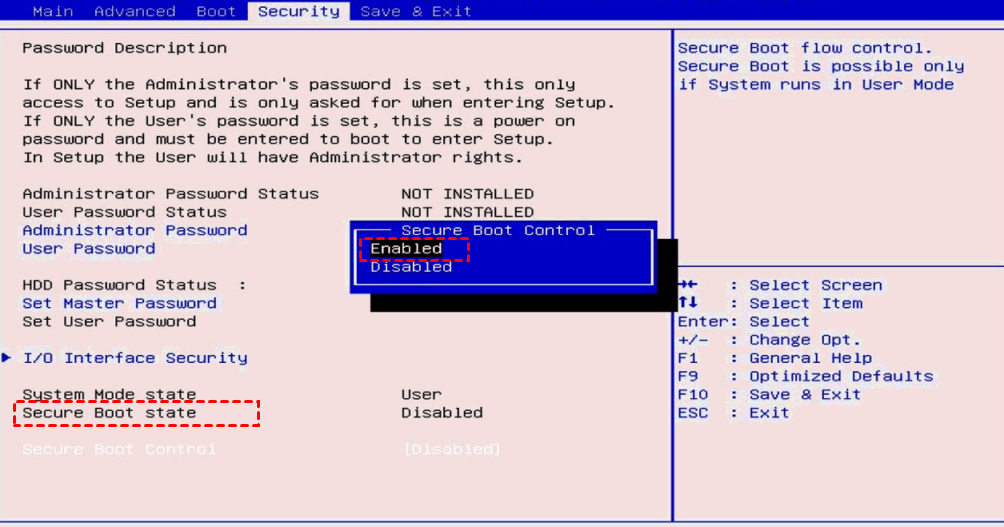
4. Press F10 to save changes and exit. And then reboot this PC.
Tip: If the PC isn't able to boot after enabling Secure Boot, go back into the BIOS menus, disable Secure Boot, and try to boot the PC again.
Fix: Secure Boot is enabled but Windows 11 says it's not
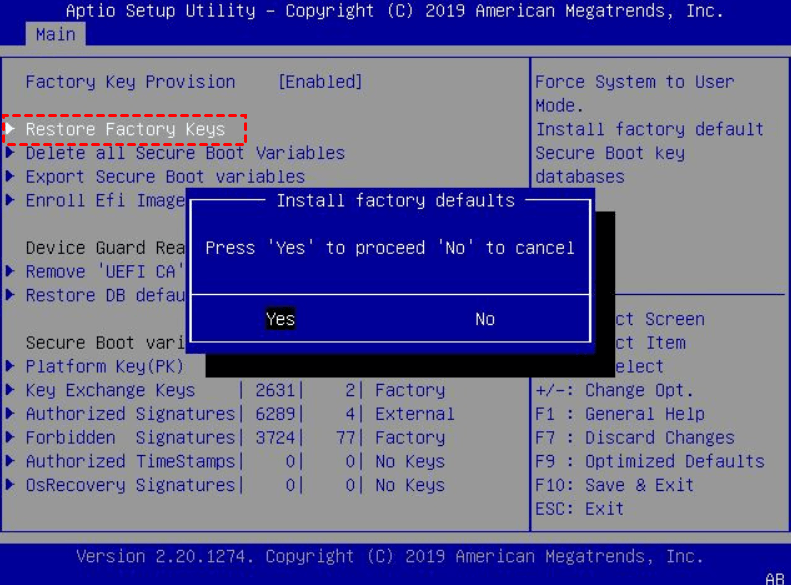
While checking system information, some users reported that the Secure Boot is disabled, though the feature is already enabled from BIOS on Windows 11 devices. Due to such situation, you can restore the Factory Keys on your BIOS to fix this issue.
1. Open BIOS on your computer. Go to the Security tab, then Secure Boot > Restore Factory keys.
2. On the Install factory defaults window, hit Enter to reset factory defaults.
3. Save the changes and exit the window.
4. Go to BIOS again, navigate to Main and check if UEFI Secure Boot is enabled.
Special case: Fix FIFA 23 “Secure Boot is not enabled on this machine”
With the launch date of FIFA 23 coming up, the fans could not be more excited. However, as all games do, FIFA 23 early access has bugs and issues. Many PC users were unable to start the FIFA 23 through EA or Origin properly and getting a security violation error occurs. If you are unfortunate enough to be affected by the Secure Boot error in FIFA 23, don’t panic, we will figure out these troubles one by one in the following parts.
Method 1. Perform a simple restart
A simple restart is often the solution to numerous errors. If you got the error of “Secure Boot is not enabled on this machine”, just close the game and restart your device. Once the restart is completed, relaunch the game to check whether the issue was solved.
Method 2. Run FIFA 23 as administrator
Run FIFA 23 and EA applications as an administrator. If you are entering the game from origin instead of EA you need to set this setting for origin as well.
1. Right-click on the application and click Properties > Compatibility.
2. From here click the box next to “Run this Program as an administrator” option. Do the same for the launcher that you’re using, either EA Play or Origin.
3. Then you need to restart the game again and check if the issue is fix or not.
Method 3. Reinstall Anti-cheat
1. Head over to the file directory of the Anti-cheat folder. Go to Steamlibrary > steamapps > common > FIFA 23 > Installer > EAAntiCheat.
2. Click on the EA Anti-Cheat Installer application file that you find in that folder.
3. A window will open. Click on the drop-down arrow and select (Installed) FIFA 23.
4. Next, click on Uninstall and let the process be completed.
5. When you see the text Uninstall success, click on install to begin the reinstallation process.
6. Close the window when it is successfully installed. Then try to relaunch FIFA 23 to check if this method fixed the error.
Always backup your Windows 11 PC to prevent error occurs
You need to be alert to the fact that when you are performing the repair methods, a mistake in any step can cause your computer to fail, so it is vital to backup your computer. When you need to perform a system backup to protect your operating system in case of a hard drive failure or system crashes, you need to rely on a safe and reliable backup software.
Luckily, the best free backup and restore software – AOMEI Backupper Standard can help a lot. It not only helps you backup your system for free, but also provides various backup functions to protect your data in all aspects.
🧱Schedule Backup: This software allows you to set scheduled automatic system backup on a daily, weekly or monthly basis, so you can always keep the latest system backup version.
🧱Different compression levels and backup modes: You can select the compression levels (High/Normal/Low) or use its Intelligent sector backup mode to help you greatly reduce the size of system/disk image files and backup time.
🧱Multiple target paths: You can backup your system to different destination locations, including backup Windows 11 to NAS devices, local disk, external disk, HDD, SSD, SD cards, USB flash drives, etc.
🧱High compatibility: It is designed to run smoothly on all Windows PC operating systems including Windows 7/8/8.1/10/11/Vista/XP. You are capable to use AOMEI Backupper Server version if you are running a server system.
How to backup your computer continuously with AOMEI Backupper step by step:
Step 1. Download this freeware on your PC, install and launch it. Then select System Backup after clicking Backup in the main page.

Note this will backup all contents of Windows 11 system partitions, including system files, boot related partitions (EFI system partition and recovery partition, etc.), application and user profile files of the system disk, etc.
Step 2. You can modify the Task Name to distinguish it from other backup tasks. The software will select the system and boot partitions by default as the source. Please select a destination path for your backup task.

► You can make your backup tasks more flexible:
💥Options: Allows you to add comments to Windows 11 system backup tasks and enable email notifications for free, and after upgrading to higher versions, you can also enable encrypted backups to improve the security of Windows 11 system backups.
💥Schedule Backup: You can set the fixed intervals to run the system backup task automatically such as daily, weekly, monthly event trigger or USB plug in. The last two are available in the Professional version.
💥Backup Scheme: Enable this will help you save the target disk space by deleting the older backups. And this feature is supported by the professional version or higher versions.
Step 3. Confirm all your operations and click Start Backup to perform the system backup.

Wrapping things up
This article shows you how to solve Secure Boot is not enabled on this machine easily as well as how to perform continuous system backup with the best free backup software AOMEI Backupper Standard.
You are also capable of making Windows 11 USB creator with AOMEI Backupper to boot your computer in case of unforeseen problems such as system failures and boot errors.

