Guide: Restore SSD Performance Securely with the 2 Easy Ways
When you have used an SSD for a while, its performance may decrease a lot. Thus you could try the methods here to secure erase it and make it nearly new. Read on the catch the details below.
By Clytze Updated on November 21, 2022
What causes SSD performance degradation?
The performance degradation of SSDs is related to the way it is stored, which uses NAND chips to store data. When we delete data from the SSD in Windows, we actually just make a “writable” mark on the location where the data is stored, but do not thoroughly wipe them. Over time, the NAND chip will gradually accumulate junk data that was deleted by the system but not actually deleted.
It is not until the location needs to be re-written that the system performs an “erase” operation and then writes new data. If the file is simply deleted and not visible, but the source is still present on the SSD, the SSD’s storage space will fill up over time, resulting in a degradation of SSD performance.

How to restore SSD health with 2 secure methods
You should know that manually deleted data can be easily recovered, the same goes for a formatted drive. Therefore, to for restoring its performance, all you need is to secure erase SSD on Windows 10 before you write new data to the SSD. Here I would like to show you secure and easy methods for you to finish this task effortlessly.
Method 1. Enable SSD TRIM command
Trim is an advanced feature of SSDs that requires both SSD hardware and operating system support. This feature is specifically designed for SSD performance degradation. When the operating system deletes data, it notifies the SSD host chip of the SSD area that is marked as "writable".
At this point the host chip will consider the area to be "erasable" and will erase the data in that area within a certain amount of time, rather than having to wait until the next write to erase the data, thus ensuring that the SSD is in a good performance state.
Nowadays most SSDs come with the TRIM features enabled by default. If you want to check if your SSD is enabled with TRIM feature, you can follow the steps to check it manually.
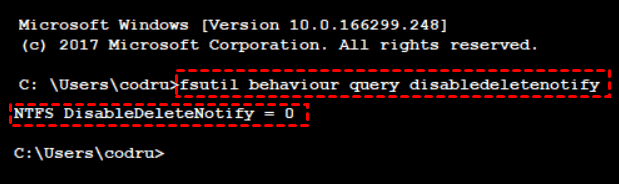
1. Type cmd in the start menu, select Command Prompt from the list, and choose Run as Administrator.
2. When the command window pop up, type “fsutil behavior query disabledeleteNotify” and hit Enter.
3. If TRIM is enabled, it will display “DisableDeleteNotify=0”. Else if the value “DisableDeleteNotify=1” is displayed that indicates the TRIM is disabled.
Tip: If TRIM isn’t enabled and you’d like to enable it, you can manually do so by running the following command in an Administrator Command Prompt window: fsutil behavior set DisableDeleteNotify 0.
Method 2. Secure erase SSD on Windows 10 with best wipe tool
To learn how to improve SSD performance, the best disk wiping tool AOMEI Backupper Professional can help a lot. It has a Disk Wipe feature that allows you to securely erase an SSD to reset its performance to factory settings. It is designed to be supported on all PC operating systems including Windows 11/10/8/7/Vista/XP. And with its help, you can:
📌 Besides SSD, you can erase hard drives, USB drives, as well as SD cards. Erase all brands of disks, including Samsung, SanDisk and WD, Crucial, etc.
📌 You can choose to wipe an entire disk, a selected partition, wipe free space on Windows 11, or unallocated space using this software to meet your various needs.
📌 As an all-in-one data protection solution, Disk Wipe is just one of the features of AOMEI. It provides outstanding backup and restore services to help you avoid the risk of data loss. For example, you can backup SSD files before wiping.
Follow the graphical steps below to tackle how to refresh SSD with AOMEI Backupper Professional.
Step 1. Download and install this disk wiping tool on your PC to have a try.
Step 2. Launch AOMEI Backupper Professional, click Tools from the left panel and then select Disk Wipe.

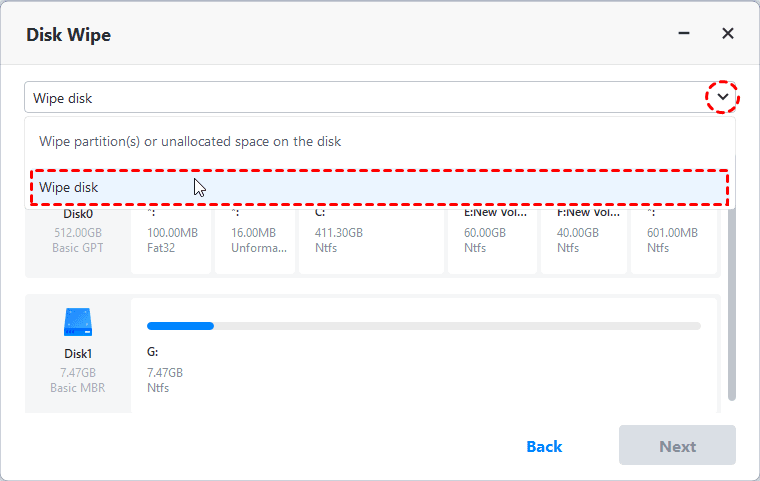
Step 3. Then you will be asked to select your desired wiping type. You will be offered 2 types: Wipe partitions or unallocated space and Wipe disk. Choose the latter one to wipe all sectors on the SSD and then click Next.
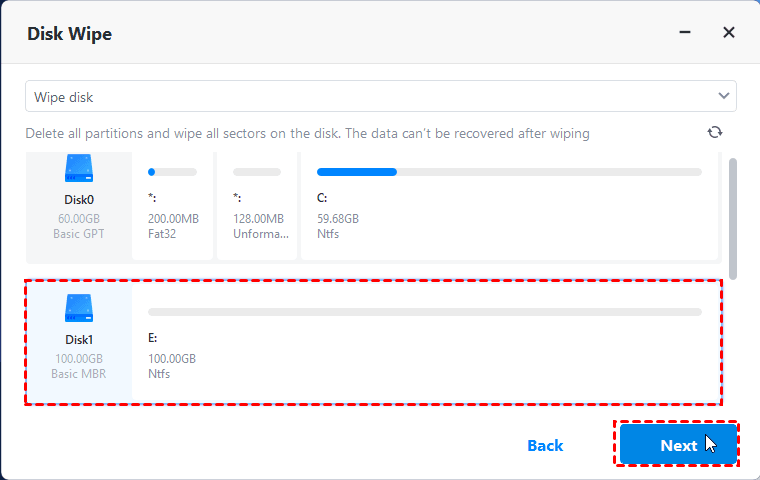
Step 4. Select the SSD you want to wipe and click Next to continue.
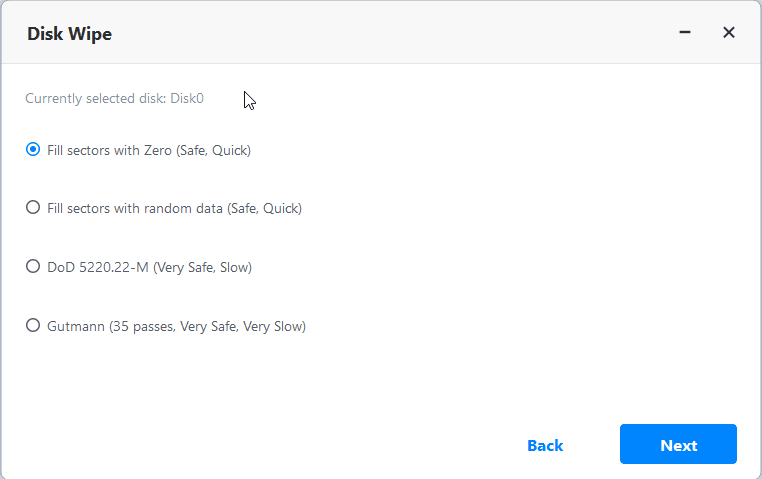
Step 5. Then you need to choose the wiping method and hit Start to begin the wiping process. You are provided with 4 options: Fill sectors with Zero, Fill sectors with random data, DoD 5220.22-M, or Gutmann.
✐ Tips:
✉ This feature doesn’t support wiping dynamic disks currently.
✉ If you are wiping system disk of the current computer, this software will create Windows PE environment automatically and restart your computer to complete this task. Please don’t stop it during the process.
FAQ: Does secure erase harm the SSD lifespan?
This depends on how many times the "secure erase" overwrites each unit. Too many unnecessary erase will uniformly reduce the lifetime of the entire drive, as each block must be erased once before it can be overwritten with new data again. As long as you use professional tools to securely erase the SSD a reasonable number of times it is unlikely to affect its lifespan.
Wrapping things up
Now you know how to restore SSD performance after reading this article. Having known the causes of SSD performance degradation, you should note that manually deleted data can be easily recovered, the same goes for a formatted drive, thus you need to do a totally SSD wiping task. AOMEI can satisfy your demands as it offers multiple wiping methods with different security levels.
In addition to the Disk Wipe feature, as the best data protection solution for Windows, it also gives you the ability to clone SSD to SSD on Windows 11 to protect the data before wiping it.

