OneDrive Won't Uninstall in Windows 10 - 4 Ways to Help You
You will learn 4 ways to fix OneDrive won't uninstall in Windows 10 and be sure it's completely uninstalled. And it's essential to select a way to protect files now!
By Ivy Updated on October 17, 2022
Why Is OneDrive not Uninstalling?
Onedrive won't sync and won't uninstall
For some reason, Onedrive has stopped syncing on both of my computers. I was able to uninstall it on one and re-install it and got it to work on my laptop. However, when I go to add/remove programs on my desktop, the cursor spins for a bit, stops, and that is that. Nothing happens. When I try to install Onedrive again, I get an error that it must be uninstalled first. So now I am stuck with a Onedrive program that will not sync.
- Question from Microsoft

OneDrive (cloud storage device from Microsoft) comes installed with Windows 10 and is enabled by default as long as you sign in with a Microsoft account. Using it you can store, view, edit and share them from or to any other computers, tablets, or phones.
But it also takes up a lot of resources and space, thereby slowing down computer performance. And some users still report that OneDrive stops syncing files for no apparent reason. In view of this, many users want to uninstall it completely or sync files in a flexible way, although Microsoft does not allow it.
OneDrive Won't Uninstall in Windows 10 - How to Uninstall It
Although Microsoft does not allow you to uninstall OneDrive, you still can do it with the following methods. And it's divided into two parts, namely uninstall OneDrive and delete all the related folders. Here I'll introduce you to the first part.
Since Windows 10 Home users do not have the access to group policy editor, so they don't have this option. Thus, if you are a Windows 10 Home user, you could consider uninstalling OneDrive using Programs and Features in Control Panel.
Way 1. Uninstall OneDrive from Programs and Features
If you are Windows 10 Home users, try the following steps:
1. Press Windows + R to open Run dialog, type control and tap OK to open Control Panel.
2. Then, select Programs and then Programs and Features in the Control Panel window.
3. Find and right-click Microsoft OneDrive in the Programs and Features window, then select Uninstall(U) to start the process of uninstalling Microsoft OneDrive in Windows 10.
.png)
Way 2. Uninstall OneDrive from Command Prompt
Uninstalling Microsoft OneDrive from command prompt requires you to end OneDrive first and then uninstall OneDriveSetup.exe in the root folder.
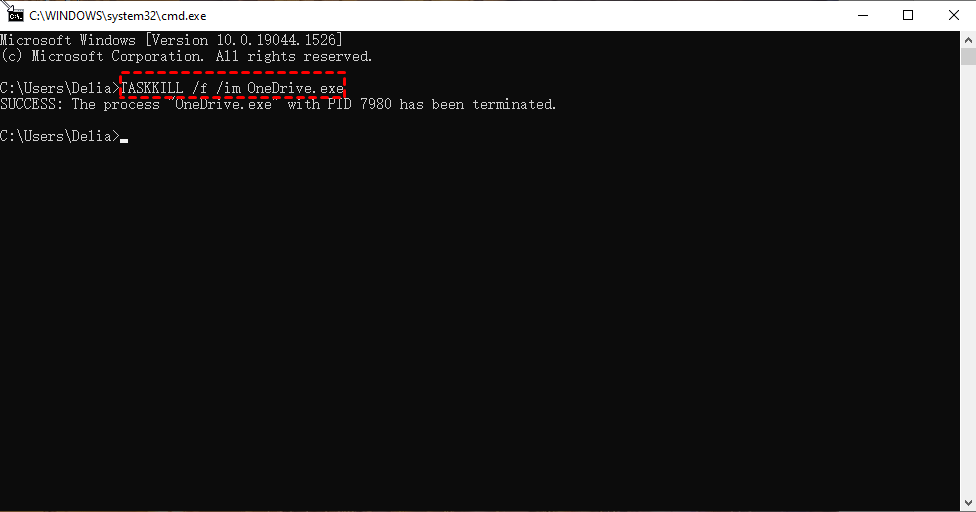
1. Type cmd in the search box and select Run as administrator.
2. Type TASKKILL /f /im OneDrive.exe in the command prompt window and press Enter to execute it.
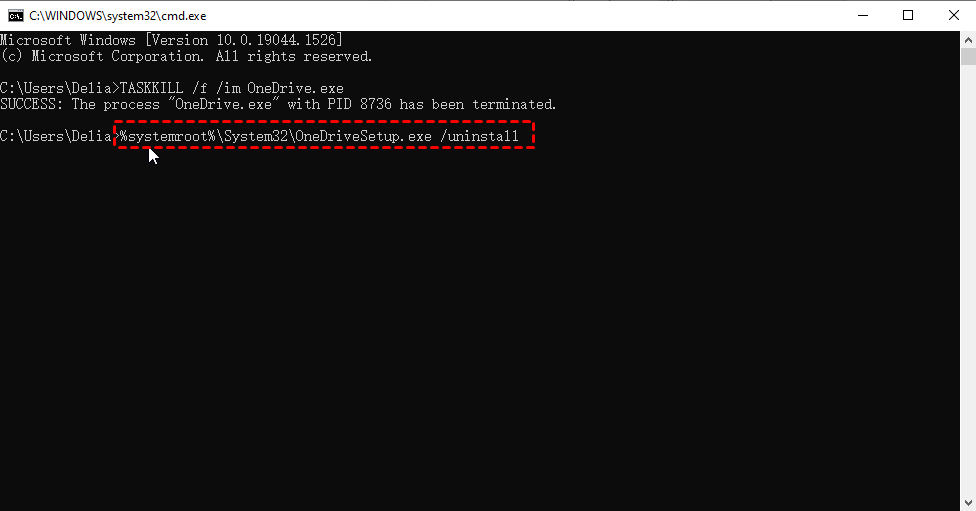
3. Enter the following command and press Enter to uninstall OneDrive in Windows 10:
For 32-bit systems: %systemroot%\System32\OneDriveSetup.exe /uninstall
For 64-bit systems: %systemroot%\SysWOW64\OneDriveSetup.exe /uninstall
The command, once executed, will immediately uninstall OneDrive from your computer and you will not receive any confirmation prompt. If you want to reinstall OneDrive, open the command prompt as described above and enter the following command.
>> For 32-bit systems: %systemroot%\System32\OneDriveSetup.exe
>> For 64-bit systems: %systemroot%\SysWOW64\OneDriveSetup.exe
Way 3. Remove OneDrive from File Explorer
Both Programs and Features and Command Prompt can help you uninstall Microsoft OneDrive in Windows 10, but the icon still exists in the File Explorer window. In this case, you need to remove OneDrive from File Explorer using the Registry Editor.
1. Open the Run dialog, enter regedit and click OK.
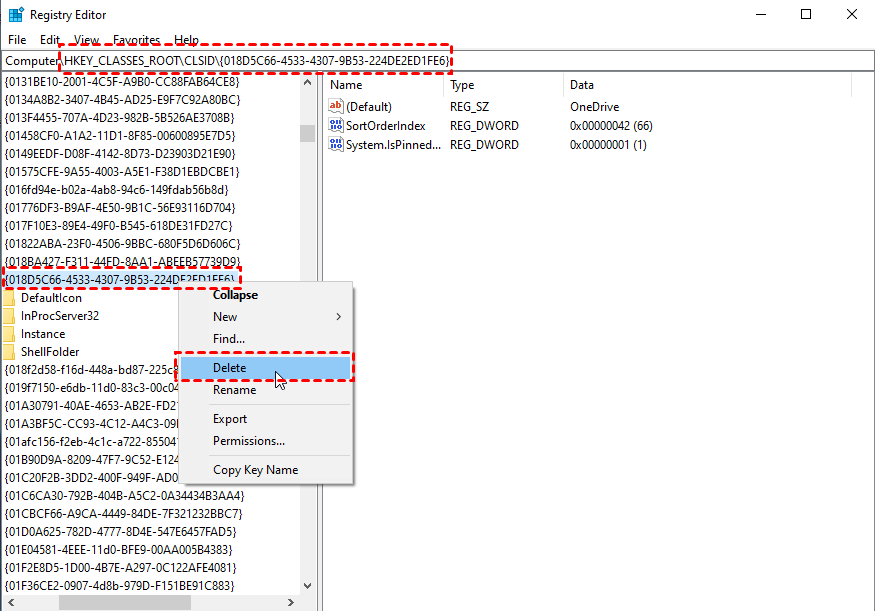
2. In the Registry Editor window, navigate to the following path, right-click it and select Delete(D) in the expanded menu.
HKEY_CLASSES_ROOT\Wow6432Node\CLSID\{018D5C66-4533-4307-9B53-224DE2ED1FE6}
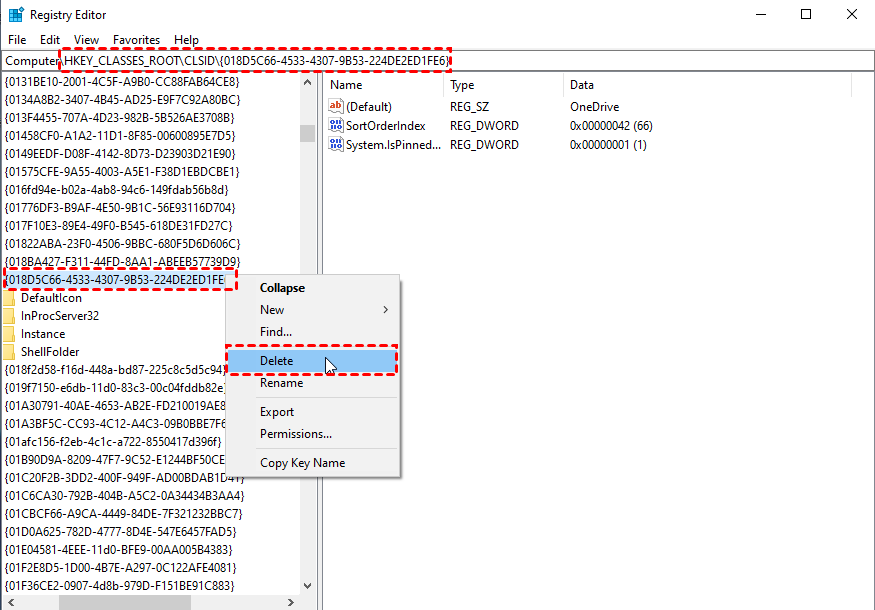
3. Then, navigate to the following path, right-click it and select Delete(D). Afterward, close the Registry Editor and restart your computer to make it effective.
HKEY_CLASSES_ROOT\CLSID\{018D5C66-4533-4307-9B53-224DE2ED1FE6}
Way 4. Uninstall OneDrive from Local Group Policy Editor
1. Open the Run dialog, type gpedit.msc and click Enter to open Local Group Policy Editor.
2. Then, navigate to the following path, click OneDrive and then double-click Prevent the usage of OneDrive for file storage from the right pane.
Computer Configuration > Administrative Templates > Windows Components > OneDrive
3. Here tick Enabled option. And then, click Apply and OK to completely disable access to OneDrive and it will also be removed from File Explorer.
If you are not satisfied with just disabling OneDrive and want to uninstall it completely, use command prompt in the Way 2.
Delete All the OneDrive Files to Uninstall OneDrive Completely
After uninstalling OneDrive using the above methods, you will find that OneDrive is not completely uninstalled. And there are some files and empty folders left. So you still need to delete them from your computer.
Delete the Rest of the OneDrive Files
Uninstalling OneDrive does not mean that all the files are deleted at the same time, some folders will still remain. If you want to delete these remaining files, you can refer to the following steps:
- Press Windows+ S key together to open Search box and enter %UserProfile%, and open it.
- Search for OneDrive in the opened folder and delete it.
- Then, follow the above steps to search and delete OneDrive files in %LocalAppData% and %ProgramData% folders respectively.
Clean Empty Folders from Registry Editory
If you still find empty OneDrive folders after uninstalling OneDrive, you can clean up those folders by doing the following steps:
1. Open the Run dialog, enter regedit, and click OK.
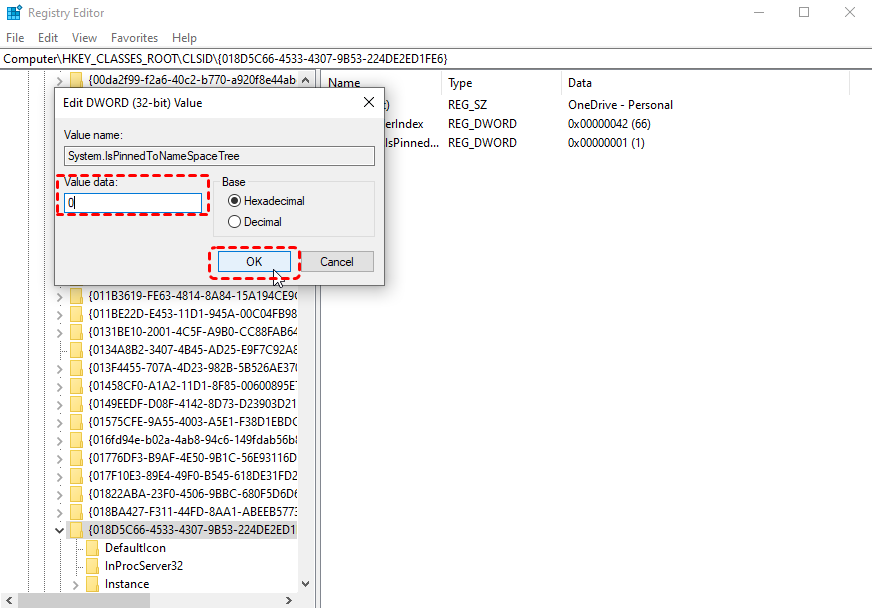
2. Navigate to the following path, find and double-click the System.IsPinnedToNameSpaceTree file.
HKEY_CLASSES_ROOT\CLSID\{018D5C66-4533-4307-9B53-224DE2ED1FE6}
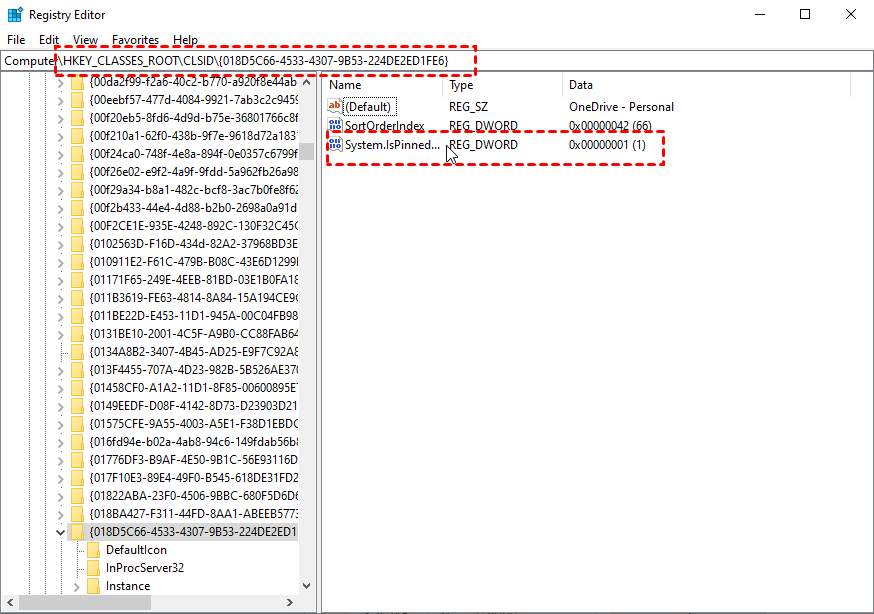
3. In the new window, change its value from 1 to 0 and click OK to save your change. And then, close it and restart your computer.
Simply Disable or Reset OneDrive in Windows 10
If you don't want to uninstall Microsoft OneDrive completely, you can choose to disable or reset OneDrive with the following methods.
Unlink Microsoft OneDrive through OneDrive Settings
In some versions of Windows 10, you cannot uninstall OneDrive. If you are in such a situation, you can choose to disable it and stop the sync process. Please note that this method does not hide the OneDrive icon in the Taskbar and the Profile Explorer.
1. Right-click the OneDrive icon in the taskbar and then click Help & Settings > Settings.
2. Go to the Account tab and click Unlink this PC > Unlink account to disable OneDrive in Windows 10.
Uninstall OneDrive in Windows 10 using PowerShell
If you don't want to completely uninstall OneDrive, you can reset it from PowerShell.
1. Type powershell in the search box and select Run as administrator.
2. Type the following commands one by one and press Enter after each one. Please ignore any errors if you receive it during the process.
👉 Stop-Process -processname "OneDrive" -ErrorAction SilentlyContinue
👉 Start-Process "$env:LOCALAPPDATA\Microsoft\OneDrive\OneDrive.exe" /reset -ErrorAction SilentlyContinue
👉 Remove-Item -Path "HKCU:\Software\Microsoft\OneDrive" -Force -Recurse
👉 Remove-Item -Path "$env:LOCALAPPDATA\Microsoft\OneDrive" -Force -Recurse
👉 Move-Item -Path "$env:ONEDRIVE" -Destination "$env:ONEDRIVE Backup"
👉 try {Start-Process "$env:SYSTEMROOT\System32\OneDriveSetup.exe"} catch {Start-Process "$env:SYSTEMROOT\SysWOW64\OneDriveSetup.exe"}
Pause OneDrive Syncing on Windows 10
If you only want to disable OneDrive temporarily without uninstalling and disabling it, the best option is to pause file syncing.
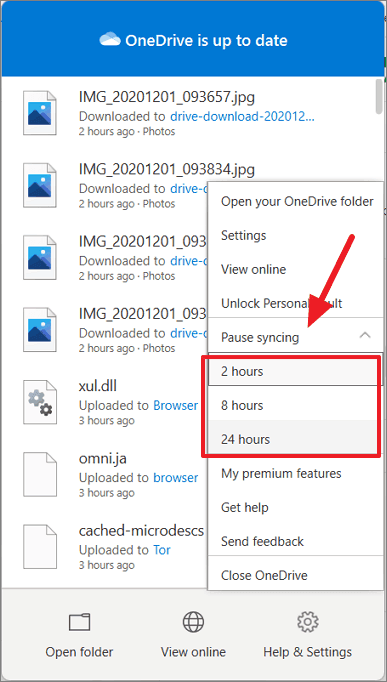
Find the OneDrive icon in the notifications area of the Windows taskbar and click it.
Click Help&Settings, then click the Pause Syncing option. According to your needs, you can choose to disable it for 2 hours, 8 hours, or 24 hours.
Disable Certain Folders in OneDrive
If you just want to disable certain folders in OneDrive, you can follow the steps:
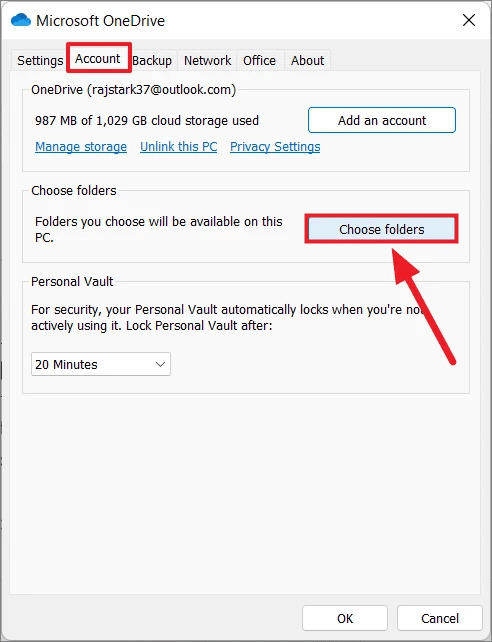
1. Open the OneDrive Settings window and then switch to the Account tab.
2. Click Choose folders and then uncheck the folders you no longer want to sync. And then click the OK button.
Onedrive won't Sync and won't Uninstall - How to Protect Files Safely
No matter what your purpose is for uninstalling OneDrive in Windows 10, you can choose one of the methods above and delete all the OneDrive files or empty folders. Afterward, you urgently need to think about how to protect the files, because your files are not protected. Here are some good choices in the following:
👍 If you want to continue using OneDrive, it's suggested to simply use it as a cloud drive and sync files to OneDrive with the best free file sync software. And usually, it will be more flexible in sync items and settings.
👍 You can also backup or sync files to cloud drives automatically like Dropbox or Google Drive.
👍 Except for cloud drives, you can still sync files to external hard drive, USB drive, or NAS and network location.
According to the 3-2-1 backup strategy, the best way is to create 3 copies of your files and save them to 2 different locations. In view of this, you can choose two or more ways to protect your files.
For file sync software, I strongly recommend you AOMEI Backupper Standard. It allows you to sync files in diferent systems (Windows 11/10/8/7/Vista) and different frequencies, such as, daily, weekly, monthly, etc. By default, it will sync only changed files, but not include the deletions. You can also enable it in the sync options.
How to start syncing?
Firstly, you need to download and install AOMEI Backupper Standard. For server users, try AOMEI Backupper Server, whether you are currently using Windows Server 2003, 2008, 2012, 2016, 2019 or the latest server 2022.
Then, launch this software and sync files with the following steps.
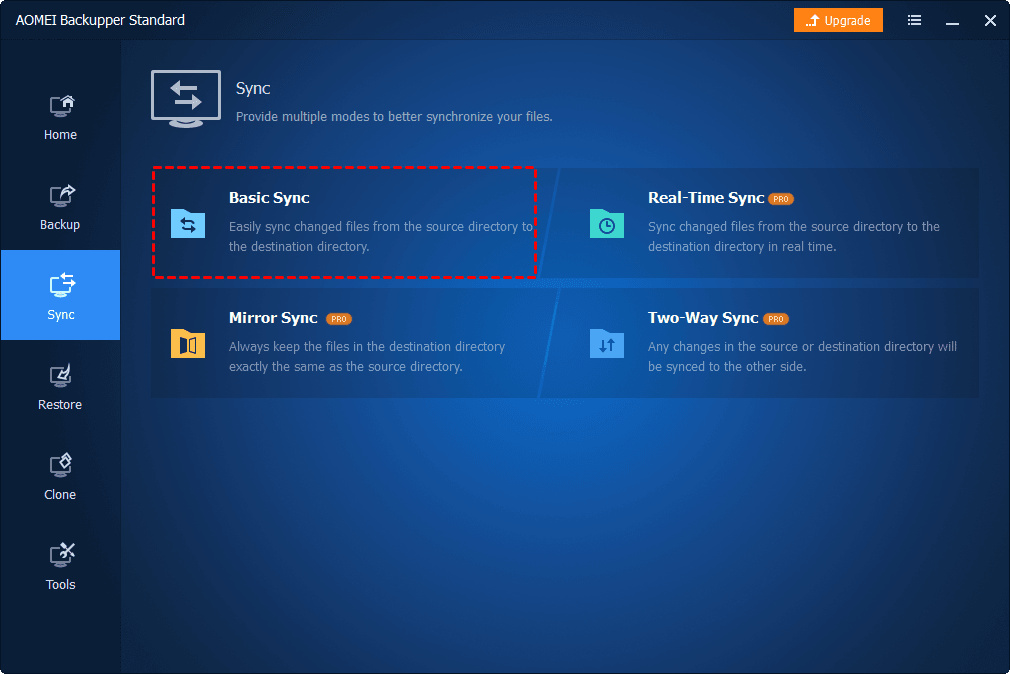
1. On the main page, tap the Sync tab on the left, and select Basic Sync.
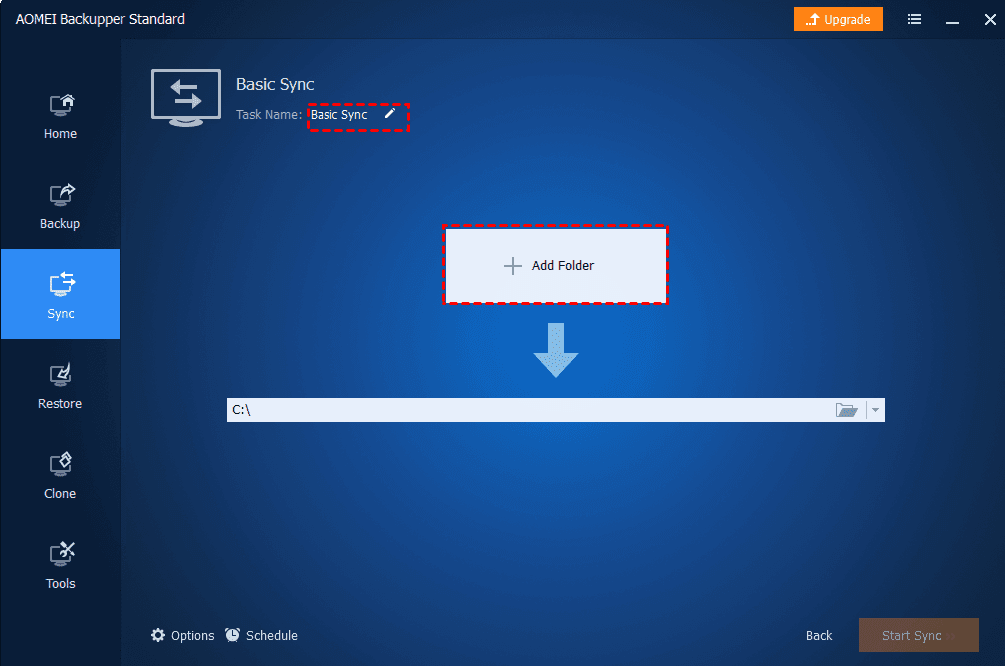
2. Click Add Folder to choose any folder you want to sync. In addition, you can tap the pencil icon upper left to change the task name to distinguish it from others.
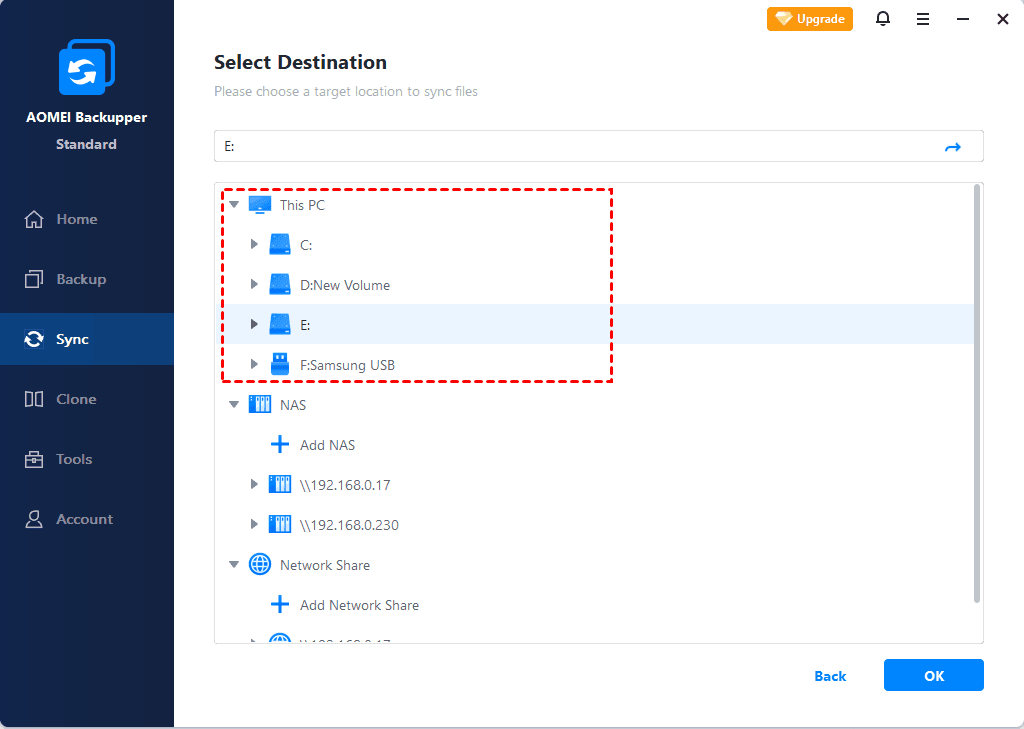
3. Then, click the second box and select a destination path to store your files. You have 3 options in the following:
- Select a local path: It allows you to sync files to an internal or external drive, USB thumb drive. Note you need to insert them and be sure it's recognized.
- Add Share or NAS Device: It is capable of adding network location or NAS device as long as you know its IP address and has the access priority.
- Select a cloud drive: It is able to sync files to any cloud drive if you install it on your computer. All of them will be listed in the Select Cloud window.
5. After selecting the destination folder, please tap the Start Sync button. In daily use or for long-term data protection, you still need to set email notification or daily, weekly, monthly schedule sync.
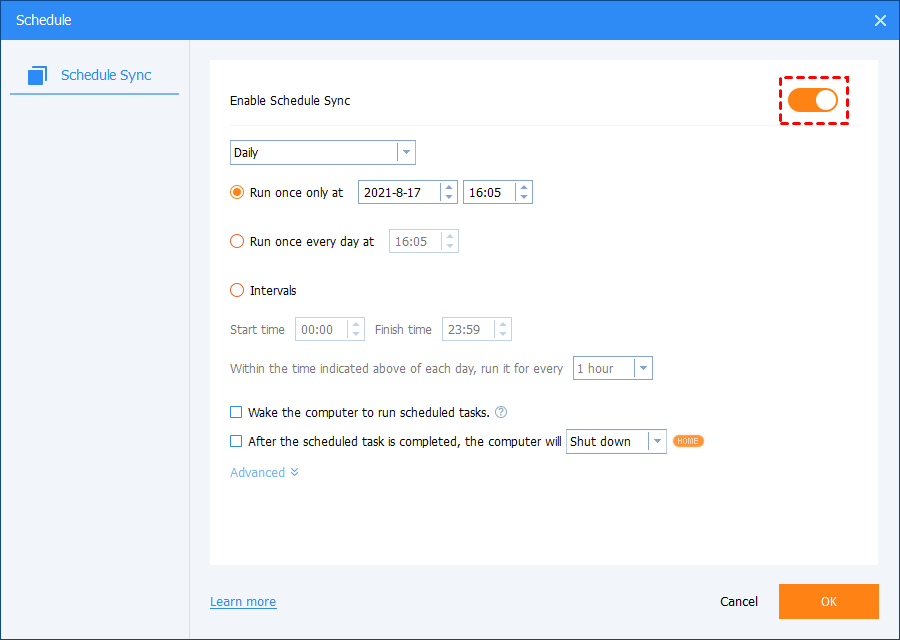
❕ Also you can try event triggers, and USB plug-in, but it requires an upgrade to the professional version. And the last one is recommended since it will copy files automatically when USB drive plugged in.
✊ Tips on sync files based on your purpose:
In addition to the basic synchronization, its advanced edition still provides you with other sync solutions:
- Mirror Sync: It allows you to make an exact copy of files on the source directory and mirror folder to the destination directory. And you cannot make any changes in the destination directory, such as, modify or delete files already in it, or add new files to it.
- Real-Time Sync: It is to sync files immediately once you made any change to files in the source directory. It's the most effective way to keep data intact.
- Two-Way Sync: It will sync files from source directory to destination and vice versa as long as you make changes in either directory. It's suitable for team collaboration most.
Conclusion
You can easily uninstall, disable or reset OneDrive with above methods and you don't need to worry about OneDrive won't uninstall problems. And it's essential to select a way to protect your files, since it's not protected now.
You can follow the 3-2-1 backup strategy to backup or sync files, no matter which way you use, you still need the best free software - AOMEI Backupper Standard to help you. It not only allows you to sync files to external drive, USB thumb drive, NAS or network location, cloud drive etc, but also allows you to selectively sync files and make it run automatically. For safer way, try file backup feature.