How to Fix NTFS File System Blue Screen
How to fix NTFS file system blue screen? Based on understanding the cause of this error, repair it with the 16 methods listed in the article and master another way to back up your disk data.
by Yuka Updated on November 1, 2022
User Case: NTFS File System Blue Screen Issue
"My Dell laptop has been running fine. Until I traveled for a while and turned it back on when the entire screen turned blue and displayed the stop code error: NTFS file system. I tried restarting the computer as instructed above, but the same error occurred again and it looked as if it was stuck in a loop. I can confirm that this laptop with Windows 10 was working fine before, but now it's suddenly showing this error. Work has forced me to resolve this trouble as soon as possible and any advice would be appreciated!"
- Question from Reddit
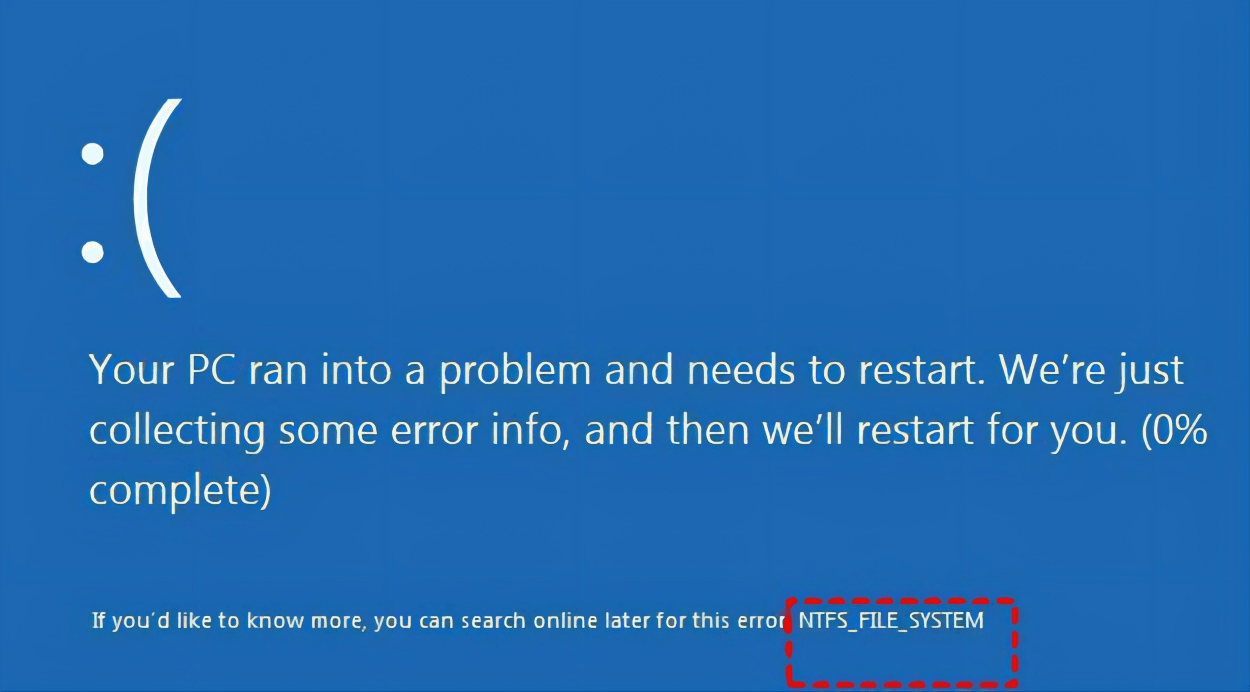
NTFS (New Technology File System) has been introduced by Microsoft's Windows NT 3.1 in 1993 and has evolved over the years to become the current mainstream file system format. However, from more and more user feedback reports, when upgrading Windows 10 or opening a specific software, Windows stop code: NTFS FILE SYSTEM may appear. This can cause your computer to get stuck in a reboot loop, which can also seriously affect your work and life.
In order to get your computer back to normal as soon as possible, it is recommended to understand the cause of this blue screen error first and then try to fix it accordingly.
Causes of Windows 10 Blue Screen NTFS File System Error
An exploration of the cause of the error will help in the next fix, and here is a list of common causes of NTFS file system blue screens for you.
- NTFS file system is corrupted.
- The computer is infected with a virus or malware.
- Insufficient system memory space.
- There is a problem with the disk driver.
- System file is corrupted.
- Hard drive is damaged or has bad tracks.
16 Ways to Fix NTFS File System Blue Screen Error
If your computer has a sudden stop code during prolonged use: NTFS file system. This may affect the overall performance of the computer and shorten the life of the associated hardware. Therefore, it is recommended that you fix this problem as soon as possible.
Please note that this error may affect the normal startup of your computer, so the following 16 methods are based on the computer not being able to boot. If your computer can start normally, please ignore the section on entering the Windows Recovery Environment (Windows RE).
Method 1. Hard Reboot the Computer And Remove The External Device
In fact, the NTFS file system blue screen happens suddenly and you will enter a reboot loop without any preparation time. At this point, you should first hard reboot your computer and disconnect those external devices that may be causing this error.
- Press the computer's power button for at least 10 seconds until the computer reboots and starts up.
- Remove the external devices connected to your computer including headset, printer, mouse, keyboard, etc. In turn, press the power button of your computer again and wait for your Windows 10 system to restart.
Method 2. Enter Windows Safe Mode
Safe Mode is a special diagnostic mode in Windows. It can automatically disable all non-core services and processes of Windows system, which will help you to troubleshoot the cause of NTFS file system blue screen and resolve the error.
- Enter the Windows Recovery Environment by forcibly shutting down and then rebooting the computer twice.
- Tap Troubleshoot -> Advanced options -> Startup Settings in order and press F4 or the number key 4 to Enable Windows Safe Mode.
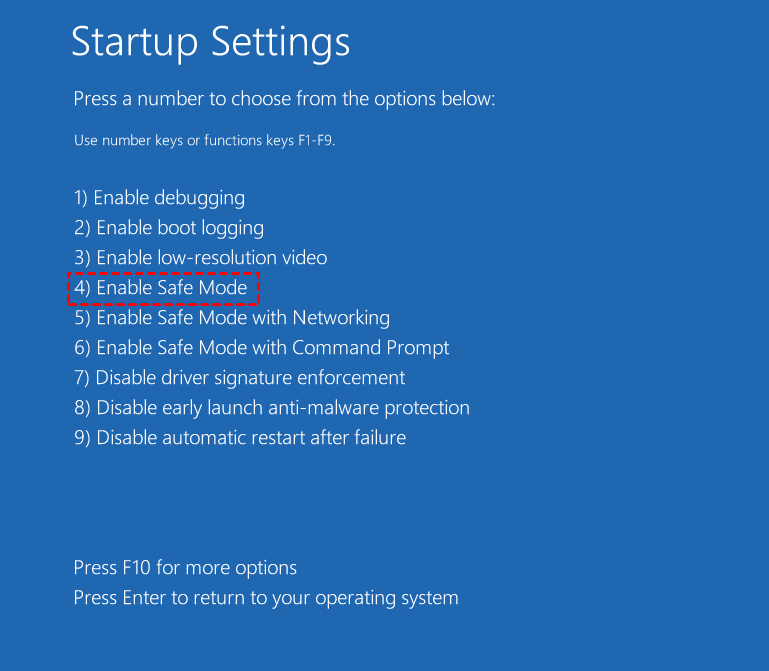
- If the blue screen error does not appear in Safe Mode, it means that there is no problem with the core services and processes of Windows system. The problem lies in third-party software, drivers, hardware, etc. You need to refer to the following 14 methods to fix again.
Method 3. Check and Clear Disk Space
The disk on which the system files are stored may also cause NTFS file system blue screens if it is running low on space itself. Therefore, you need to check and clear the disk space, which will help you to resolve this error.
- Enter Windows Safe Mode, use Windows + S to open the search box, type Disk Cleanup and press Enter.
- In the Disk Cleanup window, select the disk drive you want to clean up and tap the OK button.
- Check the types of files you want to clean in the list and tap on the Clean up system files button.

- After returning to the Disk Cleanup window, tap the OK button again.
- Go to the System Disk Cleanup window, tap the OK button and confirm this action, then wait for the cleanup of this process to complete.
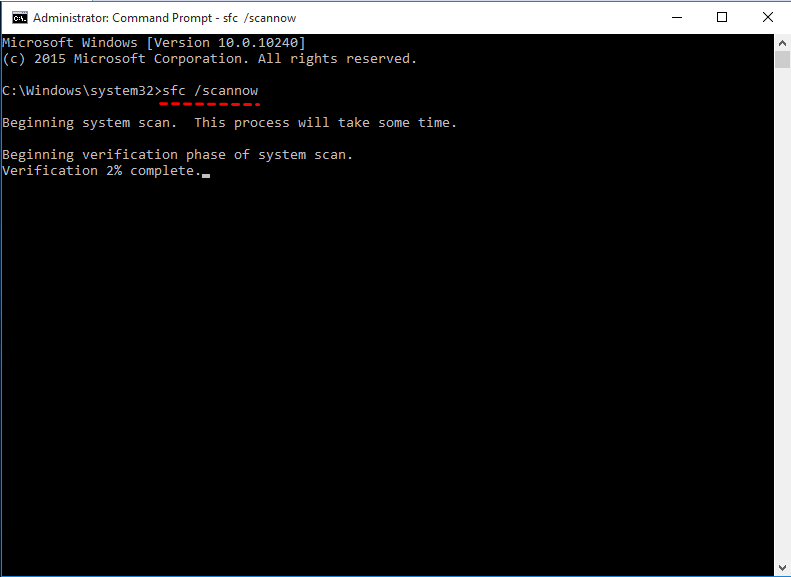
Method 4. Perform SFC and DISM Scans
Windows system files are the basis for ensuring the proper functioning of the operating system. Once any system file is corrupted or lost, it may lead to NTFS file system blue screen error. At this point you need to use System File Checker (SFC) and Deployment Image Service and Management tool (DISM) to help you fix this error. The former focuses on repairing system files, while the latter focuses on repairing system images.
- Follow the previous method and press F6 or the number key 6 to Enable Windows Safe Mode with Command Prompt.
- Use Windows + S to open the search box, type cmd, and select Run as administrator.
- In the Command Prompt window, type sfc /scannow and press Enter to execute this command.
- Enter the following commands in turn and press Enter to execute the commands respectively.
- Dism /Online /Cleanup-Image /ScanHealth
- Dism /Online /Cleanup-Image /CheckHealth
- Dism /Online /Cleanup-Image /RestoreHealth
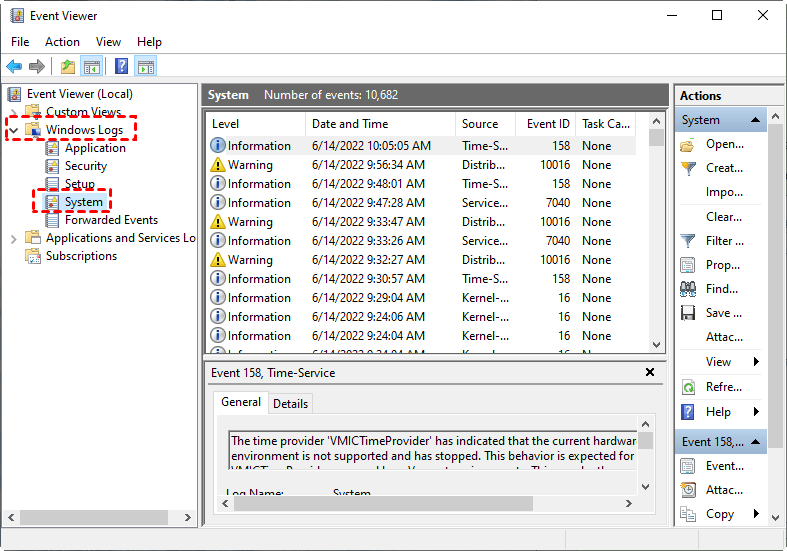
Method 5. Using the Event Viewer
If you can't determine what's causing your computer to blue screen with the NTFS file system error, you can use Event Viewer to find out.
- Enter Windows Safe Mode, right-click on the Start button, and select Event Viewer from the expanded menu.
- In the left panel navigate to Windows Logs -> System in order and in the middle panel view the most recent error message and determine the cause of the blue screen.
Method 6. Update the Disk Driver
Corrupted or outdated disk drivers can also be the trigger for NTFS file system blue screen issue. Therefore, you need to update the disk drivers in safe mode.
- Follow the previous method and press F5 or the number key 5 to Enable Windows Safe Mode with Networking.
- Right click on the Start button and select Device Manager from the expanded menu.
- Locate and expand the Disk drives, right-click the currently used disk drive, and select Update driver from the expanded menu.
- Select Search automatically for updated driver software and wait for this process to complete.

If the driver can be updated, please update it in time. If no update is available, select another disk drive and repeat the above operation again.
Method 7. Check and Fix Disk Errors
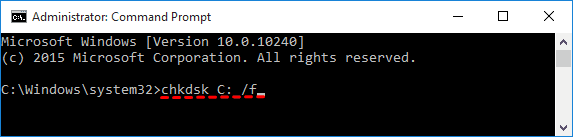
An NTFS file system blue screen error may also occur if the system disk has errors or bad sectors. Therefore, you need to use CHKDSK tool to check and fix system disk errors.
- Open Command Prompt in Windows Safe Mode.
- In the Command Prompt window, type chkdsk C: /f and press Enter to execute the command.
✨ Note: You need to replace C in the above command with the local disk drive where the system archive is installed.
- Press the Y button again to confirm the check at the next system reboot and restart your computer.
Method 8. Using Windows 10 Troubleshooting
Troubleshoot is a tool built into Windows 10 that helps you fix some common problems, including errors like blue screen. So, when you encounter NTFS file system blue screen error, you can try to fix it using this tool.
- Enable Windows Safe Mode with Networking, use Windows + S to open the search box, type Troubleshoot and press Enter.
- Confirm the Troubleshoot tab in the left panel and find and tap the Additional troubleshooters button in the right panel.
- In the Additional troubleshooters window, tap Blue Screen under Find and fix other problems, then tap the Run the troubleshooter button.
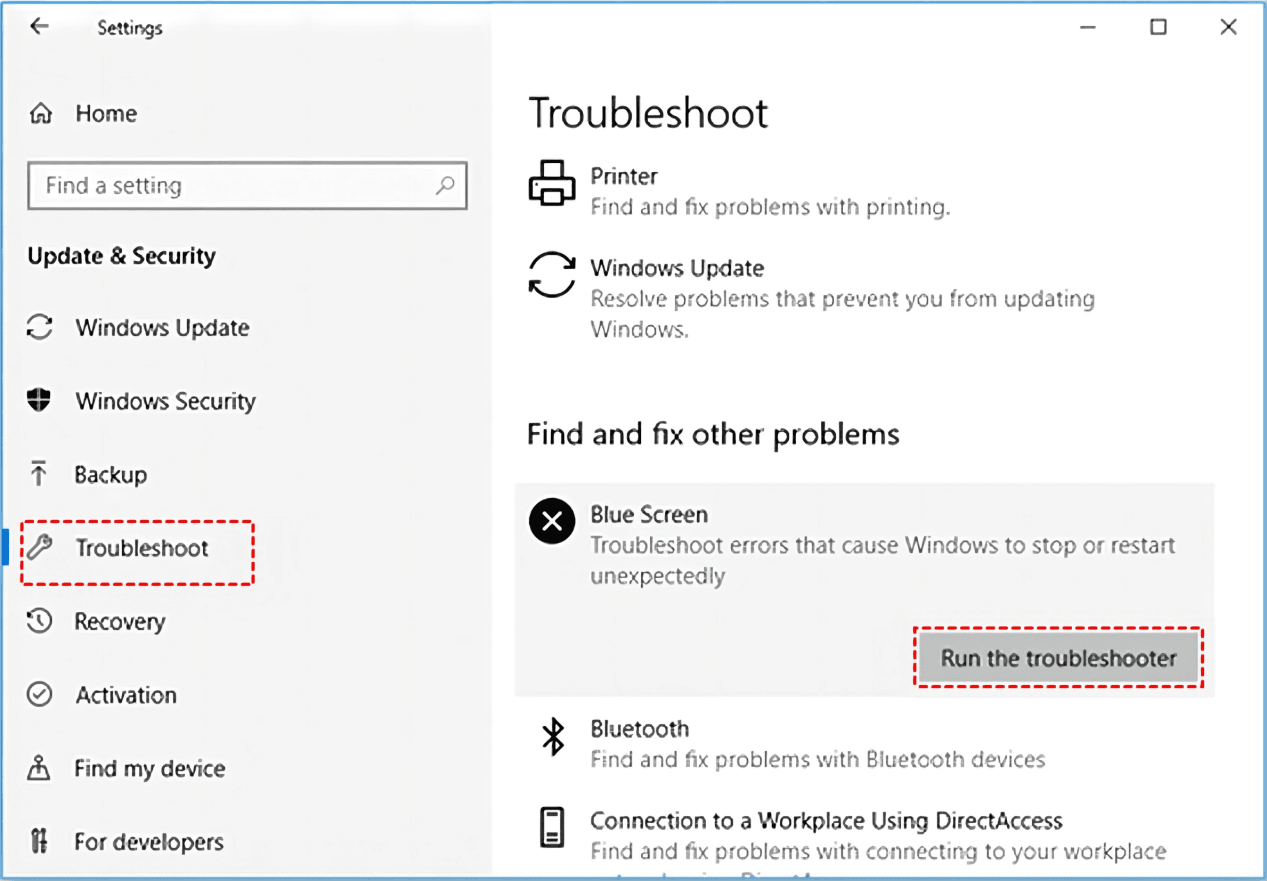
- Wait for this tool to automatically detect the problem and launch to fix the blue screen error, then restart your computer.
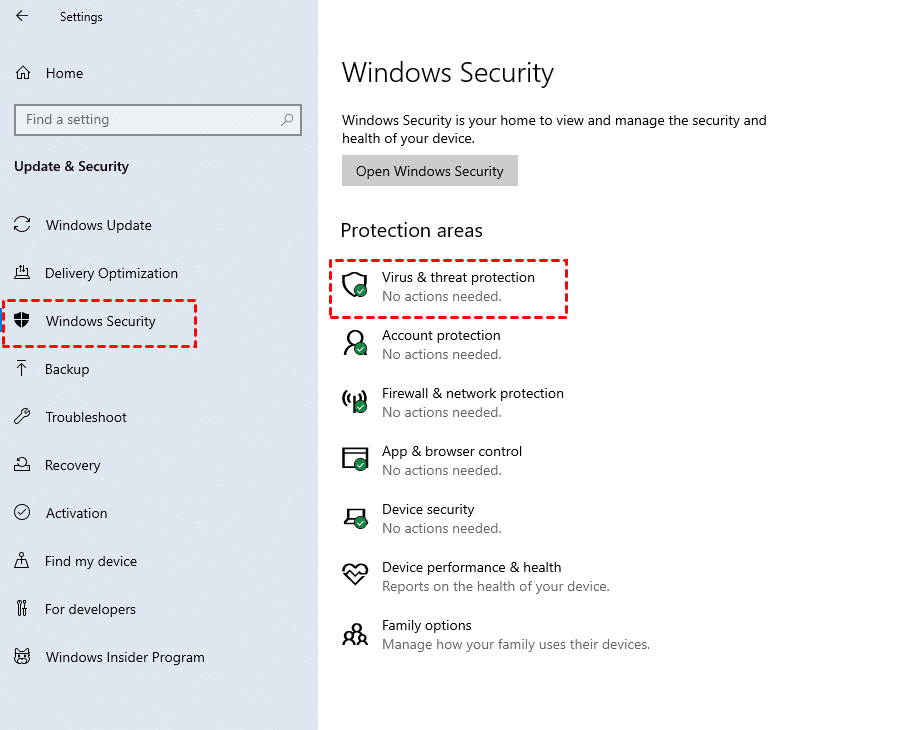
Method 9. Scan and Remove Viruses & Malware
Certain viruses and malware can cause damage to your system files and cause NTFS file system blue screen error. Therefore, you need to scan and remove these viruses and malware using Windows Defender in your computer or third-party antivirus software. Here it is more recommended to use Windows Defender.
- Enter Windows Safe Mode with Networking, use Windows + S to open the search box, and type Windows Security.
- In the Windows Security window, tap Virus & threat protection.
- In the Current threats section, tap on the Scan options.
- Switch the default Quick scan to Full scan in the expanded menu, and tap the Scan now button.
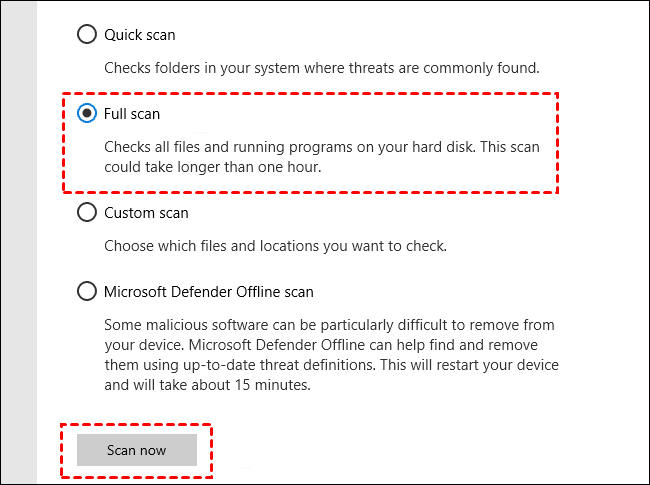
- Wait patiently for the scan to complete. If any virus or malware is scanned, please remove it in time. If necessary, you can directly delete the corresponding application and restart the computer.
Method 10. Run the Driver Verifier Manager
Driver Verifier Manager is an application built into Windows 10 that is primarily used by developers to test and verify drivers for defects. But sometimes the tool can also be used to fix NTFS file system blue screens.
- Enter Windows Safe Mode, use Windows +R to open the Run window, type verifier and press Enter.
- In the Driver Verifier Manager window, select a task according to the situation, here it is recommended to select the Create standard settings option and click Next. Then you just need to follow the wizard to complete the operation to check for drivers that have errors.
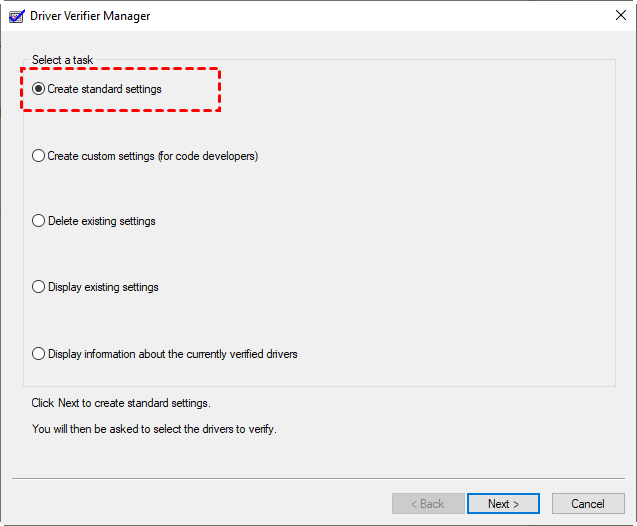
✨ Note: Driver Verifier Manager uses a lot of CPU and may slow down your computer significantly. So it is not recommended to verify all drivers at once. Also, when you have finished repairing the blue screen, do not use the application again as it may cause your computer to crash.
Method 11. Rebuild the Boot Manager
When there is a problem with the Master Boot Record (MBR) and Boot Configuration Data (BCD) files, it can cause the NTFS file system blue screen issue, so you will need to rebuild the boot manager.
- Enter the Windows Recovery Environment and tap Troubleshoot -> Advanced options- > Command Prompt in order.
- Enter the following commands in turn and press Enter separately to execute the commands.
- bootrec.exe /fixmbr
- bootrec.exe /fixboot
- bootrec /scanos
- bootrec.exe /rebuildbcd
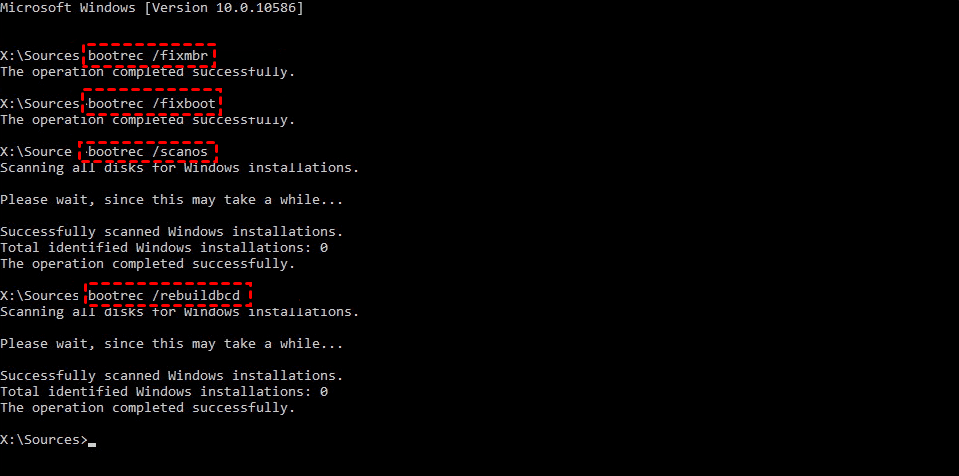
- Type exit again and press Enter to exit the Command Prompt and tap Continue to restart your computer.
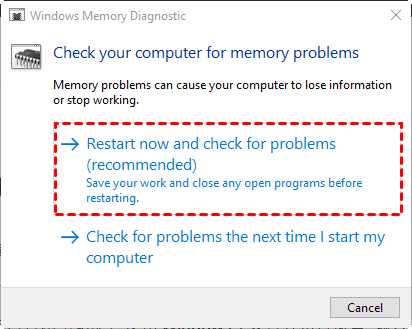
Method 12. Using Windows Memory Diagnostic Tool
If the computer memory fails, it may also cause the NTFS file system blue screen problem. In this case, you can use the built-in memory diagnostic tool of Windows to detect it.
- Enable Windows Safe Mode with Networking, use Windows + R to open the Run window, type mdsched and press Enter.
- In the Windows Memory Diagnostic window, tap Restart now and check for problems (recommended) and restart your computer to wait for this process to complete.
Method 13. Using Windows 10 Startup Repair
Startup Repair is a troubleshooter built into Windows 10 that can help you fix common problems. From the user feedback results, this tool also works for NTFS file system blue screen error, which is a worthwhile method to try.
- Enter the Windows recovery environment and click Troubleshoot -> Advanced options -> Startup Repair in order.
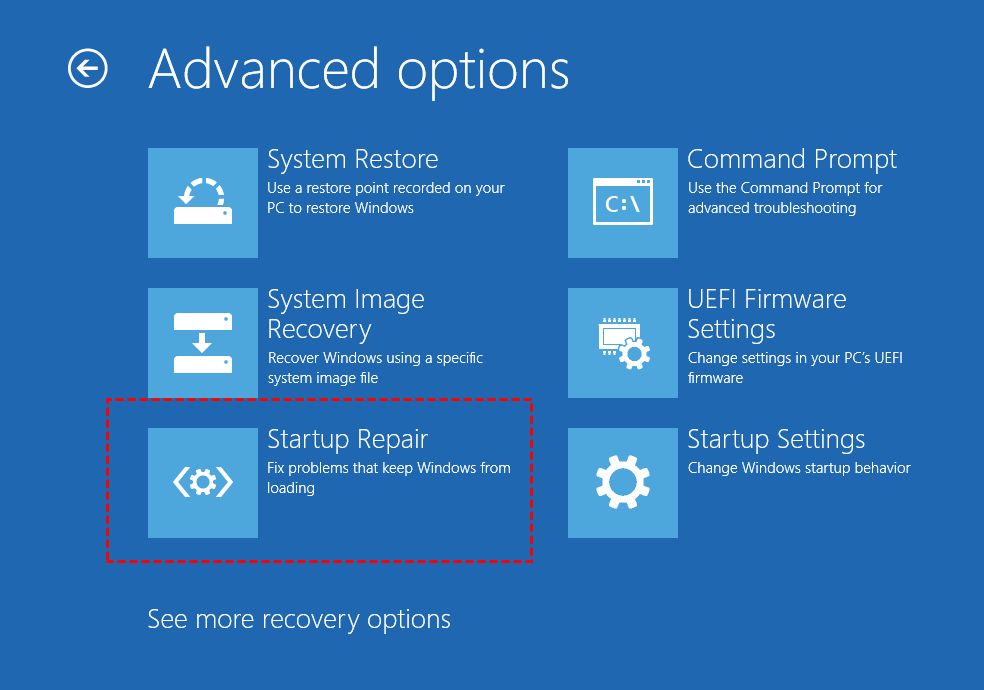
- Wait for this computer repair to complete automatically and restart your computer.
Method 14. Restore Windows 10 System
If you have created a system restore point before the NTFS file system blue screen appeared, then you can use the System Restore feature to restore your computer to a previous point in time to fix this blue screen error.
- Go to the Windows Recovery Environment and tap Troubleshoot > Advanced Options > System Restore in order.

- Select your user account and enter a password. Select a previously created system restore point in the System Restore window and follow the prompts.
Method 15 Reset This PC
- Enter the Windows Recovery Environment and click Troubleshoot -> Reset this PC in order.
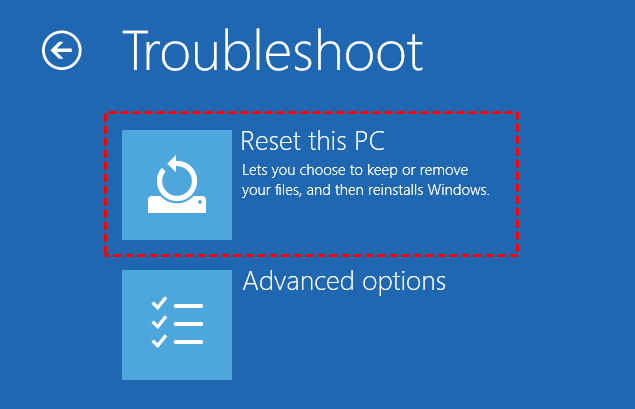
- You can choose to Keep my files or Remove everything according to your needs. Here it is recommended to choose the first one.
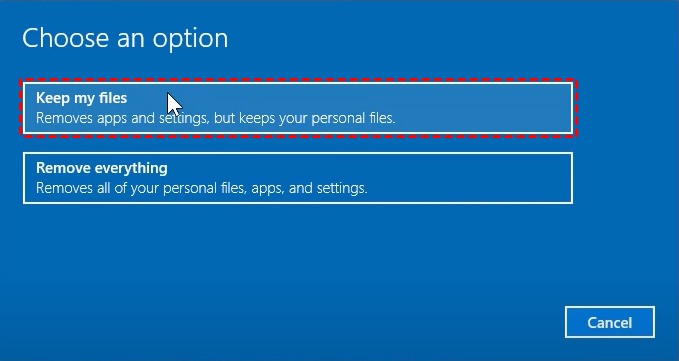
- Finally, tap the Reset button and wait for the computer to finish resetting automatically and restart your computer.
Method 16. Replace the Hard Drive with A New One
If none of the above methods have helped you fix the blue screen, then it is most likely due to a hard drive failure. Therefore, it is recommended that you replace your hard drive with a new one.
- Turn off the computer completely and remove the side panel of the case. Then disconnect the hard drive cable and remove the drive and replace it with a new one in the same manner.
- Recover the case and restart the computer. If there is a system installed with a new replacement hard drive, please enter the BIOS first to adjust the boot sequence to ensure that your computer will boot properly.
Back Up Disks Regularly to Protect Data Security
If you want to fix NTFS file system blue screen error as soon as possible, please refer to the 16 methods mentioned above, and we believe that they can bring your computer back to normal. However, you must be reminded that a corrupted disk will cause all data in it to be lost. Therefore, it is recommended that you use the Disk Backup function of AOMEI Backupper Standard to back up the important data on your disk regularly so that you can quickly recover the data you need in case of disk corruption.
AOMEI Backupper Standard allows you to backup all the contents of your local disk to any location such as cloud, NAS device, external hard disk, etc. If your computer doesn't boot properly, create bootable media on another working computer first, make sure the computer boots from the bootable media normally, and then make a disk backup. If your computer can start normally, please run AOMEI Backupper Standard directly.
- Run AOMEI Backupper Standard, switch to the Backup tab in the left panel, and select the Disk Backup button in the right panel.

- In the Disk Backup window, click Add Disk to choose the disk.

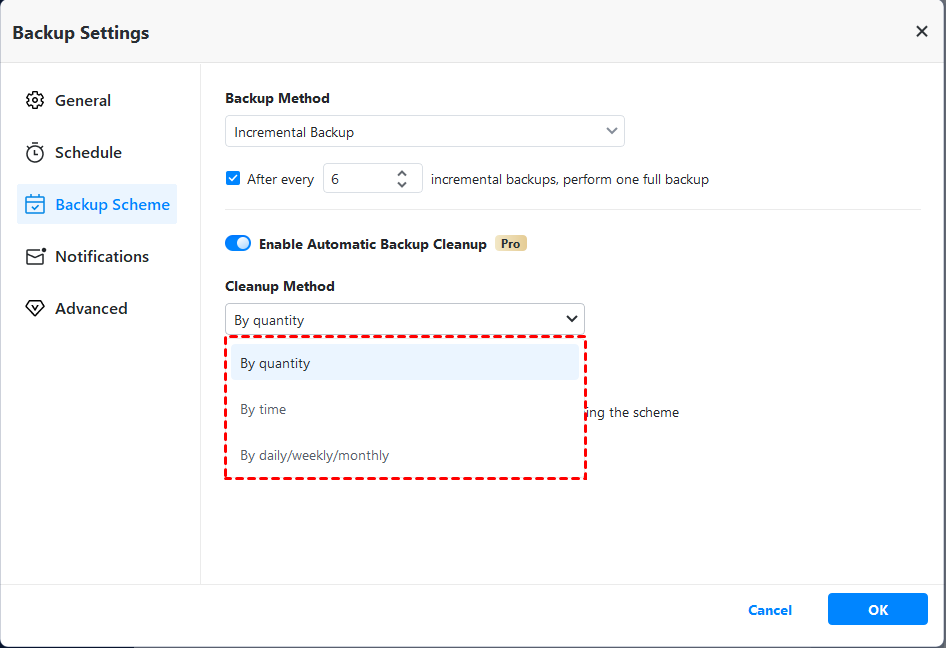
Tips: Before the backup starts, you can click on Options, Schedule and Scheme in the bottom left corner for additional settings. 🌟 Option: Allows you to comment backup tasks and enable email notifications. You can also enable encryption for backups in the pro version to increase the security of system backups.
🌟 Schedule Backup: Allows you to turn on the scheduled backup function to automatically backup the system daily, weekly, monthly, event triggers, and USB plug in (The latter two are available in pro and higher editions).
🌟 Backup Scheme: You can choose from full backup, incremental backup and differential backup. Later two backup methods can help you save disk space. Differential backup is available in the pro version, which also has an automatic cleanup feature.
- Modify the path of the disk backup according to your situation, and tap the Start backup button at the bottom right corner after confirming it is correct.

- Next, wait for this process to complete and tap on the Finish button.
In addition to disk backups, AOMEI Backupper Standard can provide you with other useful features.
- If the original data on the disk has been lost or corrupted, you can quickly restore a previously created disk backup image with the File Restore feature.
- To ensure that the required data is restored correctly, you can confirm the backed up image archive by exploring the image function.
- If you are a computer professional or IT technician, you can also use command line backup for unattended backups.
- If you are thinking of upgrading your computer's hard drive, you can clone it to an SSD, a method that saves a lot of time compared to disk backups, and copies your computer's configuration just in case.
Conclude
A sudden NTFS file system blue screen will have a serious impact on your work and life, and you need to fix it as soon as possible. In this article you can understand the cause of this blue screen error and follow the 16 methods provided to fix it, which you can trust to get your computer back to normal.
However, the disk corruption involved will cause all the data in it to be lost. For the sake of computer data security, it is recommended to use AOMEI Backupper Standard to backup the disk regularly so that you can quickly recover the data you need in case of disk corruption. If you have made regular backups of your system using AOMEI Backupper, the next time you encounter another blue screen error, such as Windows 10 inaccessible boot device after clone, you can use its restore feature to get your computer back to normal quickly.