4 Fixes: Keep Personal Files and Apps Greyed out
This article provides four methods to solve the problem of Keep personal files and apps grayed out, and finally recommends a free Windows backup software to protect your data.
By Miya Updated on October 13, 2023
User Case: How Do I Keep Personal Files and Apps on Windows 10 Upgrade?
“Hey guys, when I started the setup, it showed that the Windows 11 setup Keep personal files and apps greyed out, and the keep personal files option is greyed out too. So I was left with just nothing option but a whooping 50 GB of photos, videos, and docs on my PC, and no one would like to ever wipe off them. Is there a workaround to enable this feature? I really want to organize my stuff individually. If you have any insights or suggestions, please don't hesitate to chime in.”
When you need to configure your Windows system after an update, you find that your Keep personal files and apps greyed out, you must feel overwhelmed at this time. Don't worry, this article provides you with detailed reasons as well as four methods to help you solve this problem quickly! Finally, we recommend you to backup your Windows data before updating to prevent any accidental data loss! Please read carefully.
Why Keep Personal Files and Apps Greyed out?
Normally, during an in-place upgrade, personal files remain intact along with their settings and customizations. Additionally, apps and data are preserved on the computer.
However, there are instances when you encounter the issue of the Keep personal files and apps greyed out while performing an in-place upgrade of Windows 10 or 11. Keep personal files and apps option is greyed out can happen due to the following reasons:
- You have selected a different language for the Windows installation compared to the language currently in use.
- Your existing Windows version might be installed in an unsupported directory, or you are attempting to install an older version of Windows.
- You are trying to install a different edition of Windows than the one currently installed on your system.
These reasons can prevent you from selecting the option to Keep personal files and apps during the upgrade process. So how do we fix it, read on!
4 Ways to Solve Keep Personal Files and Apps Greyed out
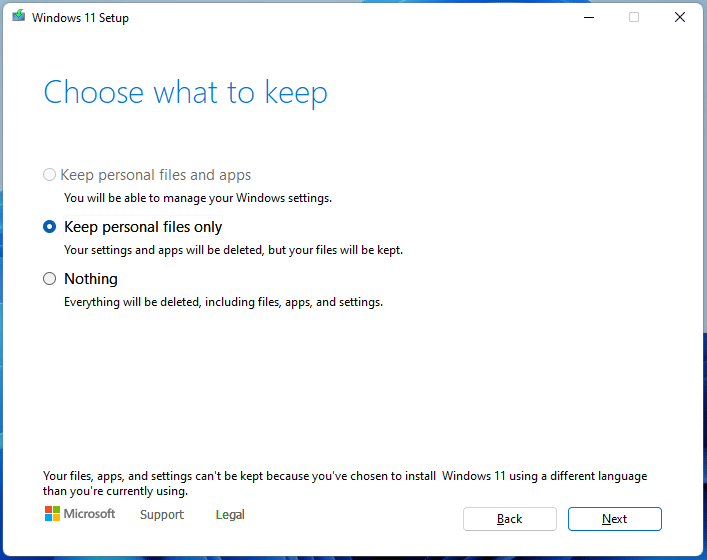
If you face the error where Keep personal files and apps greyed out in Windows 11/10, or both "Keep personal files and apps" and "Keep personal files only" options are grayed out, leaving only the "Nothing" option, it means all your data (files, apps, settings) will be erased during the update.
In this section, we will provide you with four effective ways to help you recover Keep personal files and apps option. Please choose any of the methods according to your needs.
1. Remove KB4562830
To resolve the issue of being unable to preserve files, apps, and settings during a Windows upgrade to a higher version, you have the option to uninstall KB4562830. This method has been proven effective.
Step 1. Open Windows Settings and navigate to Update & Security.
Step 2. Within the Windows Update section, click on View installed update history and select Uninstall updates.

Step 3. Access the Control Panel interface and locate KB4562830. Right-click on it and select the Uninstall option.
Once the uninstallation process is complete, you can proceed with an in-place upgrade again to check if the issue has been resolved.
2. Verify System Language
If you are unable to retain your files, apps, and settings due to a different language, you can attempt the following method:
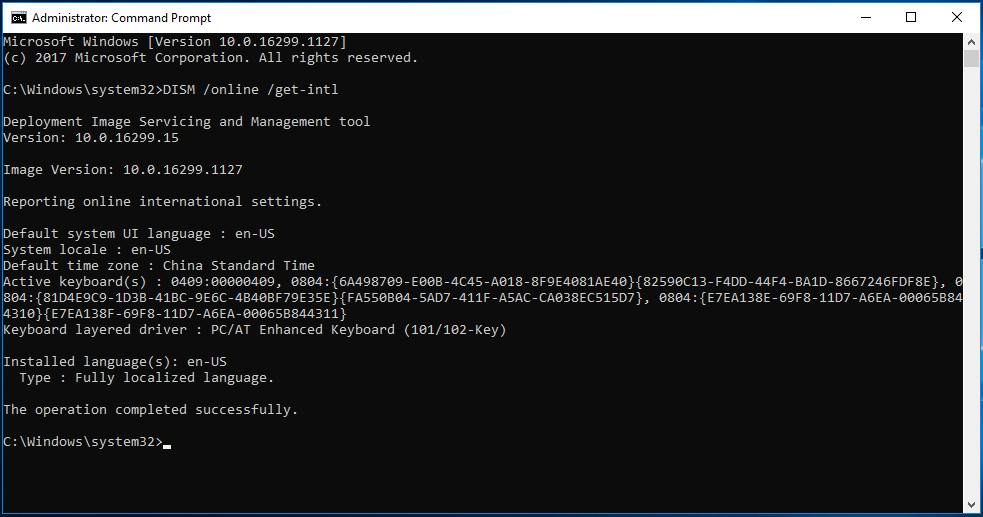
Step 1. Open Command Prompt (CMD) as an administrator in Windows 11/10.
Step 2. Enter the command "DISM /online /get-intl" and press Enter. This will display your system language. If it is not English, proceed with the following steps.
Step 3. Restart Windows and press Shift to access the Windows Recovery Environment.
Step 4. Navigate to Troubleshoot > Advanced options > Command Prompt.
Step 5.Enter the command "DISM /image:C: /set-uilang:en-US" and press Enter. This will set your system language to en-US, allowing you to retain your files during the in-place upgrade.
3. Modify System Locale in Control Panel
If you encounter the "your files, apps, and settings can't be kept" error due to a language issue, you can attempt the following solution:
Step 1. Open Control Panel by using the search box in Windows 10/11. Ensure that the items are listed by Category.
Step 2. Click on Clock, Language, and Region to proceed.
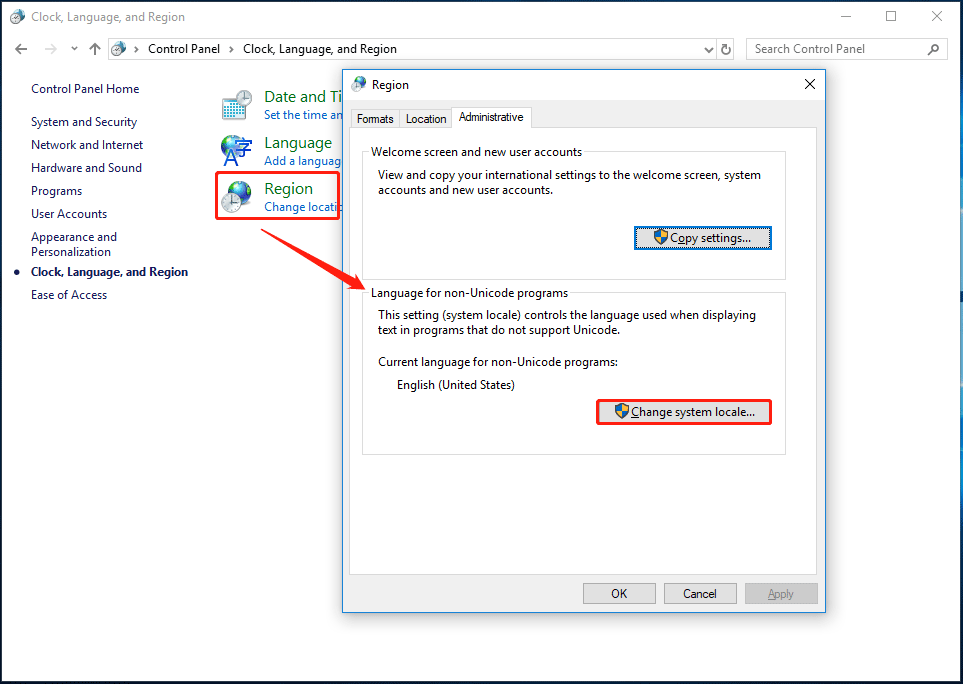
Step 3. Select Region and navigate to the Administrative tab.
Step 4. Click on Change system locale and set the current system locale to English (United States).
Step 5. Save the changes and restart your PC. Afterward, proceed with the Windows upgrade again to check if the issue has been resolved.
4. Modify Registry Settings
If you are unable to retain your files, apps, and settings due to an unsupported directory or the current version of Windows, you can attempt to modify the registry settings by following these instructions:
Step 1. Press Win + R to open the Run dialog, type "regedit," and click OK to launch the Registry Editor.
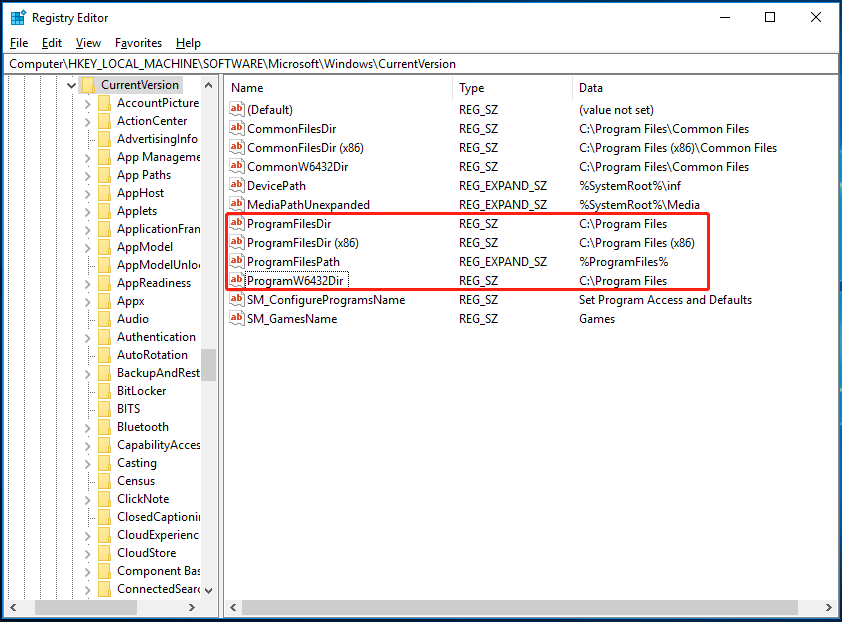
Step2. Navigate to the following location in the Registry Editor.
- HKEY_LOCAL_MACHINE\SOFTWARE\Microsoft\Windows\CurrentVersion
Step 3. Locate the entries named ProgramFilesDir, ProgramFilesDir (x86), ProgramFilesPath, and ProgramW6432Dir. Double-click on each entry and change the value data to "C:\Program Files". After making all the necessary changes, try proceeding with the installation.
The above four methods are the common ways to Keep personal files and apps greyed out in Windows. Try them out and get rid of the troubles easily. So is there any way to avoid these situations? You can use free backup software to back up your Windows data, one-click restore in case of problems, to protect your data now!
Recommend: Backup Your Files to Prevent Data Loss
You can select a free professional backup software to safeguard your data or system. AOMEI Backupper Standard is an exceptional and free backup software compatible with Windows 10, Windows 11, Windows 8.1, Windows 8, Windows 7, Windows XP, and Windows Vista PCs.
Here are some notable features of this software:
►It fulfills various backup needs such as file backup, folder backup, disk backup, partition backup, and system backup. The user-friendly interface enables you to complete backups in just three simple steps.
►Backup images can be stored on external hard drives, internal hard drives, NAS, USB/DVD/CD, or if you create an AOMEI account, you can backup files to AOMEI Cloud.
►You can set up automatic backups on a daily, weekly, monthly, event triggers or USB plug in basis.
►In addition to scheduled backups, the software supports incremental and differential backup for newly added or modified data.
►Additional backup options include adding comments to your backups, compressing data backup images, splitting images into multiple files, encrypting backups, and enabling email notifications upon completion.
The user-friendly interface enables you to configure a data backup task with just a few clicks. Let's consider system backup as an example to demonstrate how it works. If you require data backup on Windows Servers, please refer to AOMEI Backupper Server.
You can download this software for free and proceed with the installation.
Step 1. On the Home screen of the software, navigate to the Backup option and choose System Backup.
Tip: If you want to back up all the data on the hard drive, including the operating system, choose Disk Backup.

Step 2. Next, click on the second box to select a destination for saving the backup image file. You have the option to back up to an external hard drive, internal drive, or a network location.

Step 3. To commence the backup process, click on Start Backup.

Tips:
ⓞOptions: In this section, you can add comments to your backups, and adjust the compression level of the backups. If you wish to encrypt your backups, an upgrade to the AOMEI Backupper Professional edition is required.
ⓞBackup Scheme: You have the option to select backup methods in this section. Differential backup is recommended over incremental backup, as incremental backup requires all previous backups to be present for a restore. The program will automatically delete old image files to optimize disk space. To enjoy this feature, upgrading to AOMEI Backupper Professional is necessary.
Conclusion
That concludes the four methods to resolve the issue of the Keep personal files and apps greyed out. Finally, we highly recommend using AOMEI Backupper freeware to backup your Windows system. It offers a user-friendly interface and ensures reliable data security.
If you prefer an alternative to image backup, you can also utilize the AOMEI Backupper Professional edition to clone hard drive or system as a means of data backup in Windows.