How to Erase M.2 SSD on Windows 10/11 – Securely and Completely
This article will tell you how to erase M.2 SSD in the safest way possible. The erasure software can provide you with data protection and prevent any data leakage incidents from occurring.
by Yuka Updated on November 1, 2022
What is M.2 SSD?
M.2 is a form factor of solid state drive (SSD) that is shaped like a stick of gum. It is a dynamic form factor SSD for internally mounted storage expansion cards. Thin laptops and some tablets are increasingly using M.2 SSDs because they take up less space than 2.5-inch SSDs or hard drives. They are smaller than other mini Serial Advanced Technology Attachment (mSATA), but they can process data much faster than SATA or SAS SSDs.
Unlike hard disk drives (HDDs), SSDs have no moving parts and do not break or spin up or down. M.2 SSDs are useful for people who are building or upgrading a personal computer (PC) or laptop with use cases such as gaming, 3D animation, video editing or large file transfers.
Why Do You Need to Erase an SSD?
“I have an M.2 SSD that has a corrupt version of Win10 on it, and I want to completely erase it and use it in another computer. I cannot put it into another computer to erase it as it tries to boot from it. I tried changing the boot order in UEFI boot settings but it still continues to try and boot from it on restart. When I pull it out of the laptop, the laptop boots from the original Win10 OS as it should. How can I erase the M.2 so that I can use it?”
In our daily work or study, we all may encounter situations where we want to erase our M.2 SSDs. The main common ones are for the following reasons.
- Planning to sell/give away your old computer or just the drive inside. You need to securely erase your SSD or hard drive, so the next person can't get to your files to prevent information leakage.
- Want to restore your computer to factory settings. Some users want to completely erase the M.2 SSD to make their computer look like it's new and unused. Or want to upgrade their system.
- Reuse your M.2 SSD. If the data on your drive is currently unimportant and will not be used, you can reuse the SSD by erasing it.
How to Secure Erase SSD on Windows 10/11
Simply deleting a file on an M.2 SSD does not make it disappear completely. The operating system simply removes a pointer to that file, retaining all the bits. Until the drive needs that space to hold the new data and overwrite it. But that can take years, or, if you have a lot of free space, it will never happen.
You may think that simply resetting Windows 10 or 11 and enabling the option to delete files will delete all your personal data, but that's not the case. Therefore, you need a powerful disk wiping software which can help you securely erase all data on Windows 10/11.
AOMEI Backupper Professional is designed for all Windows PCs such as Windows 11/10/8.1/8/7/Vista/XP. With its help, you can:
💎 Erase entire discs, selected partitions, or unallocated space; erased data will not be recovered.
💎 Erase hard drives, USB drives, and SD cards. Supports all brands of disks, including Samsung, SanDisk and WD, etc.
💎 Create backups, recover files, clone disks with just a few clicks. The powerful features of this software can meet all your needs.
You can refer to the following illustrated steps to learn how to wipe an SSD on Windows 10.
- Click the download button below to install this software on your computer.
- Start AOMEI Backupper, click Tools on the left panel, and then select Disk Wipe on the right side.

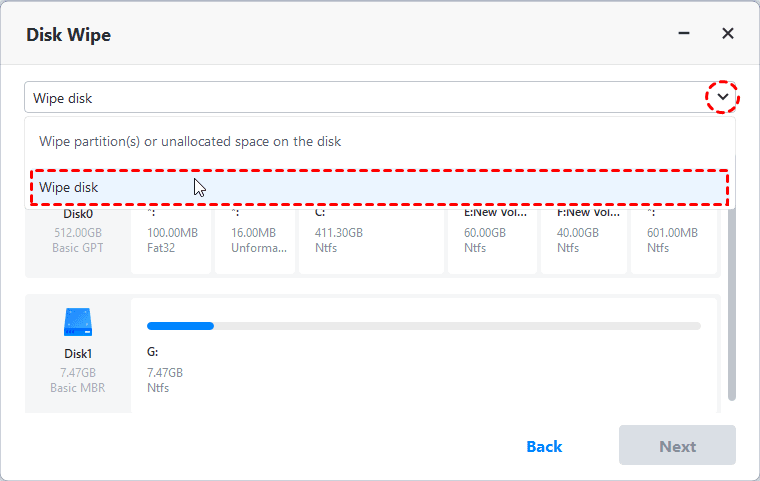
- Then you can choose the type of wipe you want according to your needs. There are 2 types provided - Wipe partition or unallocated space on the disk and Wipe disk. Select the latter type to erase M.2 SSD and click Next.
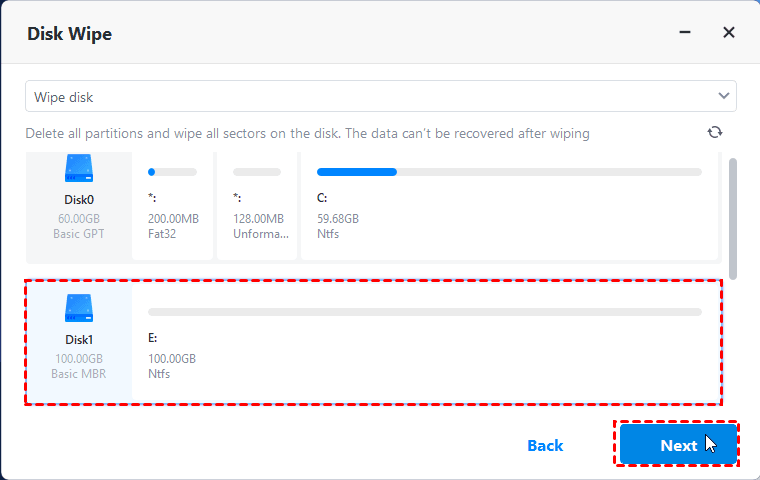
- Select the M.2 SSD you want to erase and click Next to start this operation.
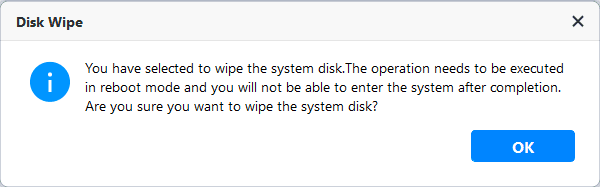
✨ Note: If you choose to erase the system disk, there will be a pop-up window prompting you that the operation will run in reboot mode, please press OK to confirm.
- On the Wiping Method page, choose Fill sectors with Zero. Then click Start to begin the zero filling process.
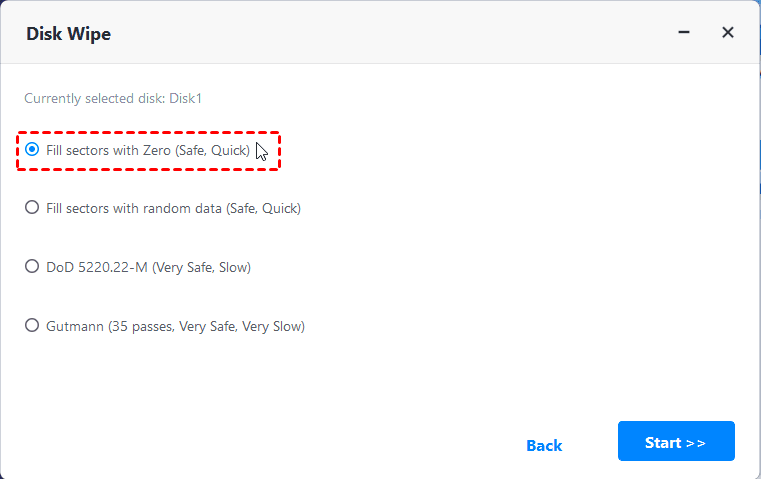
✨ Tip: You can also choose another three wiping methods like Fill sectors with random data, DoD 5220.22-M, and Gutmann.
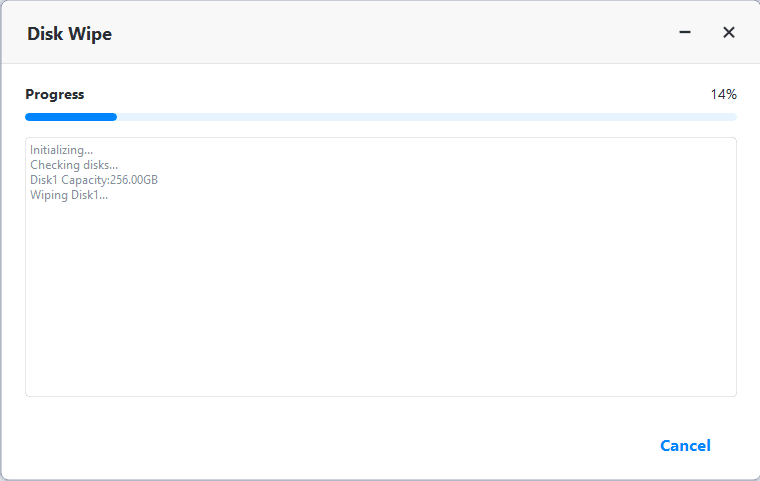
- Once the erase process starts, you will be taken to the page of the erase process. If you want to stop the process, you can click Cancel in the right corner.
Final Words
You can learn how to erase M.2 SSD in this article to prevent personal information from being compromised or to reuse your drive. The whole process is very simple, even if you are a computer novice can quickly complete this operation through the above illustrated tutorial.
The software mentioned in the article can also help you when you want to upgrade your computer's hard drive. You can use it to migrate data from the old disk to the new one, and it will ensure that you can boot successfully from the cloned disk. You will also not experience any data loss during the cloning process.