How to Delete Local Disk D Easily( 3 ways)
Want to delete the hard drive? Here are 3 ways for you. You can delete via Disk Management, PowerShell and Command Prompt. Also, you can upgrade your hard drive via professional cloning software.
By Maggie Updated on January 2, 2024
User case: remove D drive as a system drive.
Hi, I am trying to move everything on the main c drive to a bigger drive and make that be my main c drive but Ddrive thinks it is a system drive and it is really just a data drive. how do I make Windows remove d as a system drive so I can complete my main task.}}
What is a disk partition?
On Windows 10/11, a partition is like a separate section on your computer's storage, appearing as its own drive with specific settings. You can remove unnecessary partitions to free up space or adjust the size of other partitions.
The Windows operating system empowers users to independently manage partitions, enabling actions such as deleting one partition and expanding another. Common reasons for deleting a partition in Windows 11/10 include:
1. Removing an unnecessary data storage partition.
2. Deleting a recovery partition on a computer or laptop.
3. Getting rid of the EFI system partition in Windows 11/10.
4. Deleting a partition during Windows 11/10 installation.
5. Removing an unallocated partition in Windows 11/10/8/7.
In this article, we will introduce three straightforward and free methods to know how to delete local disk D using Disk Management, PowerShell, and Command Prompt.
- Warning:✎...
- Keep in mind that deleting a partition will erase all the data it contains, so make sure to back up any important files before proceeding.
How to delete local disk
Here we have 3 ways for you to delete the drive, you can choose any of it as you like:
Option 1. Via Disk Management
1. Press Windows + X and choose Disk Management.
2. Pick the drive containing the partition you want to delete.
3. Right-click on the specific partition and choose Delete Volume.
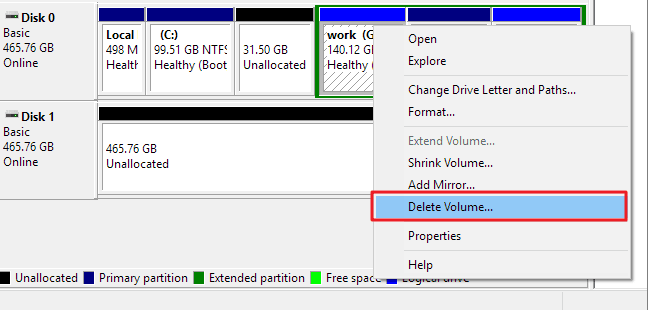
4. Confirm by clicking Yes, knowing that all data in the partition will be erased.
Option 2. Via PowerShell
Scenario 1. Delete Partition with an Assigned Drive Letter:
1. Open Start and search for PowerShell, right-click the desired option, and choose Run as administrator.
2. Type `Get-Volume` and press Enter to see a list of all partitions.
3. Type `Remove-Partition -DriveLetter [PARTITION-LETTER]` and press Enter, replacing `[PARTITION-LETTER]` with the letter of the partition you want to delete (e.g., Z).

4. Confirm by typing Y and pressing Enter.
Scenario 2. Delete Partition without an Assigned Drive Letter:
1. Open Start and search for PowerShell, right-click the top result, and choose Run as administrator.
2. Type `Get-Disk` and press Enter to see a list of all drives.
3. Type `Get-Partition -DiskNumber [DRIVE-NUMBER]` and press Enter, replacing `[DRIVE-NUMBER]` with the number of the drive containing the partition you want to delete (e.g., 2).
4. Type `Remove-Partition -DiskNumber [DRIVE-NUMBER] -PartitionNumber [PARTITION-NUMBER]` and press Enter, replacing `[DRIVE-NUMBER]` and `[PARTITION-NUMBER]` with the appropriate numbers (e.g., 1 and 2).
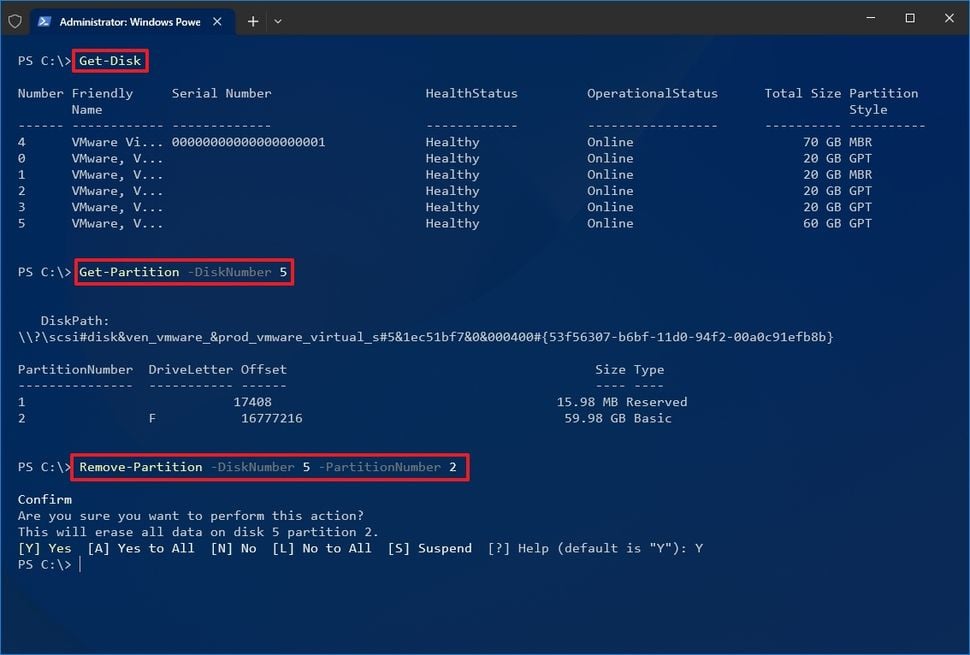
5. The partition will be deleted, and the space will show as unallocated.
Option 3. Via Command Prompt
# 1. Delete Partition with Volume Command:
1. Open Startand search for Command Prompt, right-click, and choose Run as administrator.
2. Type `diskpart` and press Enter.
3. Type `list volume` to see available volumes.
4. Type `select volume [VOLUME-NUMBER]` and press Enter, replacing `[VOLUME-NUMBER]` with the volume number (e.g., 6).
5. Type `delete volume` and press Enter to remove the volume.
# 2. Delete Partition with Partition Command:
1. Open Start and search for Command Prompt, right-click, and choose Run as administrator.
2. Type `diskpart` and press Enter.
3. Type `list disk` to see available drives.
4. Type `select disk [DRIVE-NUMBER]` and press Enter, replacing `[DRIVE-NUMBER]` with the drive number (e.g., 5).
5. Type `list partition` to see available partitions.
6. Type `select partition [PARTITION-NUMBER]` and press Enter, replacing `[PARTITION-NUMBER]` with the partition number (e.g., 2).
7. Type `delete partition` and press Enter to erase the partition.
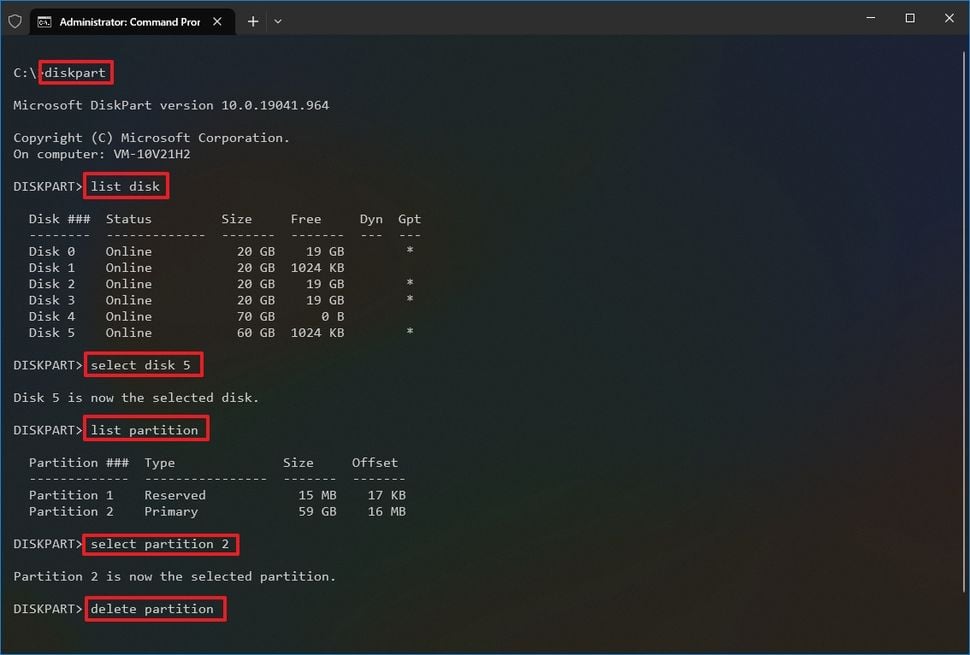
After these steps, the volume or partition will be deleted, freeing up space on the drive.
Bonus tip: How to upgrade your C drive without reinstallation
If you are searching for ways to upgrade your system drive, usually C drive as the previous user case, then a professional and reliable cloning software can help.
AOMEI Backupper Professional, the best disk cloning software for Windows, can help you with upgrading hard drive in Windows 11/10/8/8.1/XP/Vista. It has brilliant features like:
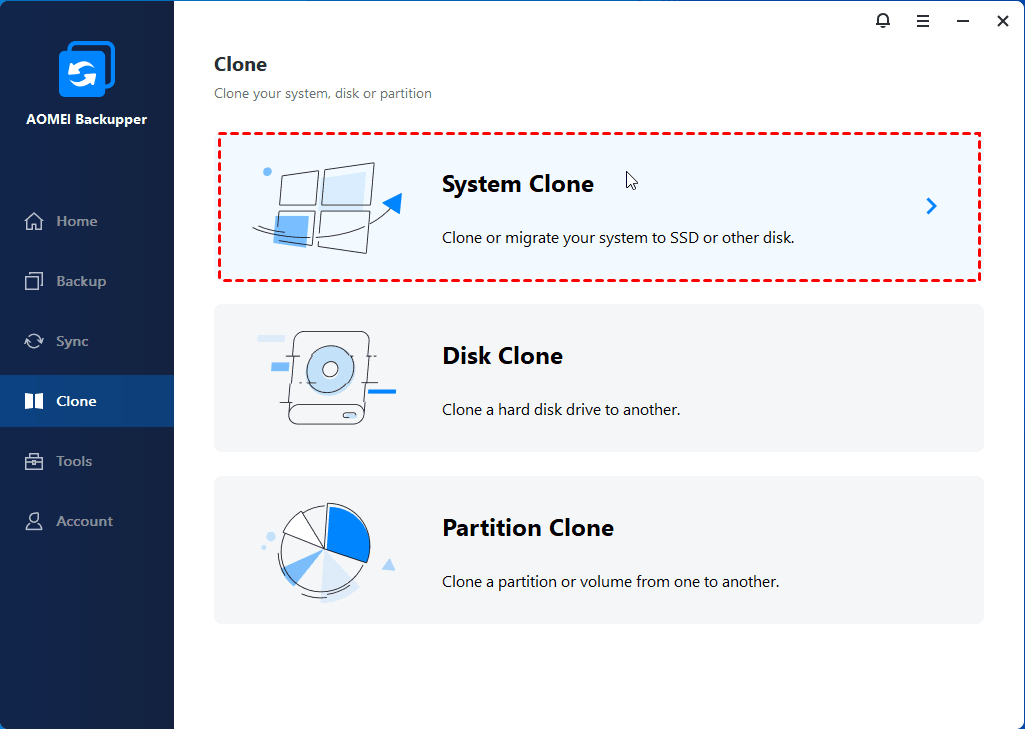
🌟 3 cloning types are supported: Disk Cloneto copy the entire disk, transferring all data from the source disk; System Clonetospecifically designed to transfer only the operating system to another drive; Partition Clone allows you to clone a specific partition, such as D: drive, E: drive, etc., offering flexibility in transferring individual parts of your storage.
🌟 SSD Alignment: When replacing a hard drive with an SSD in Windows, this option optimizes SSD performance, ensuring efficient operation.
🌟 Intelligent clone: Under the default situation, it will only clone the used sectors. So it allows you to clone a larger HDD to a smaller SSD easily.
🌟 Live clone: It allows the clone task to work in the background, so the cloning process won't interrupt running programs in the Windows Server and you can work normally while cloning.
Just download AOMEI Backupper and learn how to upgrade the current hard drive to a larger drive step by step from the next part.
Easiest Windows backup software for personal use.
- Notes:✎...
- Connect the new drive for Windows migration: Install the new hard drive or SSD. If your PC has more than one slot, just install the new drive alongside the old drive. Otherwise, please use a USB to SATA adapter to connect it.
- Backup files on the destination drive, because the drive will be overwritten during the cloning process.
Step 1. Open AOMEI Backupper and choose Clone > System Clone.
Step 2. The system drive will be selected, and you need to select the destination disk to save the image.
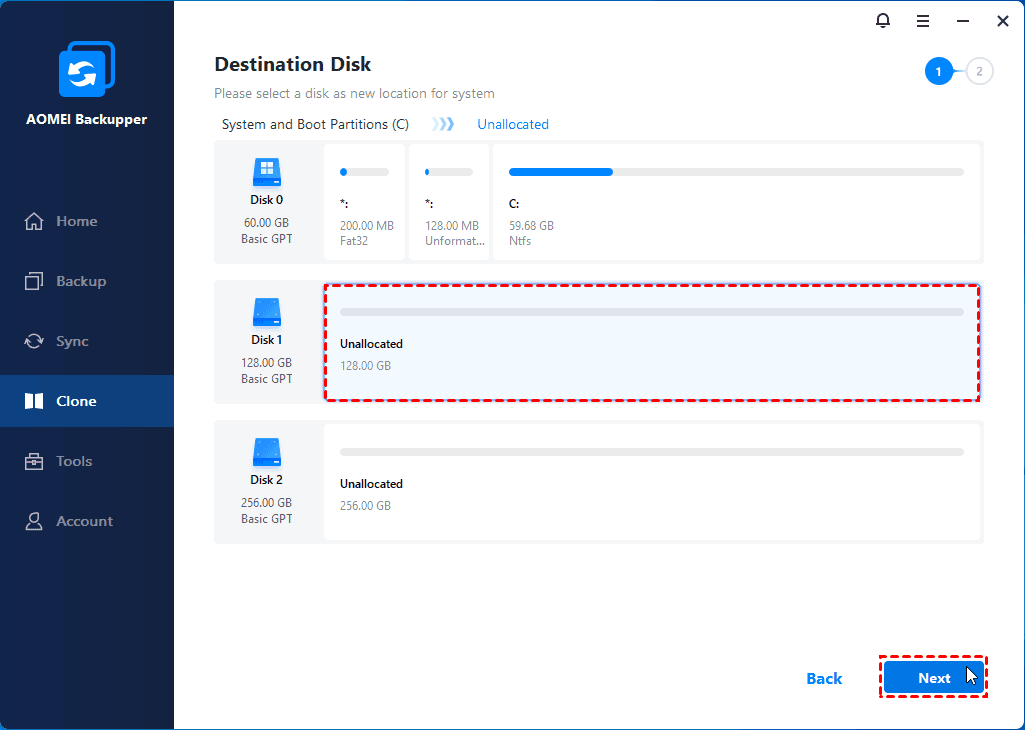
Step 3. Click Start Clone to start the migration process.
Boot Windows from the cloned new drive
Once the cloning process is complete and your PC has only one drive bay, you can shut it down and physically replace the old hard drive with the new one. However, if your PC has more than one slot and you wish to retain the old hard drive as the second storage option, follow these steps:
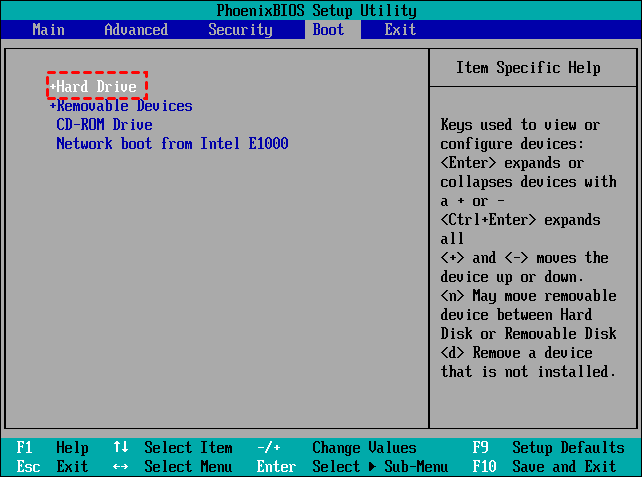
1. Restart the computer and press the required key (such as DEL, F2, F12, etc.) to enter the BIOS menu. You can find the specific key by searching for your computer's manufacturer and model on Google.
2. In the BIOS menu, set the new hard drive as the first boot option.
3. Press F10 to save the changes and exit the BIOS menu.
Extra option: how to clear local disk space on PC
Instead of deleting the disk on your computer, why not think about deleting some unnecessary files and data on disk to get more free space directly? Some users also search ‘how to clean local disk C in Windows 10/11’on Internet. Actually, this is quite simple, just need to use AOMEI Backupper’s Disk Wipe tool to erase the disk or partition.

Ending words
On this page, we have identified and presented 3 built-in ways to tell how to delete local disk D. The methods involve using Disk Management, PowerShell and Command Prompt.
Additionally, you can use AOMEI Backupper Professional to help you upgrade the system drive to a larger on to better manage your disk space, or use it to ease the unnecessary files and folders on it so as to have a bigger storage space.
Notably, this software also allows you to sync your files to could services, you can transfer local files to OneDrive, Google Drive or other services.