21 Ways to Fix Disks Showing 100% in Task Manager
If you want to fix the problem of disk showing 100% in Task Manager, first understand the cause of the problem and fix it with the 21 methods provided in the article. Also, master the easy way to backup your disk.
by Yuka Updated on November 9, 2022
How to fix disk showing 100% in Task Manager
"My Windows 10 computer would become very slow after being idle for a while. When I open Task Manager, I find that the disk usage is up to 100%. There is no doubt that high disk usage is the cause of the computer running slowly. However, I don't understand why this is happening because there are very few applications on this computer. I have tried reinstalling Windows 10. but in less than a week, the same problem reappeared. I've wasted a lot of time on this problem, can anyone give some solid advice?"
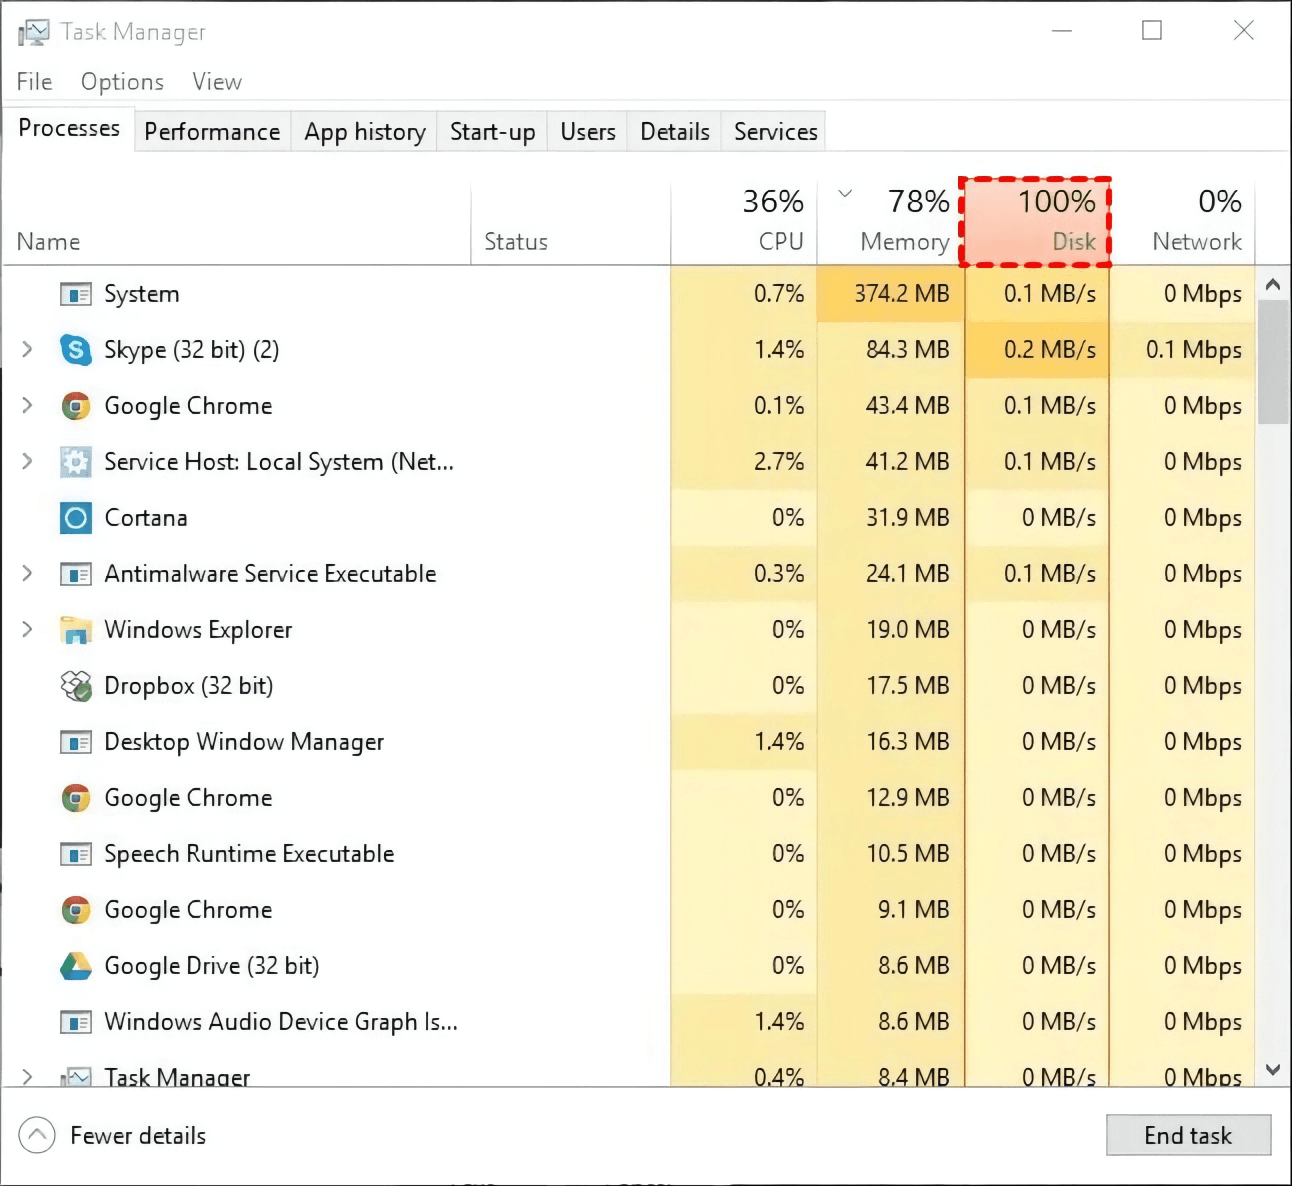
When disk usage is too high, it can cause the system to run slower and can also cause the entire system to get stuck when it reaches 100%, as described in the case above. This means that if you want to use your computer smoothly again, you have to find a way to fix the 100% disk usage problem. First, you need to understand the cause of the problem.
What is the reason why the disk shows 100% in Task Manager
When you don't know how to fix Task Manager showing 100% disk usage, you can try to start with the cause of this problem, here are the common reasons.
- Device drivers are obsolete
- Windows services are incorrect
- Corrupted or lost system files
- Disk error
- Virus or malware attack
- Conflict with anti-virus software
- Windows is obsolete
- Incorrect application-specific settings
- Too many temporary files
- Synchronization software conflicts occur
21 Ways to Fix Disks Showing 100% in Task Manager
Here are 21 ways to fix Disk showing 100% in Task Manager and lagging on Windows 10, try them in turn to make sure your computer runs smoothly. Before you start the following actions, you can try to close all the running applications and restart your computer.
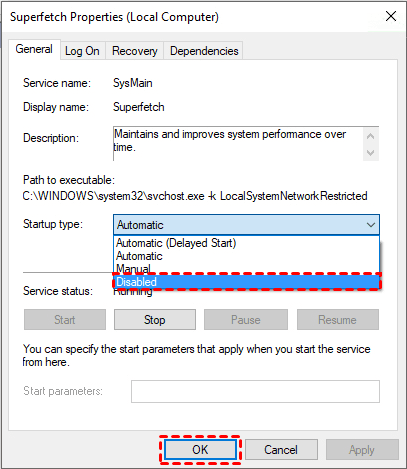
Method 1. Disable SuperFetch service
The SuperFetch service analyzes how often you use certain applications and preloads the data into memory, which can effectively reduce the startup time of these applications. However, in fact, this service can also stress the disk and cause the disk to show 100% in the Task Manager. Therefore, you need to disable this service. Please note that you can disable it from Windows Services and also from the Registry Editor.
🎈 Disable from Windows Services
- Use Windows + R to open the Run window, type services.msc and press Enter.
- In the list of services window, find and lightly double-click to open SuperFetch.
- In the SuperFetch Properties window, tap the drop-down menu next to Start Type, select Disabled and then tap the OK button.
🎈 Disable from Registry Editor
- Use Windows + R to open the Run window, type regedit and press Enter.
- Navigate sequentially to the following paths.
- HKEY_LOCAL_MACHINE\SYSTEM\CurrentControlSet\Control\Session Manager\Memory Management
- Click PrefetchParameters in the left panel and double-click it in the right panel to open EnablePrefetcher.
- Change the Value data to 0 and tap the OK button.

Method 2. Update the device driver
Outdated drivers are a major cause of the problem with disks showing 100% in Task Manager. Therefore, you can try to update the driver to fix the above issue.
- Right-click on the Start button and select Device Manager.
- Check and find the device with the yellow mark in turn, right click on it and select Update Driver.
- In the new window, tap Search automatically for updated driver software and wait for this process to complete. If you find any available updates, please update the driver in time.

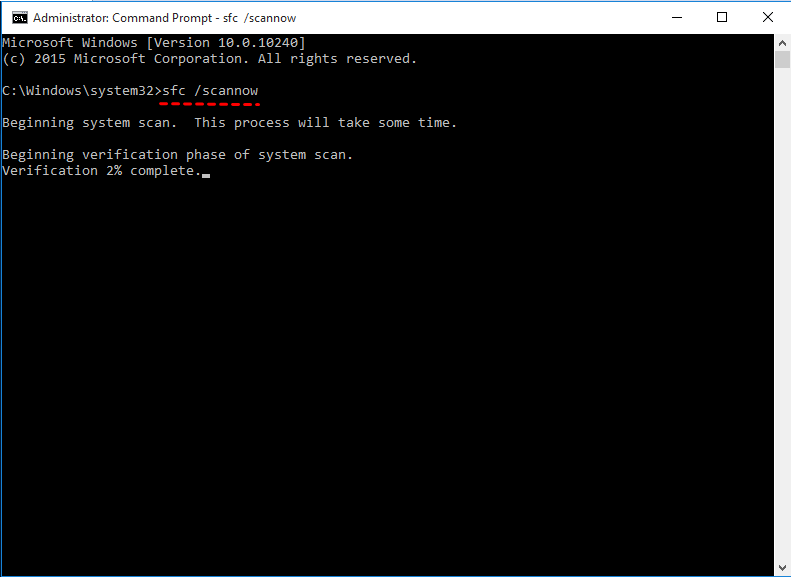
Method 3. Implementation of SFC and DISM
System File Checker (SFC) is mainly used to repair system files and Deployment Image Service and Management (DISM) is mainly used to repair system images. The combined use of both will help to fix the problem of disks showing 100% in Task Manager.
- Use Windows + S to open the search box, type cmd and select Run as administrator.
- In the Command Prompt window, type sfc /scannow and press Enter.
- Enter the following commands in turn, and press Enter to execute the commands respectively.
- Dism /Online /Cleanup-Image /ScanHealth
- Dism /Online /Cleanup-Image /CheckHealth
- Dism /Online /Cleanup-Image /RestoreHealth
Method 4. Execute CHKDSK to repair the disk
If there is an error in the computer disk, then it may also cause the disk to show 100% in the Task Manager, so you need to repair the disk with the CHKDSK tool, which will help to fix the above mentioned problem.
- Use Windows + S to open the search bar, type cmd and select Run as administrator.
- In the Command Prompt window, type chkdsk C: /f and press Enter, then press Y and Enter to continue the recovery process.

📝Note: You can change C to the drive letter of the disk where the lost archive is located, depending on the situation.
Method 5. Reset the virtual memory
Virtual memory can be thought of as an extension of the computer's physical memory. When there is not enough physical memory to perform certain tasks, the Windows system stores files temporarily in virtual memory and swaps them back to memory when needed. Resetting virtual memory helps to fix the problem of disks showing 100% in the Task Manager.
- Use Windows + Pause to open the System window, and tap Advanced system settings at the bottom.
- Make sure you are currently in the Advanced tab and click the Settings button in the Performance section.
- In the Performance Options window, switch to the Advanced tab.
- In the Virtual memory section, click the Change button.
- Uncheck the Automatically manage paging file size for all drivers checkbox and select the disk on which Windows is installed.
- Switch to Custom size and enter Initial size and Maximum size, tap the Set button, and then tap the OK button.
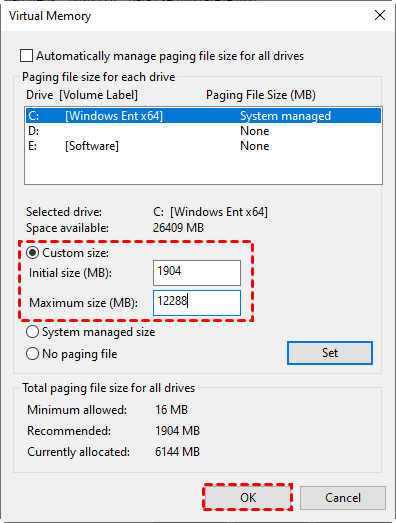
📝Note: The starting size is recommended to refer to the suggested values below, and the maximum value should be set according to your memory, which is usually 1.5 times the memory.
- Use Windows + R to open the Execute window, type temp and press Enter.
- Use Ctrl + A to select all files, right-click and delete them.
Method 6. Scan and remove viruses or malware
When your computer is attacked by viruses or malware, it may also cause the problem of the disk showing 100% in Task Manager. Therefore, you need to scan and remove these potential threats with Windows Defender.
- Use Windows + S to open the search bar, type Windows Security and press Enter.
- In the Windows Security window, click Virus & threat protection.
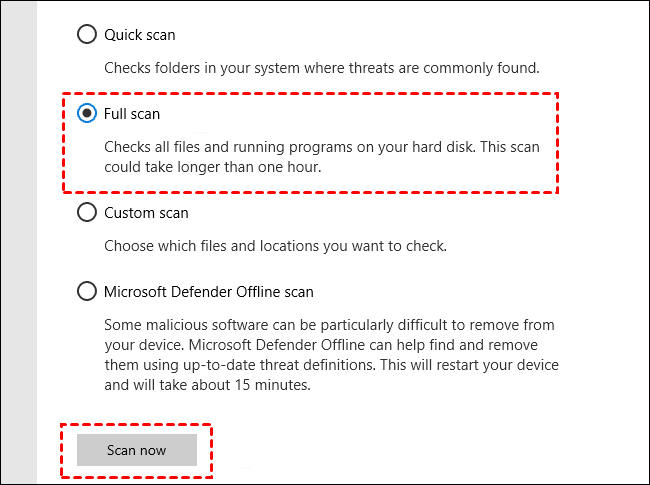
- In the Current threats section, first click Scan options, select Full Scan in the expanded options, and then click the Scan now button below. If there are any viruses or malware scanned, please remove them in time.
Method 7. Temporarily disable the anti-virus software
Usually, Windows Defender built into Windows 10 is sufficient for anti-virus needs. However, some users still worry about computer security and choose to install third-party antivirus software such as Norton, Kaspersky, AVG, etc. These applications may conflict with the system and cause the disk to show 100% in the Task Manager. Therefore, you need to disable them temporarily.
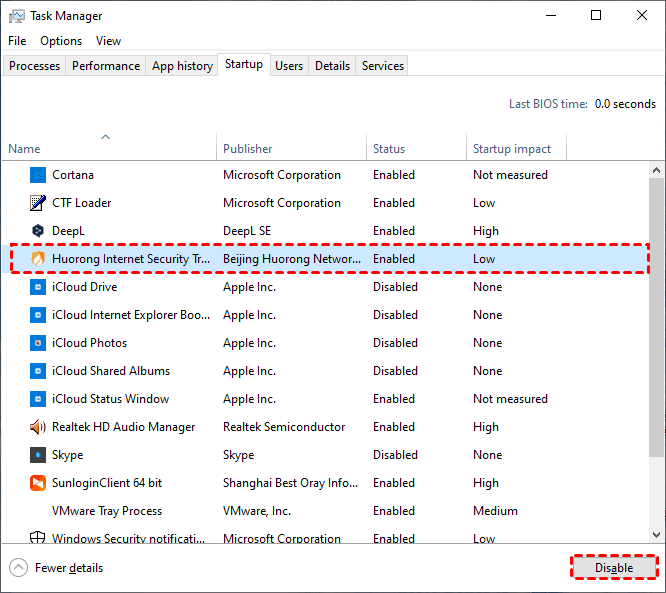
Open Task Manager, in the Startup tab list, find the third-party anti-virus software, select it and click the Disable button below.
Method 9. Repair StorAHCI.sys driver
Certain Advanced Host Controller Interface PCI-Express (AHCI PCIe) models cause firmware errors when using the StorAHCI.sys driver. When Message Signaling Interrupt Mode (MSI) is enabled, the SSD does not complete input and output correctly, causing the Windows storage stack to attempt to reset the device after waiting for an unresponsive read or write for a period of time, and causing the disk to show 100% in Task Manager. At this point, you can try repairing the StorAHCI.sys driver to fix the above issue.
- Use Windows + R to open the Execute window, type devmgmt.msc and press Enter.
- In the Device Manager window, expand IDE ATA/ATAPI controller, right-click Standard SATA AHCIController, and select Properties.
- Switch to the Driver tab at the top and tap on the Driver Details button. If you can see StorAHCI.sys in the driver archive list, then you are using the AHCI driver.
- Next, switch to the Details tab at the top, expand the Property menu and select Device instance path, then remember the PCI\VEN value.
- Use Windows + R again to open the Run window, type regedit and press Enter.
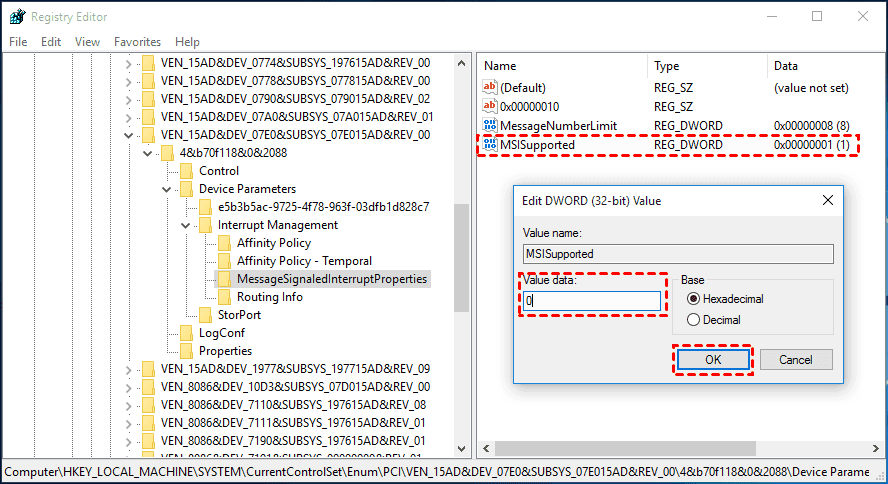
- In the Registry Editor window, navigate to the following path. Please note that you need to replace in the following path with the path of the device example item you remembered in step 4.
- HKEY_LOCAL_MACHINE\System\CurrentControlSet\Enum\PCI\\Device Parameters\Interrupt Management\ MessageSignaledInterruptProperties
- In the right panel light double-click to open the MSISupported key, and modify the value data to 0, and then click the OK button.
Method 10. Update Windows system
Updating your Windows system will fix some bugs from older versions, which will help you to fix the problem of the disk showing 100% in the Task Manager. Please note that the following steps are based on Windows 10 as an example.
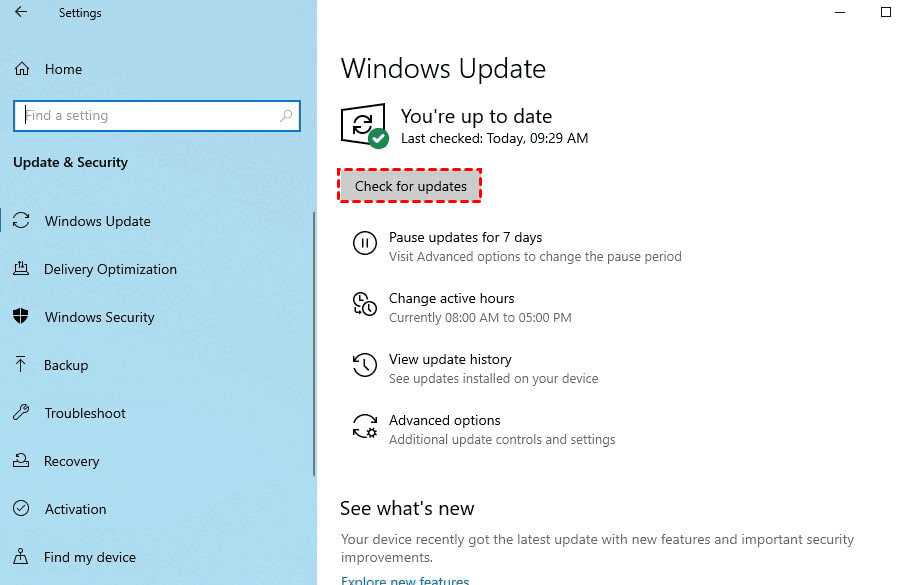
- Use Windows + I to open Windows Settings and tap on the Update & Security option.
- In the Windows Update window, tap the Check for updates button. If there are any updates available, click the Download and install button.
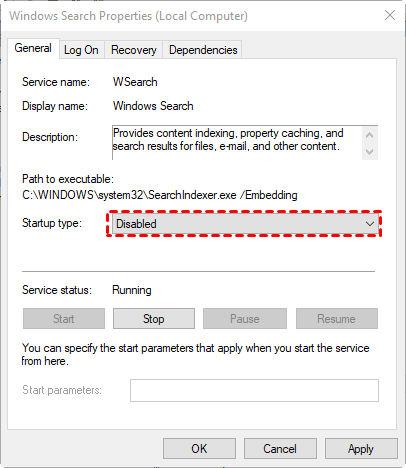
Method 11. Disable Windows Search
From the results of some user feedback, disabling Windows Search will help fix the problem of disks showing 100% in Task Manager, which is a worthwhile approach.
- Use Windows + R to open the Run window, type services.msc and press Enter.
- In the list of services window, find Windows Search and open it by double-clicking on it.
- In the General tab, change the Startup type to Disabled and click the OK button.
Method 12. Change the power option to high performance
The default power option in Windows 10 is Balanced, you can try changing it to High Performance, which will help fix the problem of disks showing 100% in Task Manager.
- Right-click on the Start button and select Power Options.
- In the Power & sleep window, tap the Additional power settings button.
- In the Choose or customize a power plan window, select High performance.
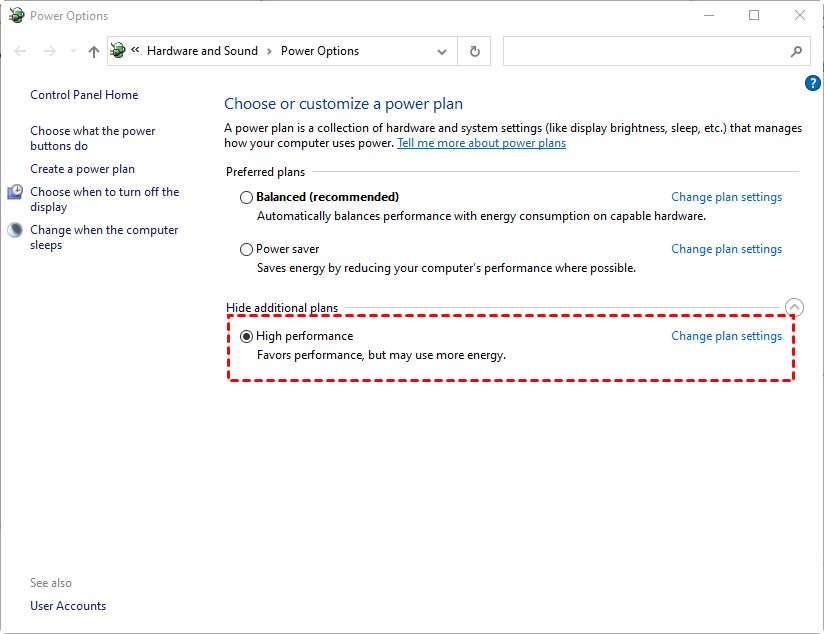
✨Tip: If your computer does not have a high performance power plan, please click Change plan settings -> Change advanced power settings in order to switch to high performance in the Advanced settings window.
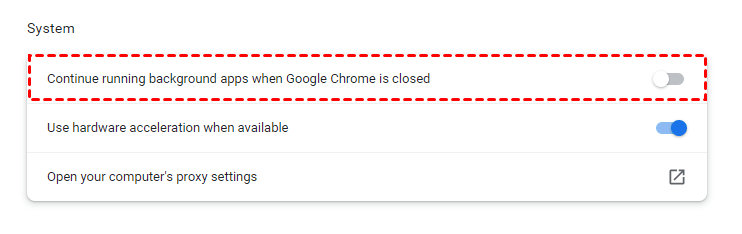
Method 13. Change Google Chrome and Skype settings
For some unknown reasons, incorrect settings of Google Chrome and Skype may also cause the issue of disks showing 100% in Task Manager. Therefore, you need to change these incorrect settings in order to fix the above issue.
🎈 Change Google Chrome settings
- Open Google Chrome, tap the ⋮ icon in the upper-right corner, and select Settings.
- Click Privacy and security in the main menu, then click Cookies and other site data and turn off the Preload pages for faster browsing and searching option.
- Then open the main menu, and expand Advanced, and then click System, close the Continue running background apps when Google Chrome is closed option.
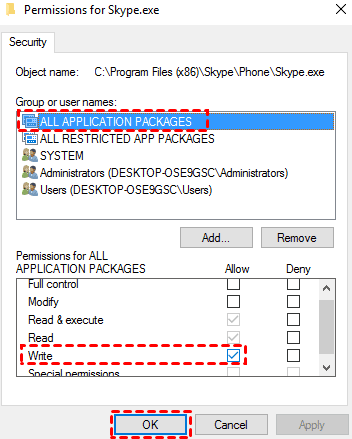
🎈 Changing Skype settings
- Make sure Skype is closed, then use Windows + E to open File Explorer and navigate to C:\Program Files (x86)\Skype\Phone.
- Find Skype.exe and right-click it, then select Properties.
- Switch to the Security window at the top, and tap the Edit button.
- Select ALL APPLICATION PACAGES in the Group or user names list, and check the Allow Write checkbox below, and tap the OK button.
Method 14. Change the BIOS mode to AHCI
Feedback from some users who have replaced their SSDs shows that changing the disk mode from RAID to AHCI is also an effective fix for disks showing 100% in Task Manager. You can try this method if your computer disk is in RAID mode.
- Restart the computer and press the F2 or Del key to enter the BIOS. please note that different brands of motherboards are different methods of entering the BIOS.
- Switch to Config at the top of the BIOS screen, and then tap Serial ATA (SATA).
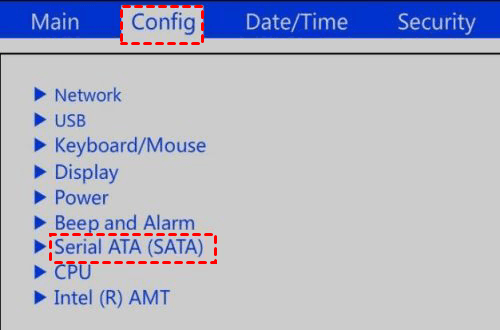
- Find the sata comtroller mode option [compatibility] and switch the mode to AHCI, and press Enter to save the changes.
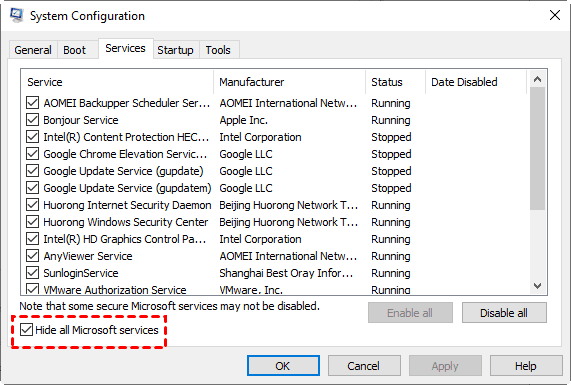
Method 15. Perform a clean start
- Use Windows + R to open the Execute window, type msconfig and press Enter.
- Switch to the Services tab at the top of the System Configuration window, check the Hide all Microsoft services checkbox in the lower left corner, and then click the Disable all button.
- Switch to the Startup tab again and click the Open Task Manager button.
- In the Startup tab list, select each startup item in turn, and click the Disable button in turn, then close any Task Manager.
- Go back to the Startup tab of System Configuration and tap the OK button.
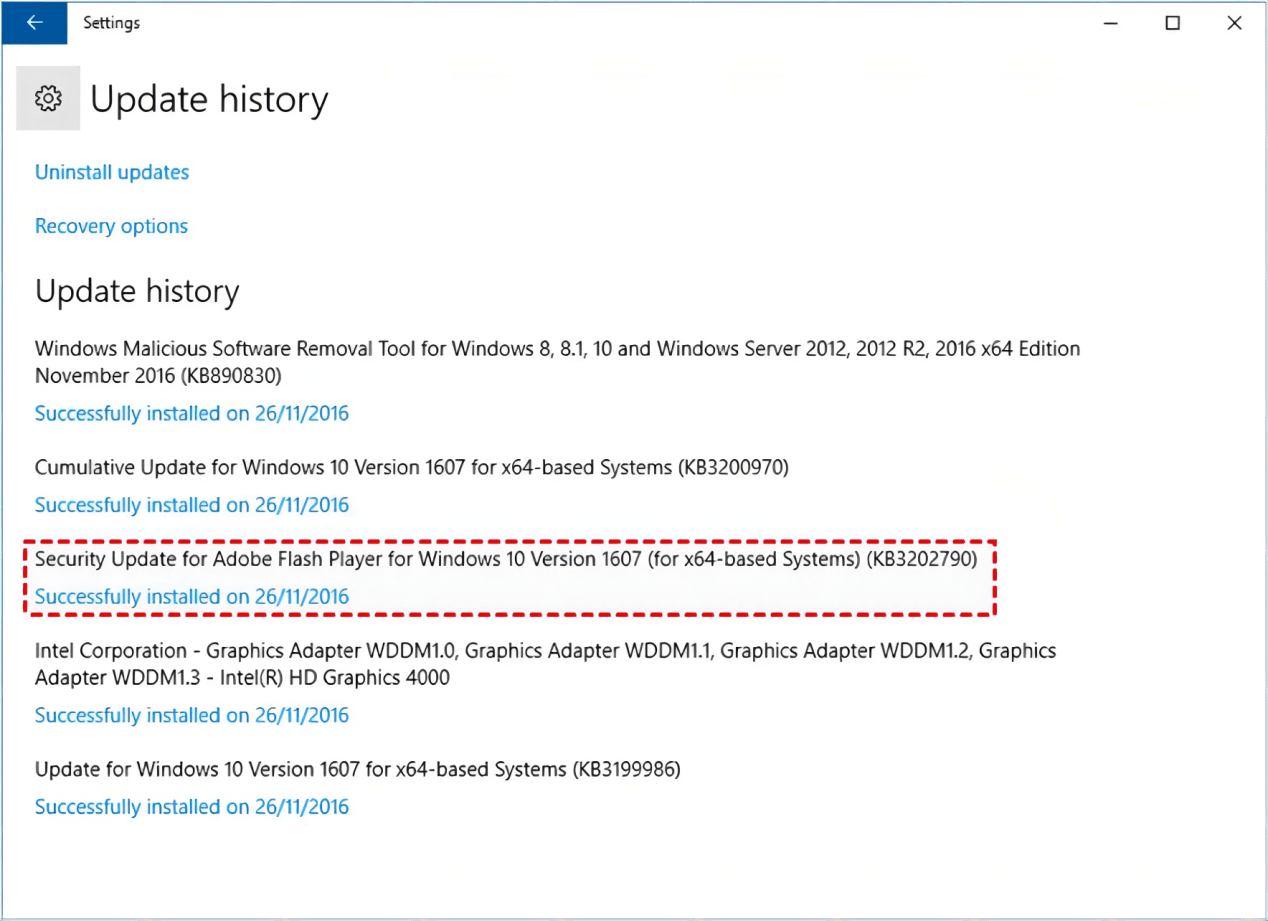
Method 16. Uninstall Flash Player
In Windows 10, for example, the update to forcibly uninstall Flash Player is already included in 1809 and newer versions. So, if you have recently updated your Windows system, then you can ignore that method. However, if you have a lower version of Windows, then you can try to uninstall any Flash Player updates, which will help to resolve the disk showing 100% issue in Task Manager.
Please open Windows Settings, click Update & Security -> Windows Update -> View update history -> Uninstall updates, find and uninstall the Flash Player update.
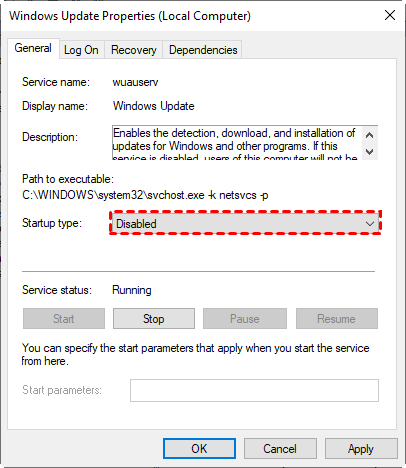
Method 17. Disable Windows Update service
- Use Windows + R to open the Execute window, type services.msc and press Enter.
- In the list of Services window, find and double-click it to open Windows Update.
- In the General tab, change the startup type to Disabled and then tap the OK button.
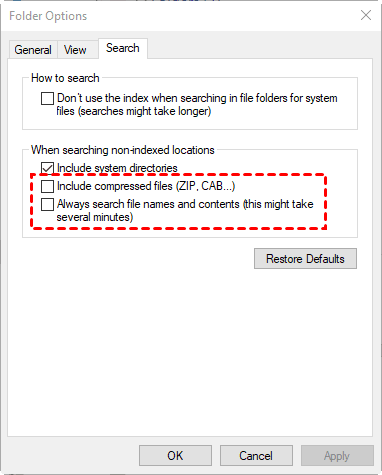
Method 18. Change File Explorer settings
- Use Windows + E to open File Explorer, tap View at the top, and then tap Options.
- Switch to the Search tab at the top of the Folder Options window.
- Uncheck the Include compressed files (ZIP, CAB...) and Always search file names and contents (this might take several minutes) checkboxes, and click the OK button.
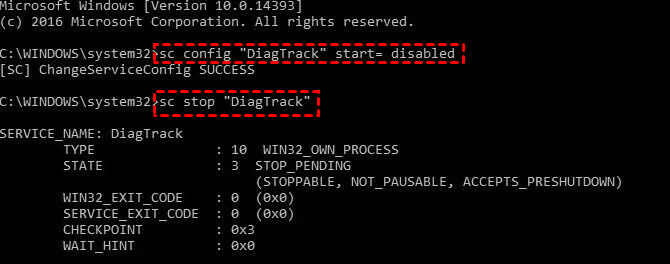
Method 19. Disable DiagTrack service
- Use Windows + S to open the search bar, type cmd and select Run as administrator.
- In the Command Prompt window, enter the following commands in sequence and press Enter.
- sc config "DiagTrack" start= disabled
- sc stop "DiagTrack"
Method 20. Delete temporary files
- Use Windows + R to open the Execute window, type temp and press Enter.
- Use Ctrl + A to select all files and folders, right-click on one of the files, and select Delete in the expanded menu.
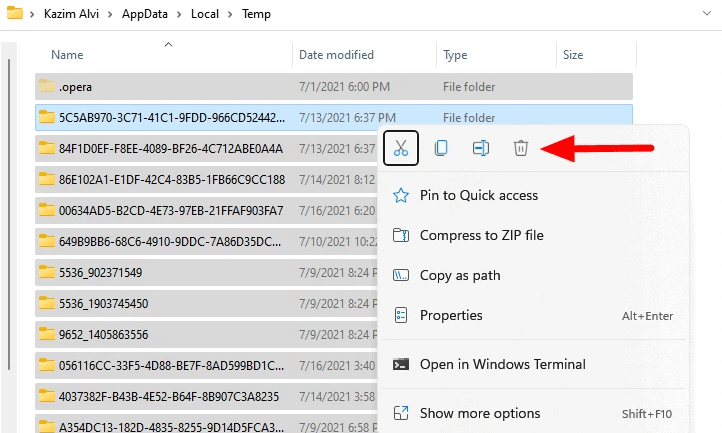
- Open the Run window again, type %temp% and press Enter.
- Use Ctrl + A to select all files and folders, right-click on one of the files and select Delete in the expanded menu.
- Open the Run window again, type prefetch and press Enter.
- Use Ctrl + A to select all files and folders, right-click on one of the files, and select Delete in the expanded menu.
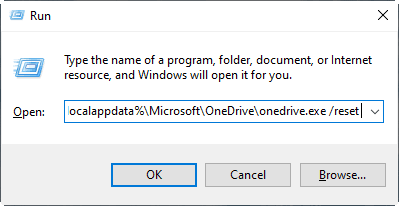
Method 21. Reset the synchronization software
Syncing software such as OneDrive can help you save disk space. However, in some cases, it may get stuck in the process of syncing files and cause the disk to show 100% in Task Manager. Therefore, you can try resetting these syncing software to fix the above issue, here is an example of OneDrive.
Use Windows + R to open the Execute window, type %localappdata%\Microsoft\OneDrive\onedrive.exe /reset and press Enter.
Back up disks for all data recovery
The problem of the disk showing 100% in Task Manager will cause the computer to run slower and will seriously affect the computer experience. Therefore, you need to fix it as soon as possible with the 21 methods provided in the article in order to use your computer smoothly.
Since the cause of the above problem involves disk failure, it may pose a threat to the security of the data in the disk. Therefore, it is recommended that you use AOMEI Backupper Standard to perform a disk backup after resolving the above problem so that you can quickly recover the data you need in case of accidental disk data loss.
As a free and professional disk backup software, AOMEI Backupper Standard allows you to quickly backup all data from your local disk to any location, including cloud, NAS devices, external hard drives, etc. on multiple versions of Windows 11/10/8.1/8/7. If you are using AOMEI Backupper Standard for the first time, please read the following in detail in order to create the correct disk backup image for the disk you need to back up. First of all, we need to download and install the software:
- Execute AOMEI Backupper Standard, switch to the Backup tab in the left panel, and select the Disk Backup button in the right panel.

- In the Disk Backup window, click the Add Disk button. In addition, you can tap the pencil icon in the upper left corner to modify the name of this backup task.

✨Tips: If you have additional needs, please click Options, Schedule Backup and Backup Scheme on the bottom left to customize your settings.
📌Option: You can add annotations to the current backup task and enable email notifications. When upgrading to the Pro version, you can also enable the encrypted backup feature.
📌 Schedule Backup: You can set up daily, weekly, monthly scheduled backups of your files for free, and after upgrading to the Pro version, you can also backup your files on event triggers and USB plug in.
📌 Backup Scheme: You can change the backup method to full backup and incremental backup for free. After upgrading to the Pro version, you can also use the differential backup and automatic cleanup backup features.
- Modify the path of the disk backup according to your situation, and click the Start backup button at the bottom right corner after confirming it is correct.

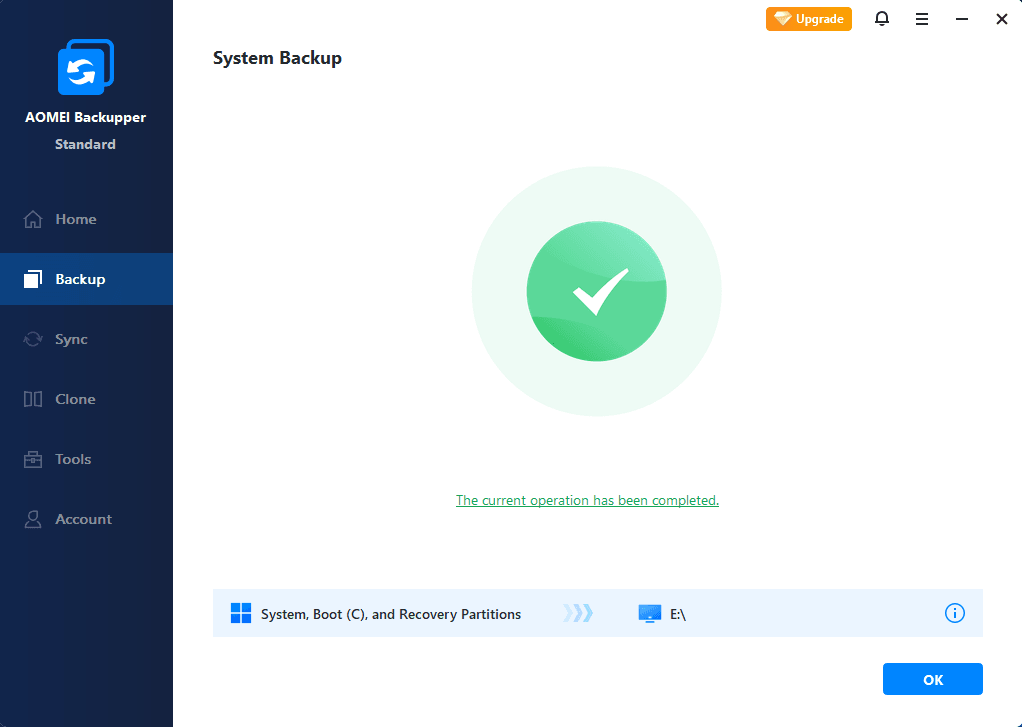
- Next, wait for this process to complete and tap the Finish button.
In addition to disk backup, AOMEI Backupper Standard can provide you with other useful features.
- The main point of disk backups is that when the original data disk data is accidentally lost or damaged, you can use the created disk backup image and recover it with the disk restore feature.
- The disk backup feature will create a backup image of the entire disk, but if you want to back up only single or multiple files (folders), use the file backup function.
- If you are thinking of upgrading your SSD, you can also use this softwareclone hard drive to SSD , which will save a lot of time.
- When upgrading your SSD, if you want to migrate your system completely to the new SSD, please use the system clone function to do so.
Summary
If you are at a loss about the disk showing 100% in Task Manager, please read the above in detail and after understanding the cause fix this problem by 21 ways to ensure your computer runs at normal speed again. However, you must be reminded that any disk may face data loss after a long period of use, so it is recommended that you use AOMEI Backupper Standard to perform disk backups to prevent disk data loss.
AOMEI Backupper Standard has a nice and clear interface that allows you to back up all the data in your entire disk to any location with just a few clicks. In addition, the software will provide you with system backup, partition clone, partition clone and many more features.