Deploy Windows 11 to Multiple Computers Easily (2 Ways)
You can learn 2 methods to easily and efficiently deploy Windows 11 to multiple computers. One is using the media creation tool, and the other is a professional image deployment tool.
By Clytze Updated on January 11, 2024
User Case: Want to Deploy Windows 11 to Multiple Computers
“We use industrial PCs running Windows with our software to control machines we sell. The PCs are identical hardware. How would we go about creating an image to use on each so we don't have to go through the windows install, drives and our software install each time. By the way, our company uses Windows 11. So, any good solutions? Thank you.”
![]()
As this user said, what approach should a company take when it needs to deploy Windows 11 to multiple computers? Even for individuals, there are situations all the computers of the family members need to be deployed. Next, this article will introduce 2 useful methods.
Reasons for Deploying Windows 11 to Multiple Computers
People may have different reasons for deploying Windows 11 to multiple computers, but there are two broad categories.
- For business users: Companies need to set up new computers or update Windows 11 for their employees in bulk, which makes it easier to implement standardized management. And it greatly reduces the time and effort of company technicians.
- For individual users: If family members have one computer each and want to deploy several computers with the same configuration, using image deploy in Windows 11 can also greatly reduce the hassle of reinstalling them one by one.
How to Deploy Windows 11 to Multiple Computers
I would like to share two simple ways to deploy Windows 11 to multiple computers with you. One method is to do so with Windows 11 Media Creation Tool. The other is to use professional third-party deploying software. You can choose anyone of them according to your needs.
Method 1. Deploy Windows 11 to Multiple Computers using Media Creation Tool
Windows Media Creation Tool can be used to upgrade your current PC to Windows 11. And it can download the Windows 11 installation files to a flash drive (or DVD) so that you can use it to reinstall Windows 11 easily. You can follow the steps below to create bootable media with Media Creation Tool and clean install Windows from it. By the way, it only supports installing systems one by one.
Step 1. Download Windows 11 Media Creation Tool and open it.
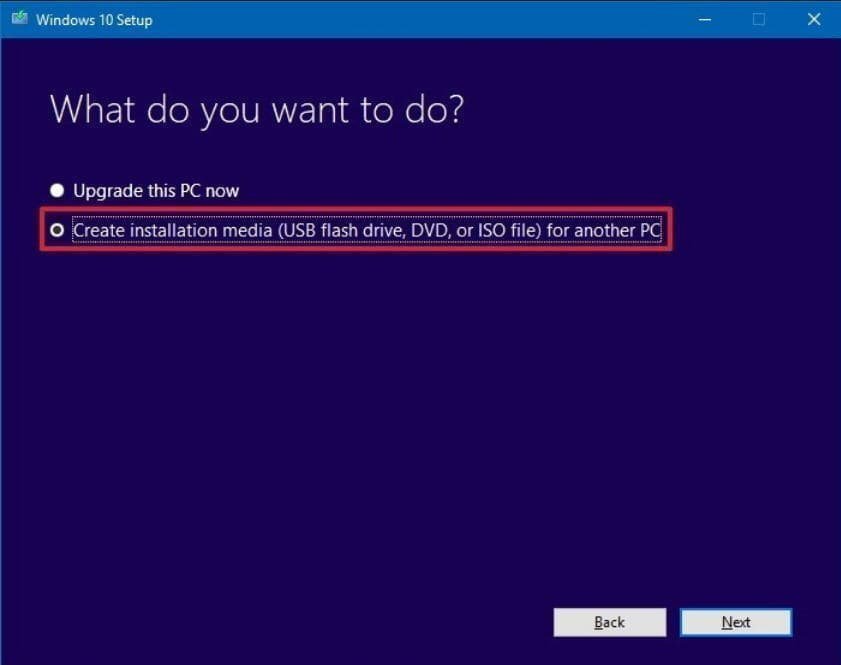
Step 2. Choose “Create installation media (USB flash drive, DVD, or ISO file) for another PC”. Please follow the instructions on the page to finish the remaining steps.
Step 3. Install the SSD after connecting the disk containing the Windows 11 installation files to your computer.
Step 4. Change the boot sequence. Boot the computer, and press F2 or F12 to enter the BIOS, then select the bootable disk as the first option, finally press "F10" or "Enter" to exit and reboot from the installation disk.
Step 5. Click "Install Now" after selecting language and other preferences.
Step 6. Input your product key or leave it blank.
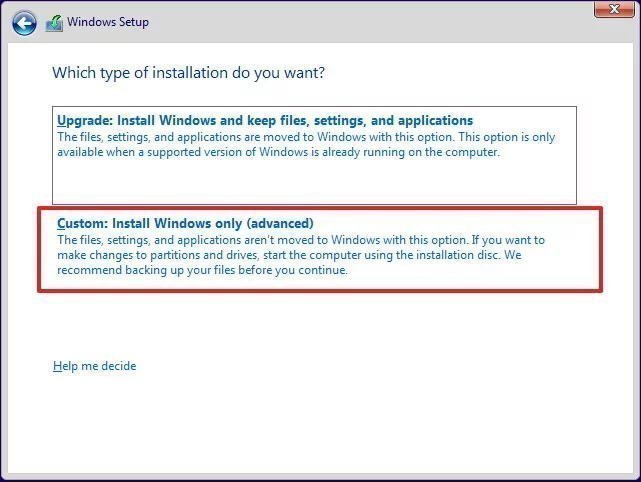
Step 7. Select Custom: Install Windows only (advanced).
Step 8. Select the partition on the SSD to install Windows, then click Next.

- Note:✎...
- Unless your SSD already has Windows 11 installed, you need to purchase a product key to activate Windows.
In general, the Media Creation Tool can help you deploy Windows 11 to multiple computers, but it is difficult to operate, especially for green hands. And it has relatively few features. If you want simpler and more functional software, you can try method two.
Method 2. Deploy Windows 11 to Multiple Computers using AOMEI Backupper and AOMEI Image Deploy
As for method 2, you need to use both AOMEI Backupper Standard and AOMEI Image Deploy. You need to backup the system of the server computer by the backup software, and then restore it to multiple client computers using the deploy software.
AOMEI Image Deploy which can deploy image to unlimited computers simultaneously is an excellent Windows 11 deploy tool. It has the following advantages:
- Easy-to-use: It guides you through step-by-step wizards, even if you are a green hand, you can easily understand and operate it by yourself.
- Real-time process monitor: You can monitor all the client computer’s IP addresses and their recovery status in real-time and can manage all clients' computers remotely.
- Support multiple operating systems: It supports Windows 11/10/8.1/8/7/Vista/XP and Windows Server 2003/2008 (R2)/2011/2012 (R2)/2016.
If you don't want to download two software, then you can choose the all-in-one backup and restore software - AOMEI Backupper Technician or techplus to complete the system backup and image deployment. In addition, you can also use various other functions on the software, including backup, restore, clone, create bootable disks, etc to protect your computer in all aspects.
The preparation and steps are the same, so you can choose based on your own needs. Next, the article shows the step-by-step guide for the method that requires downloading two software. You can keep reading.
Note: The standalone AOMEI Image Deploy only supports BIOS boot while the integrated AOMEI Image Deploy in AOMEI Backupper Technician/Technician Plus supports both BIOS and UEFI boot.
Create System Image
To deploy Windows 11 to multiple computers on same network, you need to create a system image with AOMEI Backupper first.
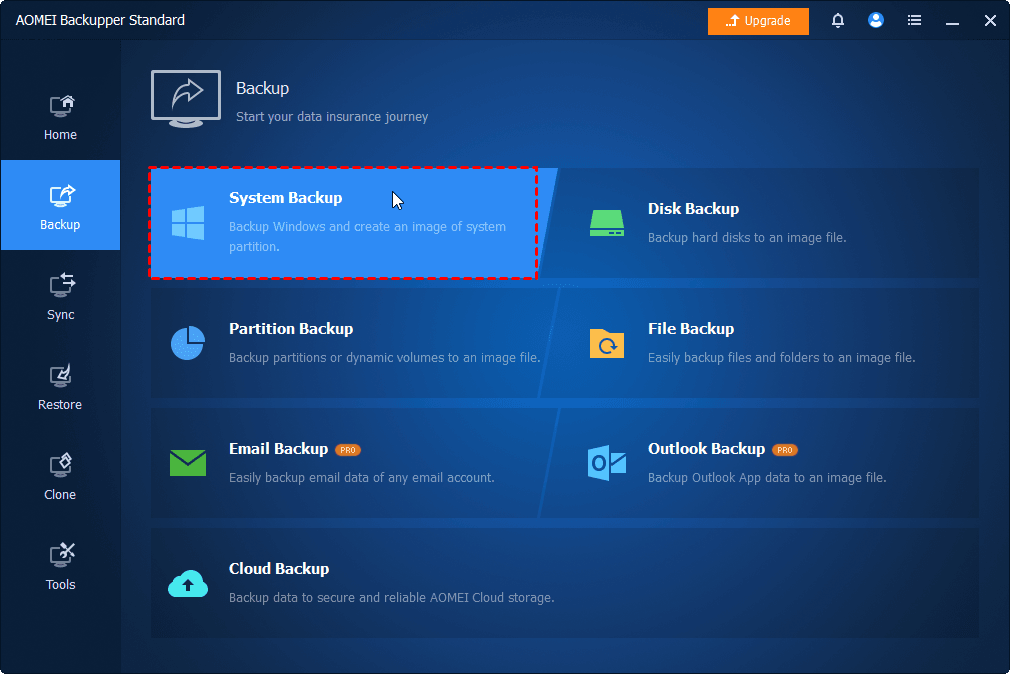
Step 1. Download AOMEI Backupper and launch it. Click Backup > System Backup.
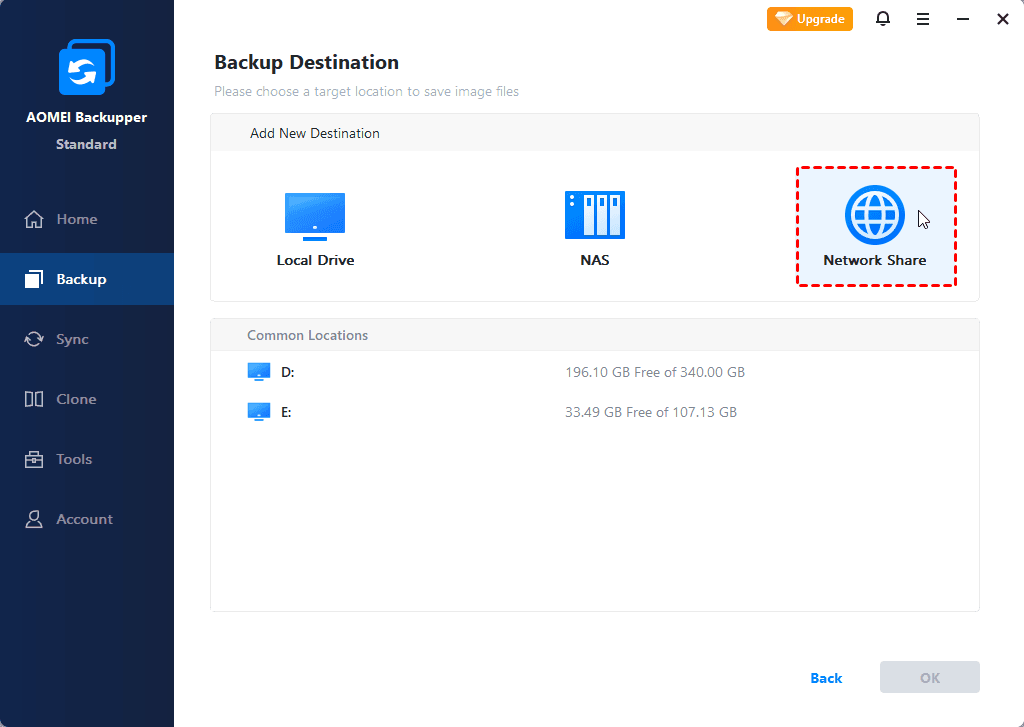
Step 2. Click the option Select a network location in the picture and then select a NAS or network share folder as the backup path.
- Note:✎...
- System backup must be backed up to a network location because image deployment requires that the backup and restore computers should be on the same network location.
Step 3. Finally, click Start Backup.
Preparations before Deployment
Before installing Windows 11 on multiple computers, you need to do some preparation work:
- Make sure the server computer and all client computers are on the same network segment of the same LAN.
- Please confirm the sequence number of the destination disks that are used for image deployment is the same. It is recommended to remove all other disks in the client computer but only keep the destination disk for image deployment.
- Make sure the network adapter in all the client computers supports PXE boot (also known as network boot).
- Verify Windows Recovery Environment is finished on the server computer system. If it is unfinished or the system is older than Windows 7, please download Windows AIK/ADK. If you don’t want to download it, please choose a machine running Windows 7 or higher system as server computer.
Install Windows 11 System Image to Multiple Computers
Once you have completed all the preparations, you can follow these steps to deploy Windows 11 to multiple computers.
Step 1. Download AOMEI Image Deploy, install and open it. Tick Create bootable WinPE ISO manually > Make WinPE > click Next.
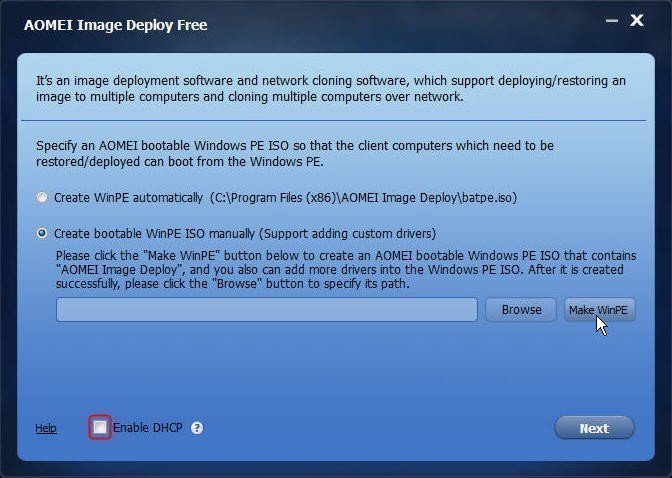
- Notes:✎...
- If you don't need to add additional drives, you can just select the first option.
- To deploy image over network, there must be a DHCP server in your LAN. If no, please tick the “Enabled DHCP”.
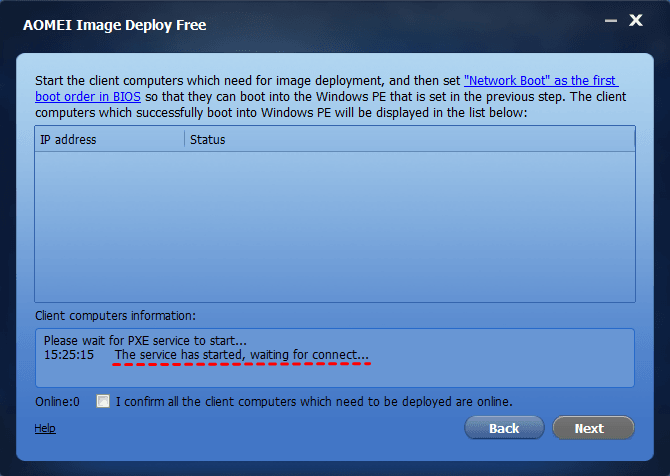
Step 2. The software will automatically create the PE environment, and you will see a message "The service has started, waiting for connect..."
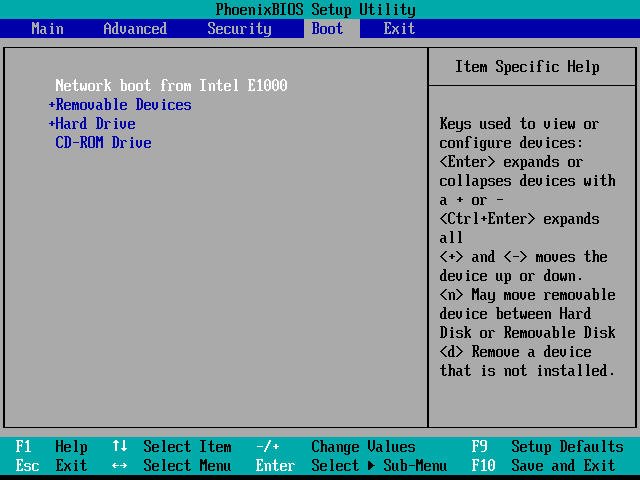
Step 3. Start client computers and change the boot priority of each client computer in BIOS. Make sure they boot from network.
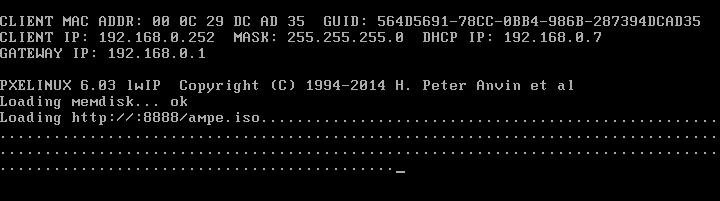
Step 4. If all the settings are correct, the computers will boot into AOMEI Image Deploy recovery environment and display its booting progress as shown below.
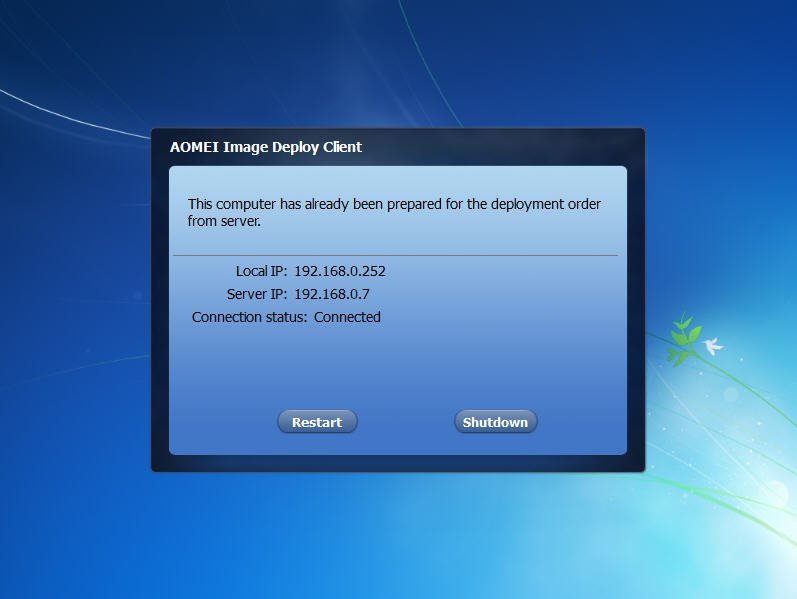
Step 5. When it is finished, you will see the client computer display local IP, server IP and connection status.
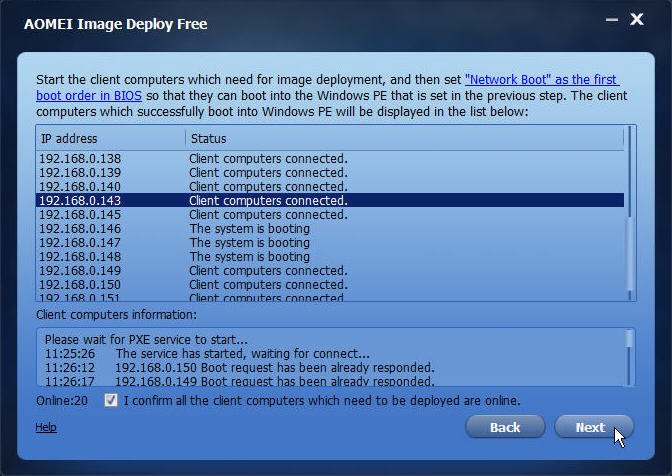
Step 6. The sever computer detects all the client computers are connected via their IP and select I confirm all the client computers which need to be deployed are online > Next.
Step 7. Click Browse to select a backup image from your network or NAS.
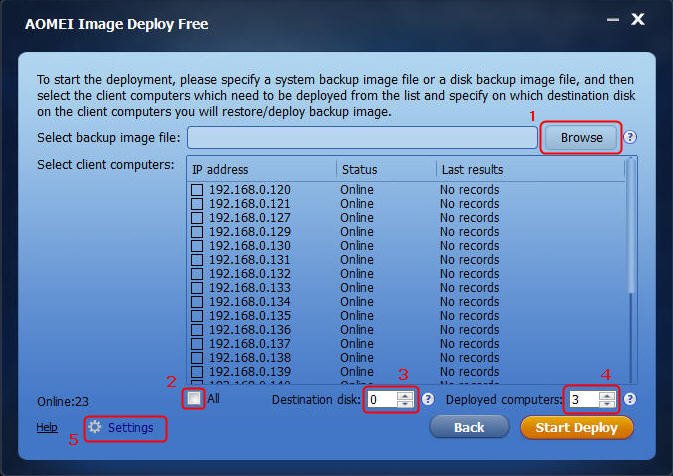
- Notes:✎...
- All: Select all computers to deploy the Windows 11 system image at the same time. The more client computers you have, the slower the deployment will be.
- Destination disk: Type destination disc number (boot disc number is 0) to specify the disc for deploying the Windows 11 backup image.
- Deployed computers: Set the number of computers per deployment.
- Settings: Set the computer name and IP address. When you are setting IPs, it can be cumbersome and time-consuming to set them manually if you have multiple client computers to set up. You can upgrade to the Technician version and after upgrading you can set up automatic IP assignment for your multiple client computers.
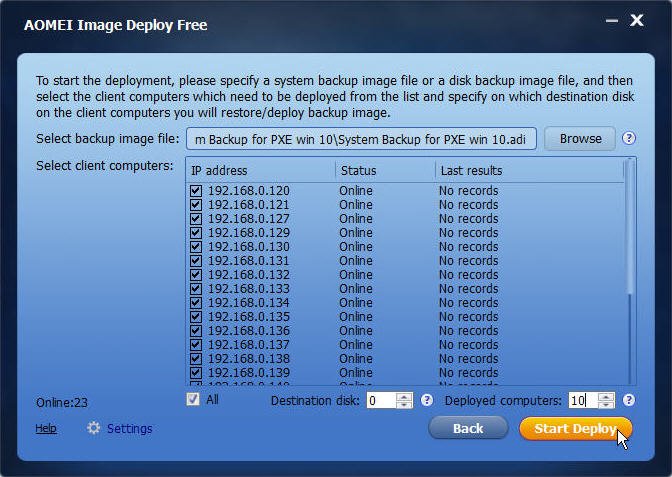
Step 4. Click the Start Deploy and you will see the progress of the image deployment. Just wait for the deployment to complete. You can upgrade to the higher edition so that you can use the universal restore feature to restore multiple computers easily.
- Notes:✎...
- IP preset and deploying image to computers with different hardware is only available in AOMEI Image Deploy Technician Edition.
- If you encounter the problem of SID conflicts, you need to remove SID with Sysprep first and then deploy the image without SID.
Tip: Backup multiple computers after deploying Windows
After deploying Windows to all computers, it is necessary to back up all computers regularly. In today's world, data are still vulnerable. Especially for business data, ransom attacks, human error, hardware damage, etc. can easily cause data loss.
AOMEI Cyber Backup is a powerful and easy-to-use enterprise backup software that enables you to easily backup multiple computers at a time.
- Backup system/disk/partition of a bunch of Windows PCs and Servers from one intuitive console.
- Schedule a backup task to run daily/weekly/monthly using the full/incremental/differential backup method.
- Store data on local and external storage devices, like HDD, flash drive, and NAS drive.
- Regularly remove outdated backup versions to free up the storage of backup devices.
- Besides backing up physical machines, it also can backup VMware, Hyper-V virtual machines, and SQL databases easily.
You can download the trial version and install this software. We will guide you how to use this tool.
Step 1. Download and install AOMEI Cyber Backup on a computer. Install the AOMEI Cyber Backup agent on the computers you want to backup.
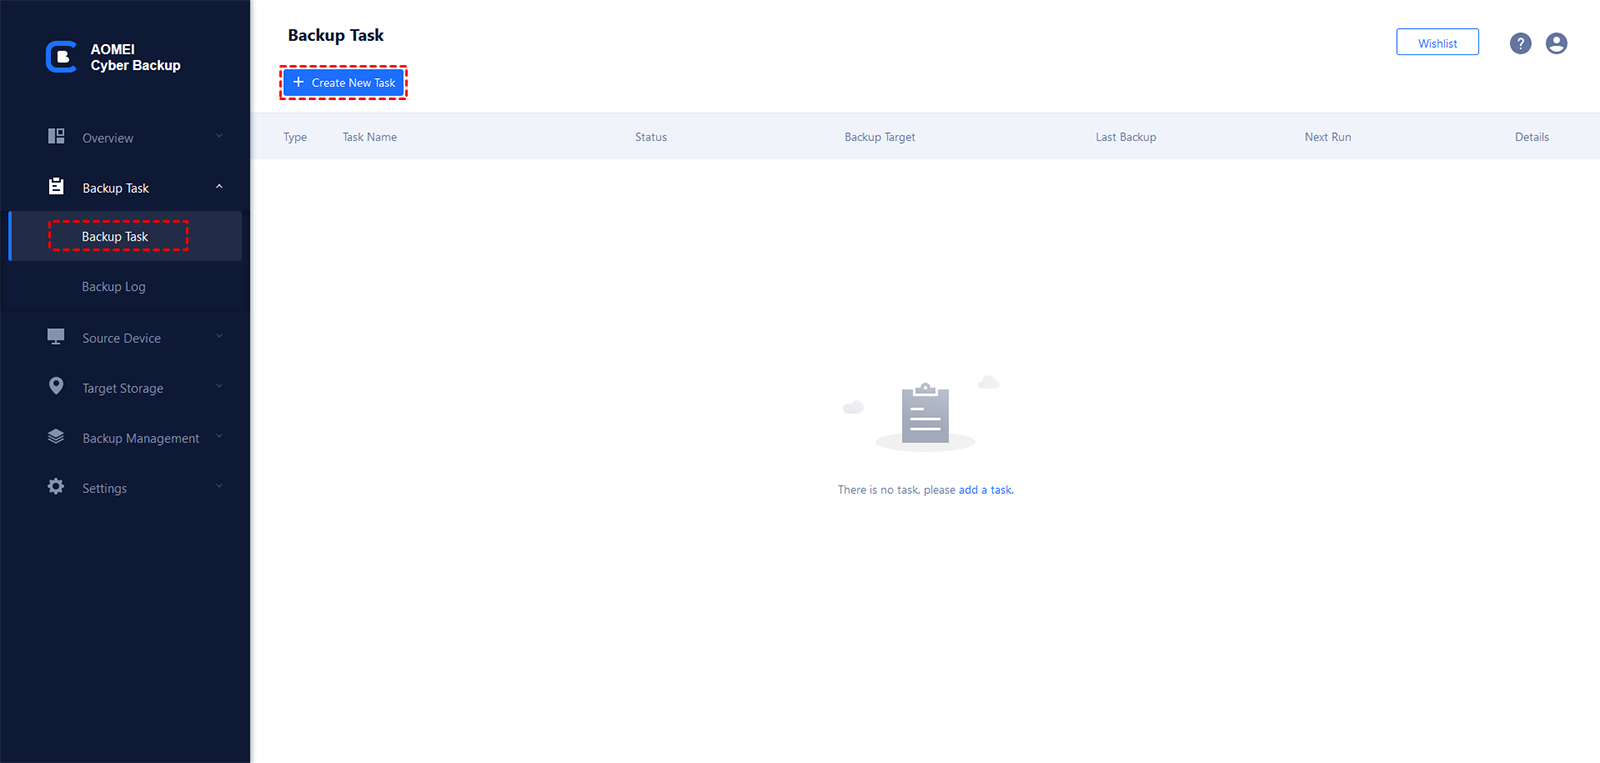
Step 2. Run and log in AOMEI Cyber Backup, and add the Windows device that you want to backup. Then click Backup Task on the left menu bar and select Backup Task > Create New Task.
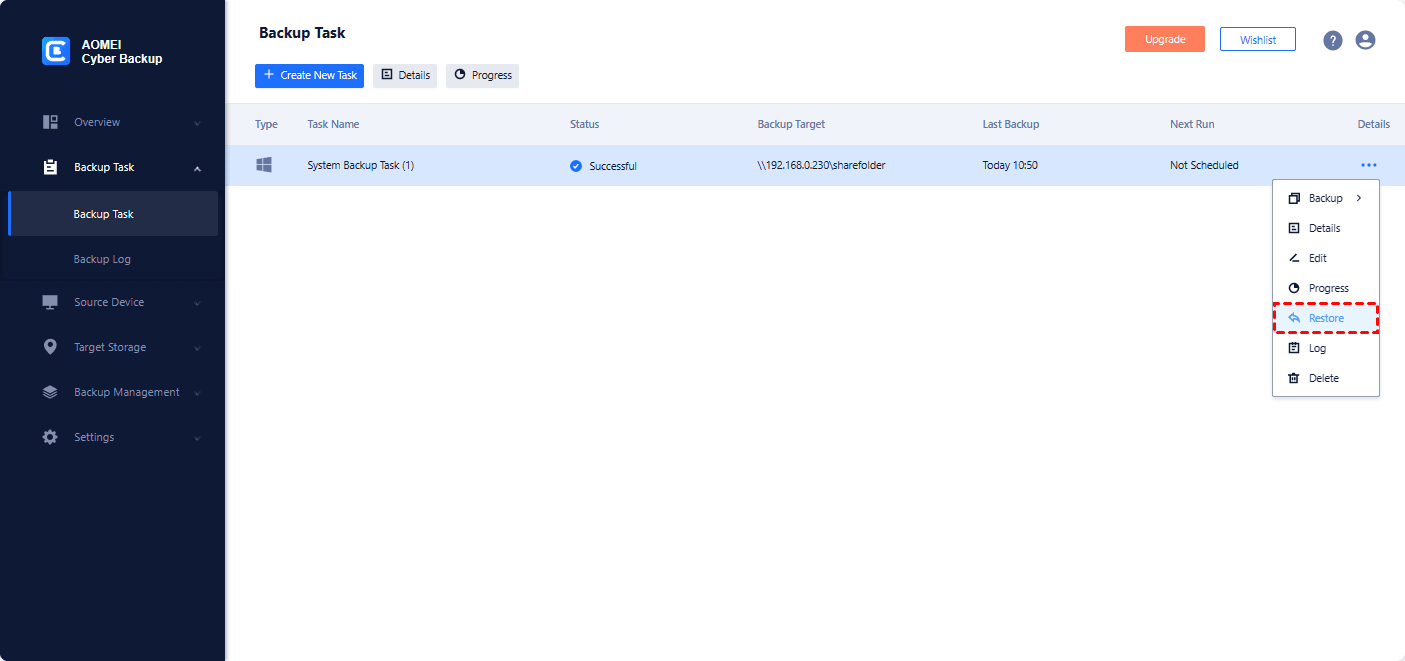
Step 2. If you need to restore a backup, just click Backup Task on the left menu bar and click the three dots icon on the task you want to restore. Then select Restore from the drop-down menu.
Summary
If you need to deploy Windows 11 to multiple computers, both the Media Creation Tool and AOMEI Image Deploy can help you. You can choose according to your needs. But to be honest, the second one is easier. You can backup your system with AOMEI Backupper and then use AOMEI Image Deploy to install it on multiple computers, which can save your time and effort.
Besides, you can use AOMEI Cyber Backup to protect your data centrally, which is also convenient for you to manage multiple computers together. If you want to know more things about it, please download and try it by yourself!

