Full Guide to Dell Inspiron 15 Replace Hard Drive with SSD
If you want to make Dell Inspiron 15 replace hard drive with SSD, you can follow the simple steps shared in this article. After the replacement, you can boot the new SSD successfully. Just continue reading for more details.
By Clytze Updated on November 30, 2022
Scenario
How to replace Dell laptop hard drive with SSD?
I am using an Inspiron 15 5770, and I would like to replace its HDD with an SSD. Forgive me if this information is available elsewhere; I have found the general procedure (literally just swapping the hard drives out), but I am having trouble finding specifics for this model.
How do I know if an SSD is compatible with this laptop? Any specific SSD recommendations?
Besides the SSD, what equipment and software will I need? I know I have to copy Windows from the HDD to the SSD, but I'm not sure how to go about it. Thank you!
- Question from Dell Community

Though there are many approaches to improve computer performance, if you’ve used the PC for a long time, the best way to speed it up and fix disk errors is still upgrading the hard drive. If you're looking for a comprehensive tutorial to figure out how to replace Dell Inspiron 15 series laptop hard drive without losing data, you are in the right place. In this article, I’ll share my perspective. Just continue reading to catch more details in the following part.
Why need to make Dell Inspiron SSD update?
You may need to replace HDD with SSD on Dell Inspiron 15 series laptops for the listed scenarios:
- Boost computer performance. SSDs have better performance than HDDs. SSD can read and write much faster than traditional HDDs, so you can boot your OS faster, play games more smoothly, load videos without lagging, etc.
- For more robust data protection. SSDs do not contain any removable parts, so it better protects your data from accidental damage caused by knocking or dropping the drive.
- Original hard drive failure. When your computer has a Blue Screen of Death, or boot problems such as a boot loop, it means that your computer's system files or hard drive has failed. So you need to transfer all your hard drive files to a new SSD to ensure that your computer works properly.
- …
Whatever your reason for Dell Inspiron 15 hard drive replacement, you can get the stepwise guide to finish this task easily in the next section.
How to finish Dell Inspiron 15 hard drive replacement
The process of how to replace Dell laptop hard drive with SSD can be summarized as X parts.
Part 1. Make all the utilities needed for the process ready to go, such as a prepared SSD with the right size and density, a SATA to USB cable, a reliable cloning tool, a suitable screwdriver.
Part 2. Transfer all data on HDD to the new SSD. Clone all data from HDD to SSD with the best SSD cloning software, including operating system, installed programs, files, configured settings, etc.
Part 3. Shut down your laptop and physically swap Dell HDD for SSD.
Part 4. Make the cloned SSD bootable
Now, let’s follow the graphical guide to realize Dell Inspiron SSD upgrade.
Part 1. Preparations before replacing
1. Connect the SSD. You can connect the SSD externally or internally according to your Dell Inspiron 15 laptop type, which including 3000 series, 5000 series, 7000 series. If your Dell laptop type has only one drive bay, you should connect the SSD to USB port via a SATA to USB cable.

2. Backup the SSD. Once you have completed the cloning process, the target SSD will be overwritten. If you’ve stored some important files on it, please use the Backup feature of AOMEI Backupper to backup the SSD at first.
Part 2. Clone Dell data from HDD to SSD with best SSD cloning tool
Before you physically swap out the HDD for SSD, you will need to migrate all data from the old drive to the new one. Here I recommend AOMEI Backupper Professional, the most secure cloning tool for you.
It can help you replace old Dell Inspiron 15 laptop HDD with SSD and ensure a secure boot in Windows 11/10/8/7/XP/Vista. Clone laptop hard drive to SSD including everything, such as, operating system, system reserved partition or efi partition, installed programs, personal data, etc. And you are allowed to optimize the performance of the SSD using the SSD Alignment feature.
Moving on, you can click the button below to download this secure SSD cloning tool to have a try.
Step 1. Install and launch AOMEI Backupper Professional, navigate to Clone tab and choose Disk Clone. If you want to migrate OS only, you can choose to perform System Clone.

Step 2. Select your current Dell hard drive as the source directory, click Next.

Step 3. Select the new SSD as the cloning destination, with the intelligent cloning technology, you can even clone larger drive to smaller SSD. Then click Next.

Step 4. Preview the information of your source HDD and destination SSD and then click Start Clone. You can check the SSD Alignment feature to boost the SSD performance. Wait for the process to complete and then click Finish.

👣 Notes:
✎ Sector by sector clone: This feature will clone all sectors of your old hard drive including the unused sectors to a larger HDD or SSD. If you clone Dell hard drive to smaller SSD with this feature, the cloning process will fail.
✎ It also helps to clone MBR to GPT disk without losing data, and vice versa.
✎ AOMEI Backupper supports cloning data disks and system disks of all brands and partition styles, such as cloning MBR to MBR/MBR to GPT or GPT to GPT/GPT to MBR directly. But you still need to ensure the partition style of the target disk is compatible with your boot mode (MBR for legacy BIOS and GPT for UEFI).
Part 3. Replace your current Dell hard drive with the new SSD
After the cloning process, prepare your Dell laptop for hard drive replacement.
1. Turn off your computer completely, disconnect the power cable and any other cables, then unscrew the back panel of your computer with a screwdriver.
2. Find the screws holding the hard drive in place and unscrew them. Store the screws carefully so that you can easily find them when you install them back later.
3. Lift the hard drive up about 35 or 45 degrees and pull it out of the drive bay. Then, with it in place, install the newly cloned SSD. Remember to secure it with the screws you removed earlier and reinstall it back into the computer backplane.
4. Now that the new SSD is on your Dell Inspiron 15 laptop, you can try to boot with it.
Part 4. Make the cloned SSD bootable
Now you should be able to boot your Dell laptop directly from the cloned SSD. However, if you find that booting from the clone SSD fails, you can follow these steps to manually troubleshoot it.
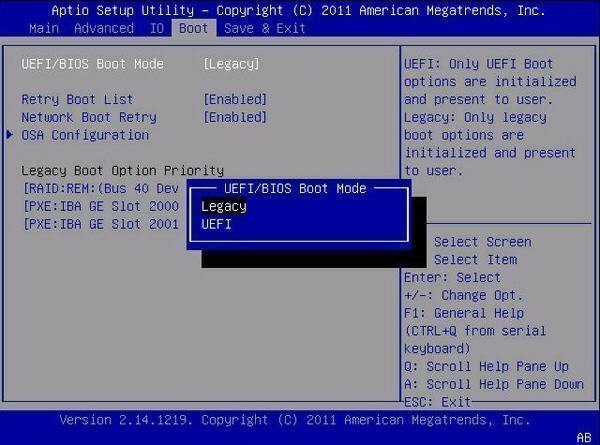
Firstly, you should check the boot order. If the boot order is correct then it is likely to be a boot mode issue (UEFI/BIOS).
In such case, figure out the disk style of the cloned SSD. If the disk style is MBR, you will have to change from UEFI to Legacy, or vice versa.
(Optional: Finally, do not forget to wipe the hard drive before throwing it or reselling it.)
Final words
Now that you've figured out how does Dell Inspiron 15 replace hard drive with SSD from the detailed tutorial in this article. In addition to physically replacing the hard drive, you will need to complete the HDD data transfer with the help of the best SSD cloning tool – AOMEI Backupper.
If you are looking for the secure way to enable Samsung SSD Secure Erase, and make the SSD unrecoverable, AOMEI can also do you a big favor. So don’t hesitate to try it out!

