2 Ways to Fix Crucial SSD not Detected in Bios
You can learn why Crucial SSD not detected in Bios and how to use 2 easy and safe ways to fix it. You can also learn how to protect SSD in the future. Keep reading for more details.
By Clytze Updated on February 22, 2023
Why Crucial SSD not Detected in Bios?
The Crucial SSD not being detected in the BIOS is a common issue that can be caused by a variety of reasons. The most common causes of this issue are incorrect BIOS settings, incompatible hardware, or corrupted data.
In order to fix this issue, it is important to first identify the cause of the problem.
- Incorrect BIOS settings: Incorrect BIOS settings are one of the most common causes of the Crucial SSD not being detected in the BIOS. This can happen if the BIOS is not configured correctly or if the settings are not compatible with the SSD.
- Incompatible hardware: Incompatible hardware is another common cause of the Crucial SSD not being detected in the BIOS. This can happen if the hardware is not compatible with the SSD or if the hardware is not properly configured.
How to Fix Crucial SSD not Detected in Bios
Now that you know why Crucial SSD not detected in Bios, let's take a look at how to use it. In the following sections, we will discuss the 2 useful methods to fix Crucial SSD not showing up in Bios or Crucial SSD not detected in Windows 10/11. So, if you're ready, let's get started. Continue reading to learn more about the solutions and how to protect SSD data in the future.
Fix 1. Configure the Crucial SSD
For the BIOS issue, you can try two solutions. We recommend that you start with the first one. The second solution involves disassembling the computer and reinstalling the hard disk, which may be difficult for beginners.
Step 1. Restart the PC and press F2/Delete to enter the BIOS.
Step 2. Expand the "SATA Configuration" menu and select "Configure SATA Configuration as IDE."
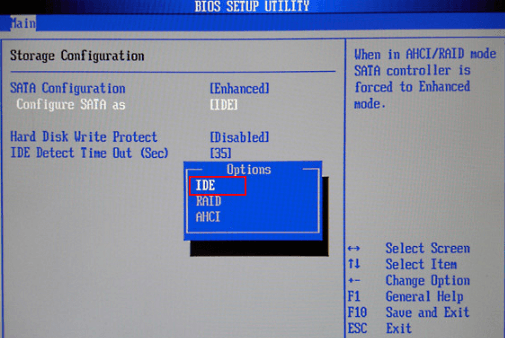
Step 3. Press F8 to save the changes and exit.
Fix 2. Reinstall the Drive
Except for the first method, you can also choose to reinstall the drive. Here are the steps to follow when using this method to fix the "Crucial SSD not detected in BIOS" error.
Step 1. Disconnect your PC's power supply. (If you are using a laptop, you can remove the battery.)
Step 2. Use a screwdriver to open the PC's case. (Or disassemble your laptop's shell by removing some screws.)
Step 3. Disconnect the hard disk and cable. Then, reinstall it.
Notes:
- For desktop PC: Locate the SSD connector on the lower middle of the motherboard > You should see a horizontal slot labeled SATA or PCIe > Unscrew the mounting screw opposite the slot > Insert the SSD > Secure the SSD with the screw.
- For laptop: Open SSD slot > Slide the SSD to the slot > Secure SSD with the screw.
Bonus Tip: How to Protect SSD in the Future
Regular disk backup can effectively protect your Crucial SSD data from problems such as Crucial SSD not detected in Bios. When you need disk backup, you need to choose a safe and reliable backup software, such as AOMEI Backupper Standard, which can not only help you back up disk for free, but also provide various backup functions to protect your data comprehensively.
- Scheduled backup: This software allows you to set up scheduled automatic disk backups on a daily, weekly or monthly basis, so you can always keep your Crucial SSD with the latest backup version.
- Incremental backup: You can choose the incremental backup method to perform your backup tasks. Incremental backups will only back up the changed parts, so this method will help you save backup time and storage space.
- 2 kinds of backup services: It supports Microsoft's VSS and AOMEI's backup services, so it can ensure that your backup tasks will not be interrupted in the middle.
- Different paths: You can backup your Crucial SSD to different destinations, such as local disk, external disk, HDD, SSD, USB drive, NAS, etc.
Step 1. Download and install AOMEI Backupper Standard. Open the software, click Backup > Disk Backup.

Note:
Except for Disk Backup, it also provides System Backup, Partition Backup and File Backup, you can choose them if you need.
Step 2. Click Add Disk to choose the Crucial SSD that you want to backup.

Step 3. You need to select the destination for your disk backup and then click Start Backup.

Notes:
- Schedule Backup: You can set the fixed intervals to run the disk backup task automatically such as daily, weekly, monthly event trigger or USB plug in. The last two are available in the Pro version.
- Backup Schemes: You can select 3 different backup methods (Full/Incremental/Differential). You can also enable automatic backup cleanup feature to save disk space. Differential backup and cleanup features are available in the professional version or higher versions.
Summary
In conclusion, the Crucial SSD not detected in BIOS is a common issue that can be caused by a variety of reasons. To fix this issue, it is important to first identify the cause of the problem and then take the appropriate steps to fix it. Additionally, it is important to use a reliable backup and recovery solution - AOMEI Backupper to secure the data on the SSD in the future.
If you want to rescue a computer that can't boot or restore a system to a computer with different hardware, its Universal Restore feature will be very helpful. You can download this software to explore more useful features.

