8 Ways to Fix 'CHKDSK Cannot Continue in Read Only Mode' Error
If you don't know how to fix 'CHKDSK cannot continue in read-only mode' error, please read this article in detail to learn the causes and 8 ways to fix it as well as how to prevent data loss.
By Clytze Updated on October 27, 2022
How to fix 'CHKDSK cannot continue in read only mode' error
"I received a notification yesterday while using my laptop asking me to check the disk for errors. I immediately executed CHKDSK as a sysadmin, only to receive: Error found, CHKDSK cannot continue in read-only mode. I A colleague of mine suggested to format the disk directly to fix this error, but I only have this one hard drive on my laptop, and I am worried that I will lose some important data by doing so. Does anyone know how to fix this error? I want to make the computer as soon as possible Back to normal".

CHKDSK is a utility that checks and repairs disk errors to ensure that your computer's files and file systems are in logical order, while detecting and repairing bad sectors. Although CHKDSK is very powerful, in some cases, you may receive a 'CHKDSK cannot continue in read-only mode' error message during use, as described in the above case. If you want to fix the CHKDSK cannot continue error as soon as possible, please understand thecause of the error first.
What causes the 'CHKDSK cannot continue in read only mode' error?
The following are common causes of errors.
- Disk contains read-only file system
- Virus or malware on disk
- Hard drive is damaged
- The target drive is in use by the application
- The file system is corrupt or missing
- The target hard disk is set to read-only mode
8 Ways to Fix 'CHKDSK Cannot Continue in Read Only Mode' Error
The following 8 methods can help you to fix 'CHKDSK cannot continue in read-only mode' error easily, just follow the steps.
- Check disk on next reboot
- Execute CHKDSK in recovery environment
- Change read-only mode to normal mode
- Remove write protection on disk
- Close all running files or applications
- Scan for and remove viruses or malware
- Execute SFC to repair system files
- format the disk
Method 1. Check disk on next reboot
If the target drive is being used by another application, you will receive the 'CHKDSK cannot continue in read-only mode' error during the CHKDSK process. At this point, you can set the next reboot to perform a CHKDSK scan to bypass the above error.
- Use Windows+S to open the search bar, enter cmd and select Run as administrator.
- In the Command Prompt window, type chkdsk /r c: and press Enter. Note that you can replace c with another drive letter depending on your situation.
- Since the target drive cannot be locked, you will be asked if you want to schedule this volume to be checked at the next system restart. At this point, all you need to do is press the Y key to set the check to be performed the next time the system restarts.

Method 2. Execute CHKDSK in the recovery environment
If the above method fails, you can also use CHKDSK from Windows Recovery Environment (Windows RE), which will help you fix the error that CHKDSK cannot execute in read-only mode.
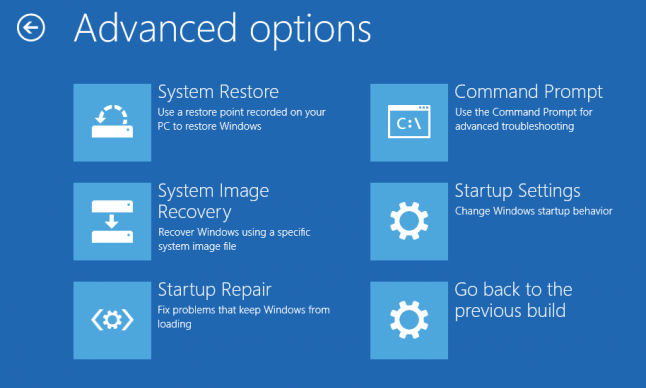
- Click the Start button, then click the Power button, hold down the Shift key and click Restart.
- Enter the Windows Recovery Environment and click Troubleshoot > Advanced Options > Command Prompt.
3. Next, your computer will restart automatically. You can enter the following commands in the command prompt character window according to actual requirements, and press Enter to execute the command.
chkdsk x: (check disk for errors and not fix)
chkdsk x:/f (checks and fixes disk errors but does not scan for bad sectors)
chkdsk x:/r (checks and fixes disk errors and scans for bad sectors)
Please replace the x in the above command with another disk letter.
Method 3. Change read-only mode to normal mode
If the target hard disk is set to read-only mode, it will result in CHKDSK read-only mode and you will receive the error 'CHKDSK cannot continue in read-only mode'. Therefore, to fix the above error, you can change the read-only mode to normal mode.
- Use Windows+S to open the search bar, enter cmd and select Run as administrator.
- In the command prompt window, type diskpart and press Enter.
- Type list disk and press Enter. You will see a full list of active disks.
- select disk 1 again and press Enter. Note that you can replace 1 with other disk numbers.
- Type attributes disks clear readonly again and press Enter. The read-only mode can be changed to the normal mode.

Method 4. Remove the write protection feature on the disk
In some cases, a 'CHKDSK cannot continue in read-only mode' error occurs when the disk is write-protected. If you want to fix the above error, you can try removing the write-protect feature on the disk from the login editor.
- Use Windows+R to open the execution window, type regedit and press Enter.
- In the Login Editor window, navigate to the following path:
Computer\HKEY_LOCAL_MACHINE\SYSTEM\CurrentControlSet\Services\USBHUB3
- Double-tap on the right panel to open Start, change the value data to 3, and click the OK button.

Method 5. Close all running files or applications
If the target drive is being used by another application, you can try closing all executing files or applications to fix the 'CHKDSK cannot continue in read-only mode' error. It is recommended that you do this in the Task Manager.
Use ESC+Shift+Ctrl to open Task Manager and view suspicious files or applications in the Handlers tab list. If you find a suspicious file or application, right-click it and select End Task.

Method 6. Scan for and remove viruses or malware
You may also encounter the 'CHKDSK cannot continue in read-only mode' error while using CHKDSK if there is a virus or malware on the disk. To fix the above errors, you need to scan for and remove these viruses and malware.
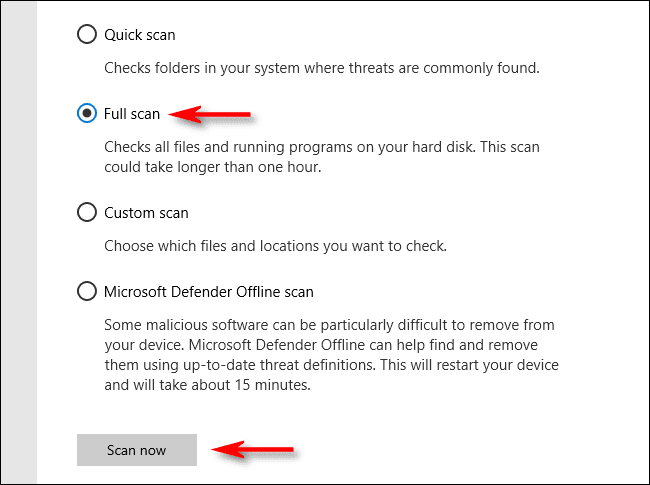
- Use Windows+S to open the search bar and type Windows Security.
- In the Windows Security window, click Virus & threat protection.
- In the Current Threats section, click Scan > Full Scan, and click the Scan Now button.
Note: If you are not confident enough about Windows Defender's antivirus capabilities, you can also install and run powerful third-party antivirus software such as Bitdefender,Norton, Kaspersky, etc. to scan again to ensure that the disk is not compromised by viruses.
Method 7. Perform SFC to repair system files
Windows System File Checker (SFC) is a utility that can help you check and repair corrupted system files. Since corrupted system files are a significant cause of the 'CHKDSK cannot continue in read-only mode' error, you can fix this error through SFC.
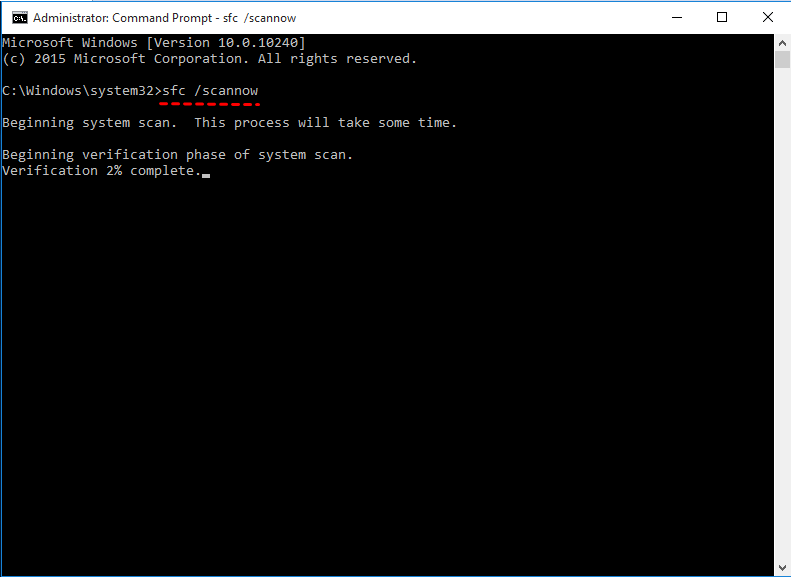
- Use Windows+S to open the search box, enter cmd, and select Run as administrator.
- In the command prompt character window, type sfc /scannow and press Enter to execute this command.
Method 8. Format the disk
If none of the above methods help you to fix the 'CHKDSK cannot continue in read-onlymode' error, then you can only format the disk to fix the above error. Please be aware that formatting a disk will result in the loss of all data on it, and it is recommended that you make a disk backup before proceeding .
- Use Windows+R to open the execution window, type diskmgmt.msc and press Enter.
- Find the target disk and select one of the volumes, right-click on it, and select Format from the expanded menu.
- In the Format window, select a file system, uncheck the Quick Format checkbox, and click the OK button.
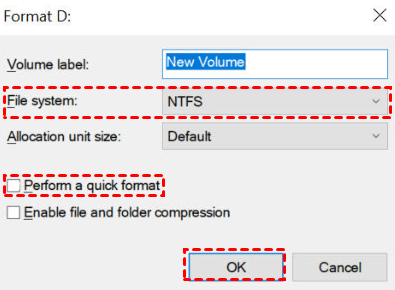
Note: As long as there are no special needs, it is recommended that you choose the NTFS format. Also, since the full format automatically scans and repairs bad sectors in the disk, it is recommended that you need to cancel the quick format.
Create a copy of all data on disk to prevent data loss
In order not to lose your data, you can choose a free and safe disk cloning software to create a copy of all data on the disk. AOMEI Backupper Standard is a good choice and it has the advantages below.
- Secure boot: After cloning, you can boot your system successfully from the cloned disk.
- Intelligent clone: If the source disk has bad sectors, it can clone bad sectors disk by skipping them automatically.
- Live clone: The software allows the cloning tasks to run in the background so that you can use your computer normally during the cloning process.
- Sector by sector clone: This feature can help you clone the disk to a larger one, and it will clone all sectors whether they are used or not.
- Different system: It supports Windows 11/10/8/7/XP/Vista, etc.
Then download AOMEI Backupper Standard and follow the graphic tutorial below to create a copy of all data on your disk. Please note that if you are a Windows Server user, you can select AOMEI Backupper Server.
Step 1. Open AOMEI Backupper Standard, and click Clone > Disk Clone.
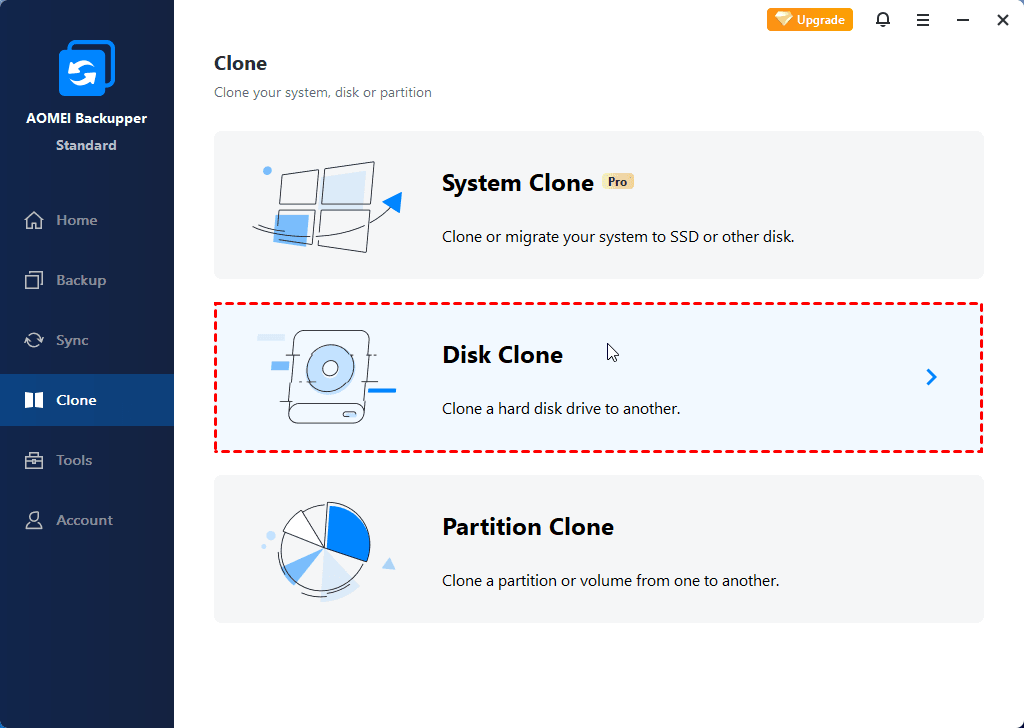
Note:
The standard version only supports 2 types, namely MBR to MBR (system disks) and data disk clone. If you need to clone GPT to GPT, or clone disks from GPT to MBR and vice versa, you can upgrade to the professional version.
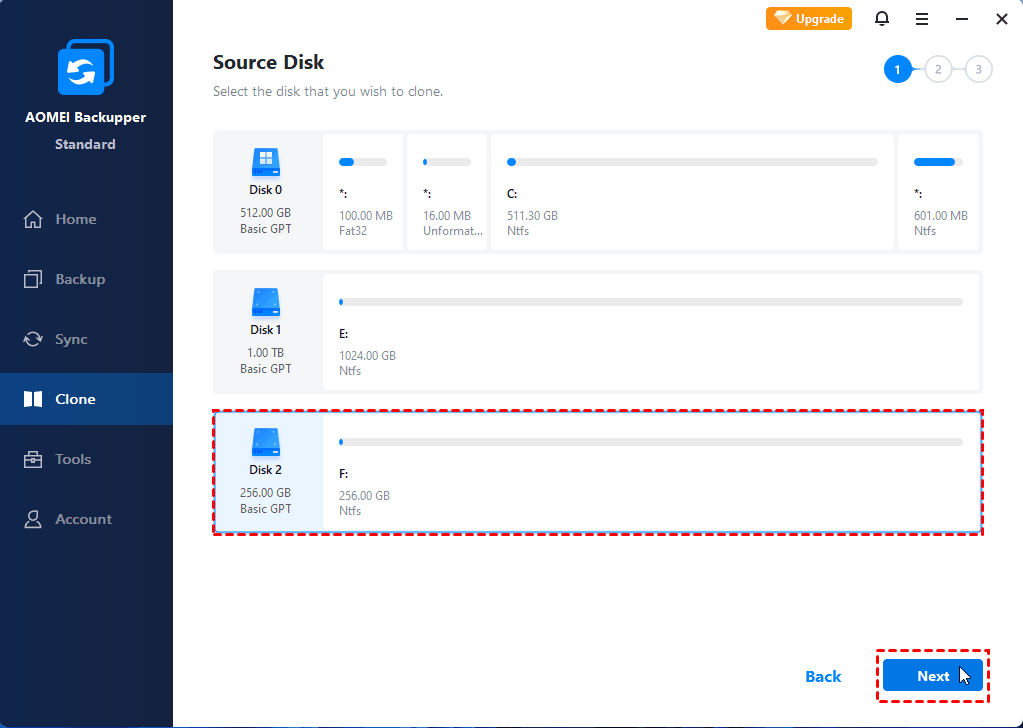
Step 2. Choose the disk as the source disk. Then, click Next.
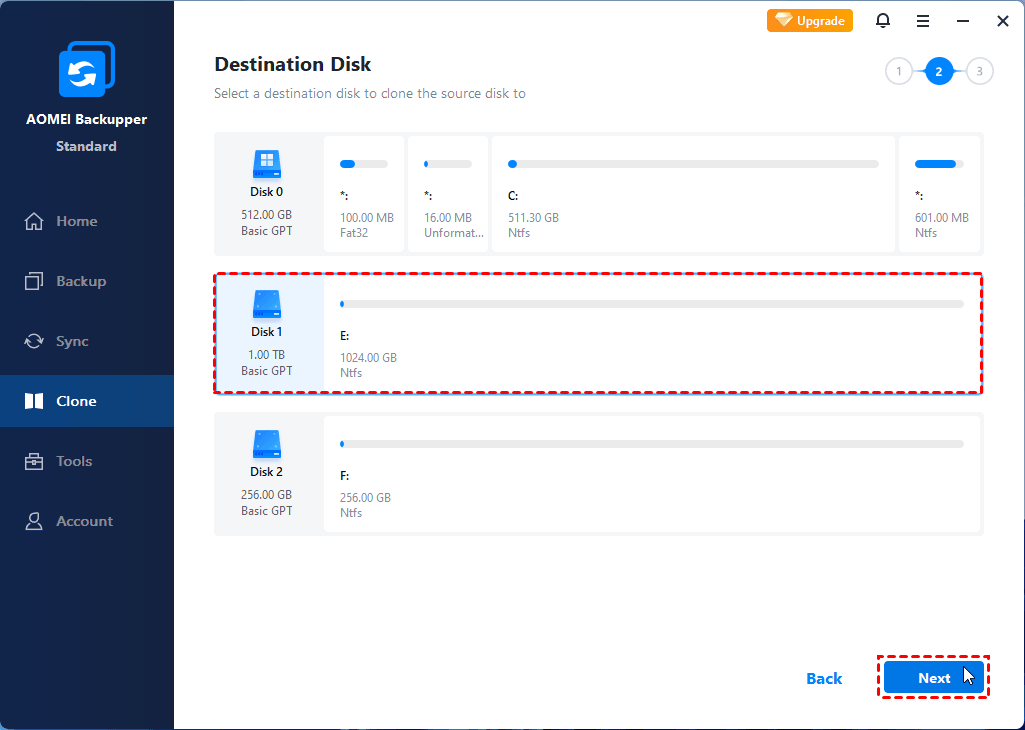
Step 3. Choose the other disk as the destination disk. Then, click Next.
Step 4. Confirm your operations and click Start Clone.
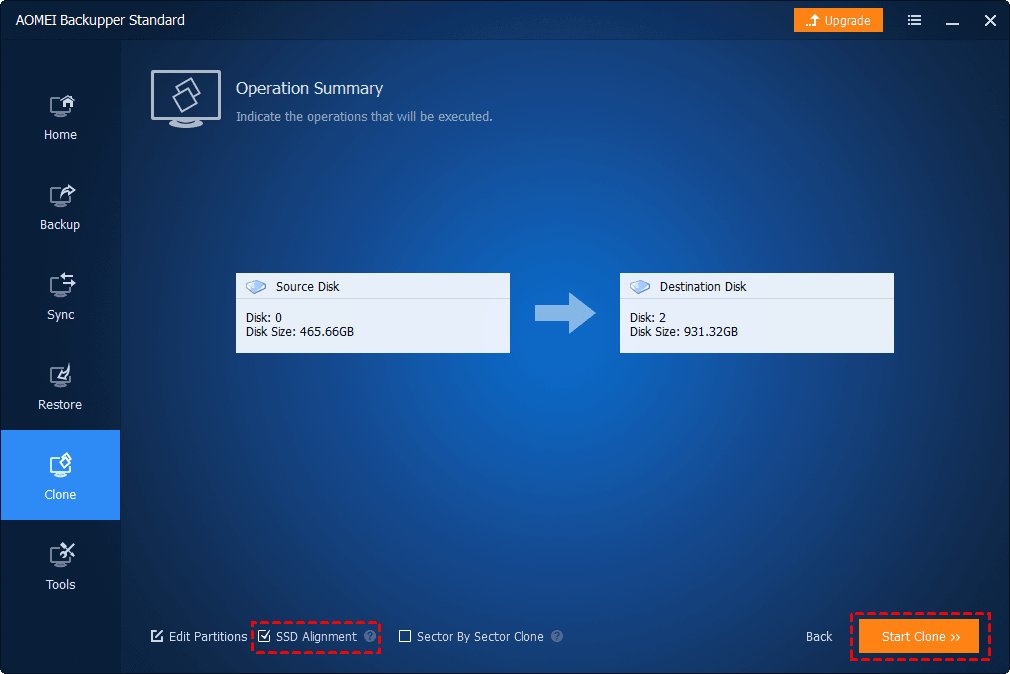
Notes:
- Edit Partitions: You can change the partition size using this feature (advanced version). If you need, it can help you convert the destination GPT disk to MBR and vice versa.
- SSD Alignment: If your target disk is an SSD, you can tick the SSD Alignment option to accelerate the reading and writing speed of the SSD.
- Sector By Sector Clone: If your target disk is the same as or larger than the source disk, you can use this feature that can clone all sectors whether they are used or not.
Summary
When you are stuck with the 'CHKDSK cannot continue in read-only mode' error, pleasefix it with the 8 methods provided in this article to ensure that the CHKDSK tool can perform properly. But need to remind you that when the system prompts you to use CHKDSK to repair the disk, it means that your disk is likely to have errors. Therefore, it is recommended that you use AOMEI Backupper Standard to clone the disk after repairing the disk errors to prevent Data loss due to errors.
As a free and professional disk cloning software, AOMEI Backupper Standard has a clear interface and simple operation, allowing you to easily clone all the contents on the disk to other hard disks. In addition to this, the software provides you with file backup, disk restore, basic sync, and more.

