Fix the 'Cannot Open Volume for Direct Access' Error (11 Ways)
How to fix 'Cannot open volume for direct access'? This article will introduce the cause of this error and 11 fixes, then provide a way to avoid data loss. You can read on for more details.
by Clytze Updated on October 27, 2022
How Can I Fix the CHKDSK Error Message?
"I am using an Android cell phone, but recently I suddenly received a message that my Micro SD card is corrupted. At the suggestion of my friend, I took the Micro SD card out of my phone and connected it to a computer with Windows 10 installed.
When I tried to repair it by executing the CHKDSK tool from the Command Prompt, I received an error message: Cannot open volume for direct access. My friend doesn't have any good idea to fix this error, so I have to ask for help. Does anyone know how to fix it? I really don't want to give up my newly purchased Micro SD card".
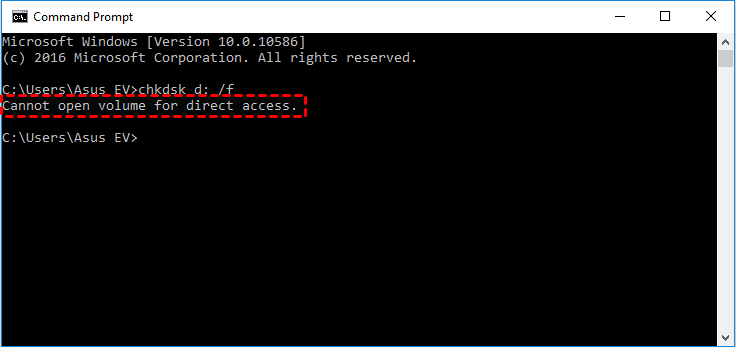
CHKDSK is a Windows tool that is mainly used to check the integrity of volumes and to repair logical system errors that exist in them. However, CHKDSK is not always stable and when you try to repair a corrupted USB drive, external hard drive or Micro SD card using CHKDSK, you may encounter the 'Cannot open volume for direct access' error mentioned in the case. So, how to fix this error? First, you should understand the cause of this error.
Why the Error Message 'Cannot Open Volume for Direct Access' Appear?
When you encounter this error, it means that CHKDSK cannot access the disk and is unable to scan and repair the disk. Therefore, you need to understand the cause of the error and try to fix it as soon as possible, here are the common causes of this error.
- The hard drive has a physical failure or is damaged.
- Drive is damaged.
- The disk file system is corrupted.
- The drive has bad tracks.
- The drive is locked by a third-party application or service.
11 Ways to Fix 'Cannot Open Volume for Direct Access' Error
When you encounter the error 'CHKDSK cannot open the volume for direct access', you can repair it in one of the 11 ways described below. Note that some of these methods may affect the security of the data on the disk and it is recommended to perform a disk backup or file backup before starting the repair to prevent data loss.
- Reconnect the device and restart the computer
- Format a corrupted device
- Disable or uninstall third-party applications or services that may lock the partition
- Check for and repair bad tracks
- Perform CHKDSK from a safe mode or clean boot environment
- Perform a primary hard drive self-test from the BIOS
- Check disk health
- Disable BitLocker encryption
- Repair via Windows Powershell
- Use the free CHKDSK alternative
- Create a new partition with diskpart
Method 1. Reconnect the Device and Restart the Computer
As we all know, restarting the computer is a good fix and it can be effective in fixing many problems. So, when you use CHKDSK to check your hard drive partition and see the error message 'Cannot open volume for direct access external hard drive', you can disconnect all devices first and then try to restart your computer, which may help to fix the error.
Step 1. Turn off the computer completely and reconnect all external devices. Please note that if you are using a laptop, you need to remove the battery.
Step 2. Press and hold the power button for 60 seconds, connect the external device again and restart your computer. Open the Command Prompt again and use the CHKDSK command to check if the CHKDSK error has been fixed. If you can still see the same error message, go to the next method.
Method 2. Reallocate A New File System with Format
When you check your hard drive partition using CHKDSK and see the error message 'Cannot open volume for direct access', it means that your device's file system is probably corrupted. For this reason, you need to reallocate a new file system by formatting the corrupted device so that your hard drive or external storage device will be back to normal. Here you will find two different methods of formatting.
Through the Windows Explorer
Step 1. Use Windows+E to open Windows Explorer.
Step 2. Select the device or partition you want to format, right-click it and select Format... from the expanded menu.
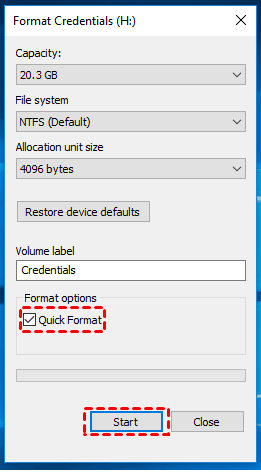
Step 3. In the formatting window, change the preset options according to your needs and check the Quick Format checkbox.
Step 4. Finally, click on the Start button and wait for the process to complete.
Through the Disk Management
Step 1. Right-click This PC on the desktop and select Manage in the expanded menu.
Step 2. In the left panel of the Computer Management window, find and expand Storage, and then select Disk Management.
Step 3. Select the device or partition you want to format, right-click it, and select Format... in the expanded menu.
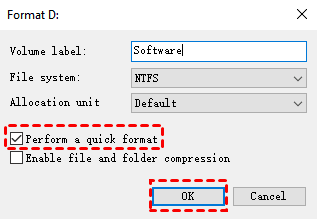
Step 4. In the formatting window, change the preset options according to your needs and check the Perform a quick format checkbox, click the OK button and wait for the process to complete.
Open the Command Prompt again and use the CHKDSK command to check if the CHKDSK error has been fixed. If you can still see the same error message, go to the next method.
Method 3. Disable or Uninstall Apps or Services that Lock the Partition
From the feedback of some users, disabling or uninstalling third-party applications or services such as virus checkers or disk monitoring tools that may lock the partition will help fix the 'Cannot open volume to access SD card directly' error. If you have a similar application or service installed on your computer, then this would be a worthwhile approach to try.
Disable Services that May Lock Partitions
Step 1. Use Windows+S to open the search box and type in Services.
Step 2. In the search results, click on the service application below the best comparison.
Step 3. Select the service that may lock the partition in the list of services window, right-click it and select the Properties in the expanded menu.
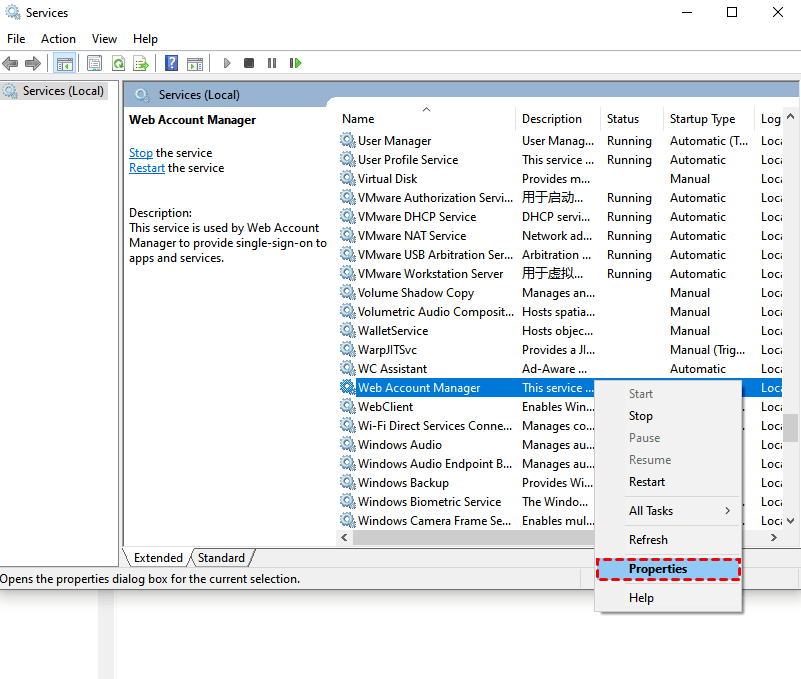
Step 4. Change the Startup type to Disabled in the content window and tap the OK button.
Uninstall Third-Party Applications that May Lock Partitions
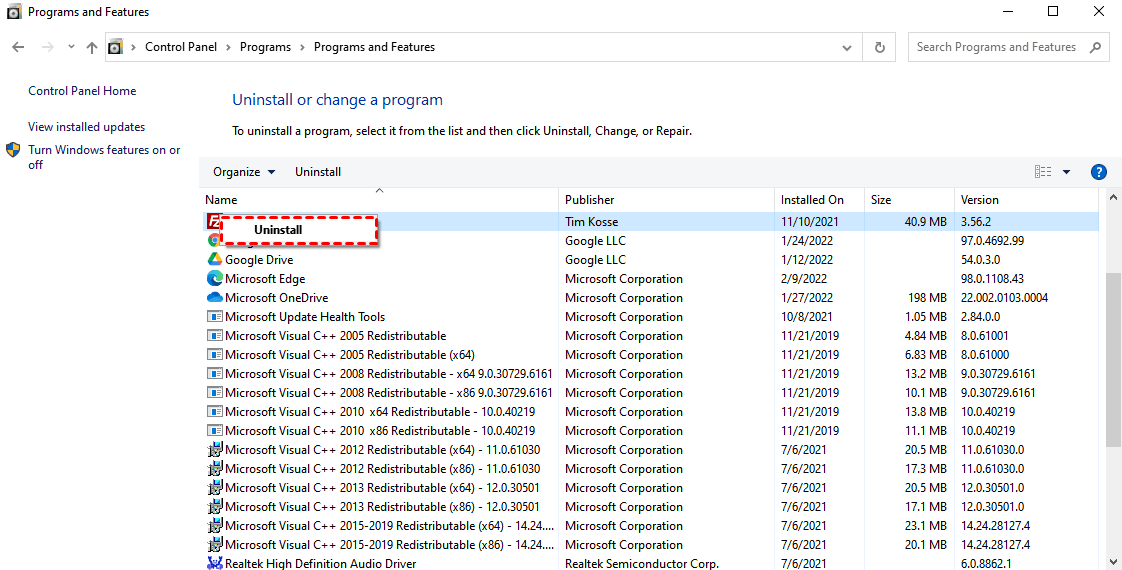
Step 1. Use Windows+R to open the Run window, type control and press Enter.
Step 2. In the control panel window, click Programs > Programs and Features.
Step 3. Select the application that may lock the partition in the list of applications, right-click it and select Uninstall.
Step 4. Confirm this operation and wait for the uninstallation process to complete. Open the Command Prompt again and use the CHKDSK command to check if the CHKDSK error has been fixed. If you can still see the same error message, go to the next method.
Method 4. Check for and Repair Bad Tracks
When you have bad tracks on your storage device, it may cause the error 'Cannot open volume for direct access USB drive'. Therefore, you can try to fix this error by checking and repairing the bad track.
Step 1. Use Windows+E to open Windows Explorer and select the storage device or disk you want to check and repair.
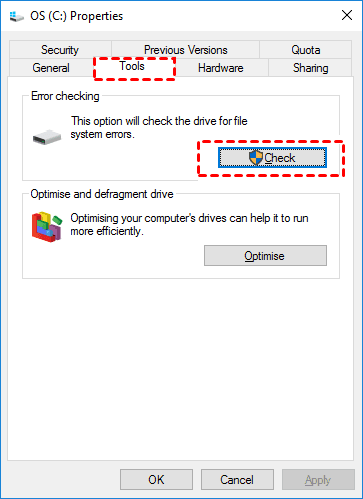
Step 2. Right-click on the disk you have selected and select Properties in the expanded menu.
Step 3. Switch to the Tools tab at the top of the Properties window, and in the Error checking section, click on the Check button.
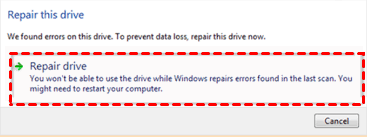
Step 4. Click on the Scan drive option and wait for the scan to complete.
Step 5. When a disk drive error is found, you need to click Close, then click Repair drive, and restart your computer.
Open the Command Prompt again and use the CHKDSK command to check if the CHKDSK error has been fixed. If you can still see the same error message, go to the next method.
Method 5. Perform CHKDSK from a Safe Mode or Clean Boot Environment
Safe mode and clean boot can be used when you check your hard drive partition with CHKDSK and see the error message 'Cannot open volume for direct access'. Safe Mode is a special diagnostic mode in Windows that automatically disables all non-core services and processes on your Windows system to help you troubleshoot errors. Clean boot is another diagnostic mode where you need to manually disable all third-party services and startup programs, which also helps you troubleshoot errors.
Perform CHKDSK from Safe Mode
Step 1. Tap the Start button on the far left of the taskbar, then tap the Power button, hold the Shift key, and select Restart in the expanded menu.
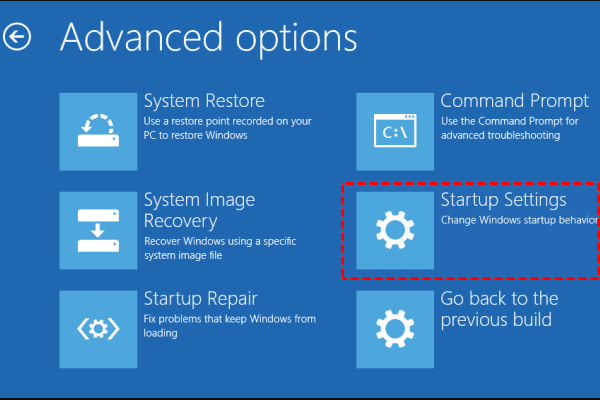
Step 2. After entering Windows recovery mode, click Troubleshoot > Advanced Options > Startup Settings, and press F6 or the number key 6 to start Windows Safe Mode (with command prompt characters).
Step 3. In safe mode, execute the Command Prompt as system administrator and enter the chkdsk /x /f /r command to check if the above error has been fixed. If you can still see the same error message, go to the next method.
Perform CHKDSK from Clean Boot Environment
Step 1. Use Windows+R to open the Run window, type msconfig and press Enter.
Step 2. Switch to the Services tab at the top of the System Settings window, check the Hide all Microsoft services checkbox in the lower left corner, and then click the Disable all button.
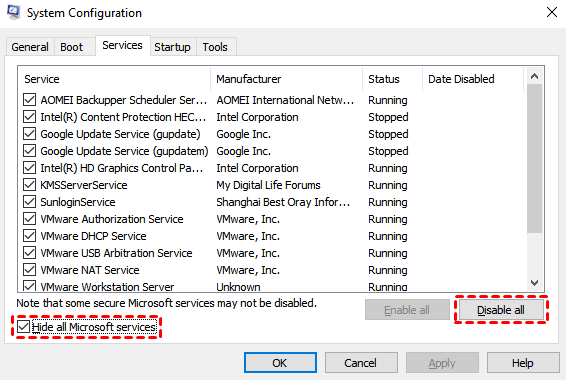
Step 3. Then switch to the Startup tab and click Open Task Manager button.
Step 4. In the Startup tab list, select each startup item in turn, and click the Disable button in turn, and then turn off Task Manager. Then return to the System Settings startup tab and click the OK button.
Step 5. Restart your computer, open the command prompt character again and use the CHKDSK command to check if the CHKDSK error is fixed. If you can still see the same error message, go to the next method.
Method 6. Perform a Primary Hard Drive Self-test from the BIOS
When you check the hard drive partition using CHKDSK and see the error message 'Cannot open volume for direct access', you can perform a self-test of the primary hard drive from the BIOS, which will help you fix this error.
Step 1. Turn off your computer and wait for 30 seconds.
Step 2. Press the power button to start your computer, and when the Windows logo appears, press the appropriate button for BIOS. Please note that the BIOS entry method is different for different brands of motherboards, and you can seek support from the motherboard manufacturer for details.
Step 3. In the BIOS settings, use the arrow keys to find the Primary Hard Drive Self Test in the menu options, and press the Enter key.
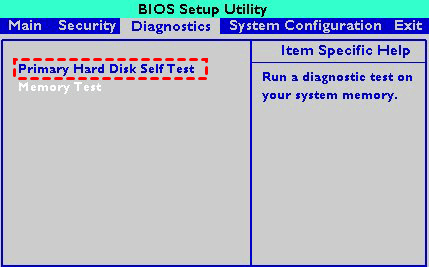
Step 4. After the self-test is completed, the computer will boot normally. Open the Command Prompt again and use the CHKDSK command to check if the CHKDSK error is fixed. If you can still see the same error message, go to the next method.
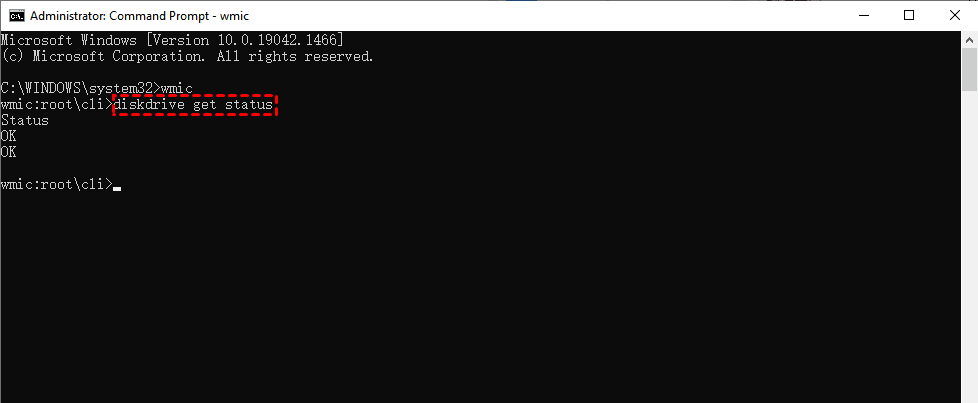
Method 7. Check Disk Health
You can check the status of the disk via the WMIC utility in the Windows Command Prompt to confirm if there is a root cause of the 'Cannot open volume for direct access' error on your hard drive, which will help you fix the error.
Step 1. Use Windows+S to open the search box, type cmd and select Run as administrator.
Step 2. In the command prompt window, type the commands below in order and press Enter to execute them respectively.
- wmic
- diskdrive get status
If your drive is in good health, then you will receive an OK message.
Method 8. Disable BitLocker Encryption
BitLocker Drive Encryption is a built-in full disk encryption feature in Windows Vista, Windows 7, Windows 8 and Windows 10 that secures data by encrypting the entire volume. While this action improves security, sometimes it can also be the trigger for the 'Cannot open volume for direct access' error. For this reason, you need to disable BitLocker Encryption.
Step 1. Use Windows+R to open the Run window, type control and press Enter.
Step 2. In the control panel window, click System and Security > BitLocker Drive Encryption.
Step 3. Select the drive you want to disable and expand it, then click the Turn off BitLocker button and confirm this operation.
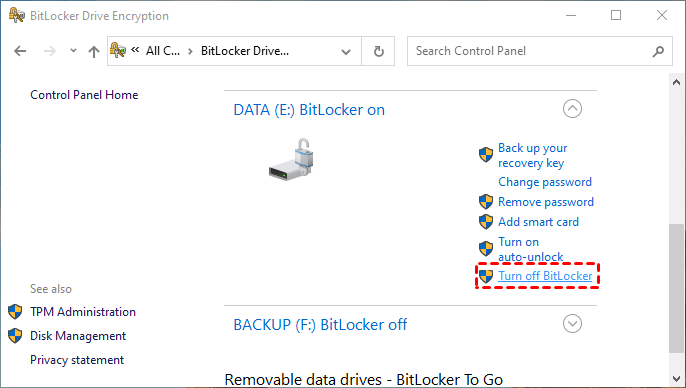
Open the Command Prompt again and use the CHKDSK command to check if the CHKDSK error is fixed. If you can still see the same error message, go to the next method.
Method 9. Repair via Windows Powershell
In addition to the Command Prompt, Windows has another similar built-in tool called Windows Powershell, which can be used when you use CHKDSK to check a hard drive partition and see the error message 'Cannot open volume for direct access'. Powershell can be used to verify the authenticity of the CHKDSK error.
Step 1. Right-click the Start button on the far left of the taskbar and select Windows Powershell (System Administrator) from the expanded menu.
Step 2. In the Windows Powershell viewport, type repair-volume -driveletter C and press Enter to execute it.
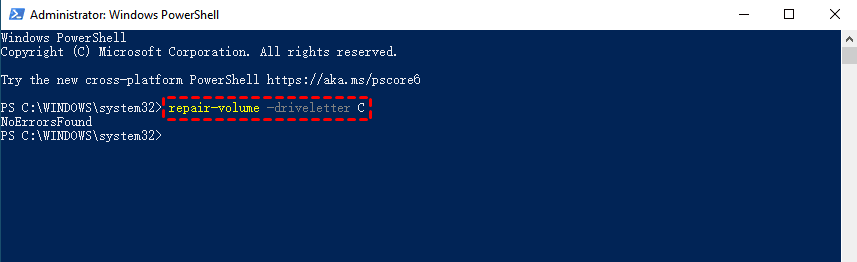
Note:
This command is mainly used to repair a volume, you can replace C with any other existing volume on your computer.
Step 3. After waiting for this process to complete, open the command prompt character again and use the CHKDSK command to check if the CHKDSK error has been repaired. If you can still see the same error message, go to the next method.
Method 10. Use the Free CHKDSK Alternative
CHKDSK is a command line utility that checks for errors and corruptions in your hard drive and repairs them. But in fact, many free software and tools can do the same job, which will effectively avoid the 'Cannot open volume for direct access' error.
Here we recommend Ariolic Disk Scanner, Windows Surface Scanner, Gsmartcontrol and SeaTools. The first three can help you find bad tracks and errors in your hard drive so you can identify risks in time, and the last one is a dedicated application for hard drives that can do the same.
Method 11. Create a New Partition with Diskpart
Windows has a built-in partition utility called diskpart that cleans up disk space by deleting partitions and file systems and creates a new, completely clean volume, effectively fixing the 'Cannot open volume for direct access' error.
Note: Before you start this operation, please make sure that there is no SD card connected to your computer. In addition, this method will delete all files on the hard disk, so please be careful and make a file backup in advance if necessary.
Step 1. Enter the Windows recovery environment (Windows PE). Click Troubleshoot > Advanced Options > Command Prompt.
Step 2. In the Command Prompt window, enter the following commands in sequence and press Enter to execute them respectively.
- diskpart
- list disk
- select disk 1 (take disk 1 as an example)
- clean (this command will clean the selected hard disk)
- create partition primary (make the disk primary)
- active (boot partition)
- format fs=ntfs quick (makes the disk formatted as NTFS file system)
- assign (this command will assign the disk)
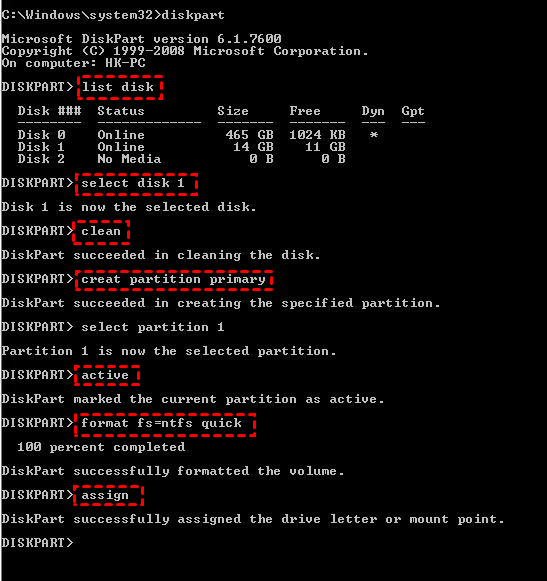
Step 3. Finally, you also need to type exit twice and press Enter to exit the diskpart utility and command prompt characters.
The Best Way to Avoid Data Loss
As mentioned above, these 11 methods can help you fix the 'Cannot open volume for direct access' error, but the method of creating a new partition with diskpart will cause all data on the disk to be erased. For the safety of your data, it is recommended to use AOMEI Backupper Standard to make a backup of your files before performing this operation to avoid losing important data.
AOMEI Backupper Standard is a free and professional file backup software for Windows 11/10/8.1/8/7 and many other versions. Besides local disk, you can also backup your files to cloud, NAS device, external hard disk, etc. If you have an AOMEI account, you are able to backup files to AOMEI Cloud.
Next, this article will introduce the detailed steps of AOMEI Backupper Standard file backup.
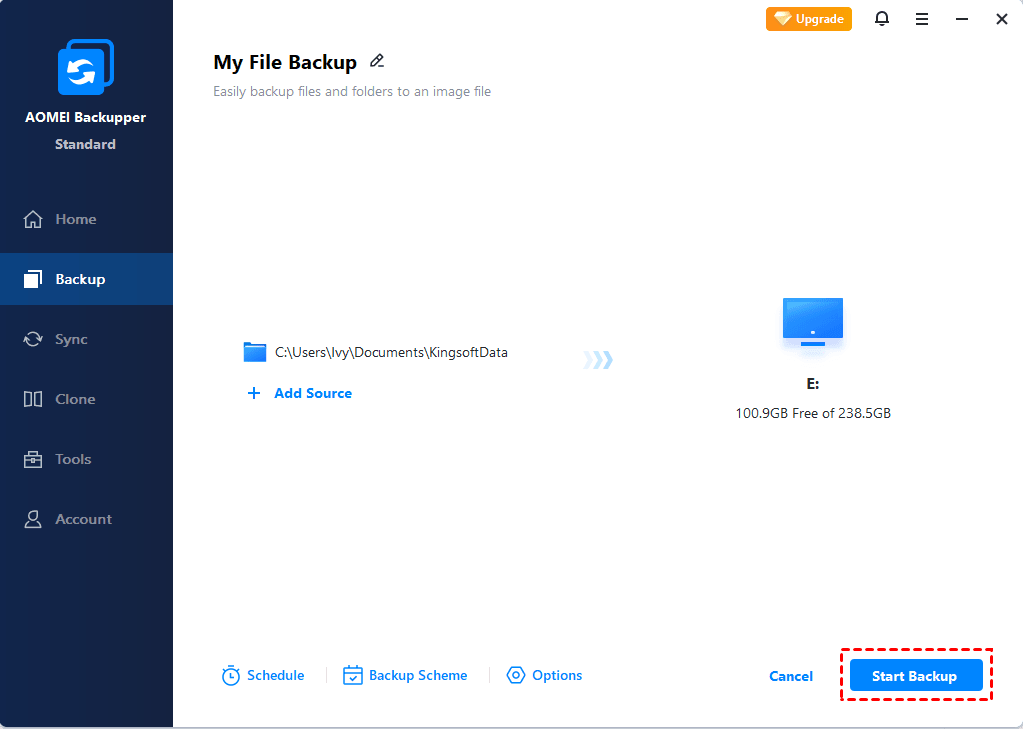
Step 1. Download AOMEI Backupper Standard, install and launch it. Then click Backup > File Backup.

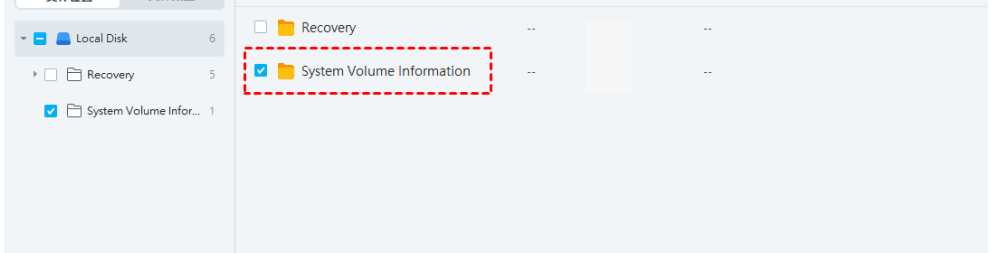
Step 2. Click Add File or Add Folder, then select the files or folders you want to backup. In addition, you can tap the pencil icon in the upper left corner to name this backup task.

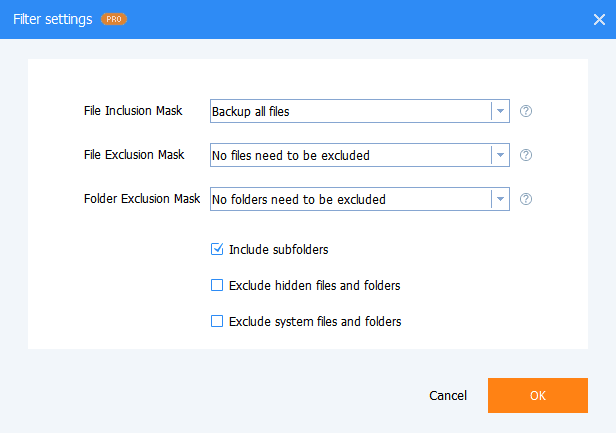
Tip: After adding a folder or file, you can tap the funnel icon to open the filtering settings, this feature needs to be upgraded to the Pro version. It allows you to customize the settings below.
- File Inclusion Mask: You can specify the file extensions to be backed up, such as .doc, .xls, .ppt, etc. Only files with the same extension can be backed up to the destination path. You can also use more extensions using semicolon spacing.
- File Exclusion Mask: You can specify the files to be excluded, and files with the same extension will not be backed up to the destination path. You can also exclude more extensions by means of semicolon spacing.
- Folder Exclusion Mask: You can specify folders to be excluded, and folders with the same name will not be backed up to the destination path. You can also exclude more folder names through semicolon spacing.
Step 3. Choose the destination for your backup.

Notes:
- Options: It allows you to add comments to backups, enable encrypted backups, enable email notifications, and to enable encrypted backups you need to upgrade to the Pro version.
- Schedule Backup: It allows you to enable scheduled backups. You can set daily, weekly, monthly, event-triggered and USB plug-in backups.
- Backup Scheme: You can change the backup method and enable the automatic clean backup feature. The backup methods include incremental backup, full backup or differential backup, where differential backup can only be used when you upgrade to the Pro version. And the automatic clean backup feature, again, is unique to the Pro version.

Step 4. Confirm all your operations and then click Start Backup.
The purpose of file backup is to ensure data security, so when your source files or folders are lost or corrupted, you can use AOMEI Backupper Standard's File Restore feature to restore the previous file backup image.
And to restore the file backup image more precisely, you can confirm it by its explore image function to make sure the required file is restored correctly.
As you can see from the above, the disk is also at risk of corruption, so it is recommended that you use AOMEI Backupper Standard's Disk Backup feature to backup all the data in the disk as an image file to ensure the safety. In addition to disk data, you can also create system backup images for quick recovery in case of a system crash or unbootable.
How to Recover Data from a Corrupted Storage Device
Performing file backup in advance can effectively avoid the loss of existing data. However, there is nothing you can do about the corrupted storage devices. So, how can you recover data from a corrupted storage device? Here we recommend Wondershare Recoverit, and here are the detailed steps.
Step 1. Download and install Wondershare Recoverit, open the software and log in to your account.
Step 2. Next, you need to select a location where the data was lost. If you are recovering from a hard drive, select a hard drive from the bottom of the hard drive list.
Step 3. Wait for the scan to complete and select the files that need to be recovered and click the Recover button.
Summary
When you encounter the error 'Cannot open volume for direct access', don't worry, and try the 11 methods mentioned above, which will help you fix the error. However, these methods are not perfect and some of them may cause the disk data to be erased. For this reason, we recommend using AOMEI Backupper Standard for file backup to prevent data loss.
AOMEI Backupper Standard has a simple and easy-to-use interface, allowing you to easily backup your files to any location you want to keep your data safe. Besides, the software also provides you with other features that you may be interested in, such as Disk Clone, Partition Backup, Basic Sync, etc, to protect your computer data in all aspects. You can download the software to explore more functions.

