Create Windows 7 Image for Multiple Computers' Deployment
Want to learn how to create Windows 7 image for deployment? This article gives you the easiest way to do this. Click for more details.
by Yuka Updated on November 14, 2022
Quick Navigation:
Advantages to create Windows 7 image for deployment
As it’s known to us that backing up Windows 7 is essential in case of data loss. However, fewer people know there is another usage for backing up Windows 7. That is you can create Windows 7 image for deployment.
Image deployment involves creating a custom system image including OS, drivers, settings, and applications on a single computer and then deploying the image to other computers. The configuration of computers is all the same after deployment. By deploying image, you can enjoy the following advantages.
-
Saving time and efforts: Think about this, suppose you have multiple computers, manually setting up the computers one by one will take you much time. If cloning Windows 7 to multiple computers simultaneously can be realized, it will save much time and efforts.
-
Standardization: If you use image deployment, it ensures that all the computers are as close to identical as possible. However, if you perform installation and configuration one by one, each computer may be slightly different. Standard computers’ management and maintenance are much easier than disparate ones’.
How to create a Windows 7 system image for deployment
To deploy Windows 7 image to other computers, you need to create a system image first. You can use free backup and restore software – AOMEI Backupper.
✦ It offers you a perfect experience with its user-friendly and clean interface. It is very easy to use even if you are a green hand.
✦ It is embedded with various backup types. You are allowed to create a system or disk image. You can also run automatic file backup with it.
✦ It supports all editions of Windows 10/8.1/8/7/Vista/XP.
Follow the easy steps below to create system image backup for Windows 7.
Step 1. Download AOMEI Backupper and launch the tool. At the main interface, click Backup and select System Backup.

Step 2. As this software will automatically select the source for you, you just need to click the second bar to select a network location as destination path.

✡ Tip: The system backup or disk backup image file must be saved to a NAS or network share folder which is on the same network segment of the same LAN as the server computer.
Step 3. Confirm the operation and click Start Backup.

Tips:
-
Windows 7 image backup can be also used as a recovery plan apart from system deployment. If there is anything bad happening to your computer, you can restore system to the previous good state with the backup image.
-
AOMEI Backupper can be also used to create custom Windows 10/8 image for deployment.
How to deploy Windows 7 image to multiple computers simultaneously
After creating the system image, you can now deploy it to other client computers. To deploy Windows 7 to other client computers, you need image deployment software. There are many OS deployment tools on the market for this task. However, some of them are extremely hard to use. And some image deployment tools are expensive. Usually, you will spend over $1,000 to deploy 50 computers.
Here, I would like to recommend you free and easy-to-use Windows deployment services for Windows 7/8/10/11 and Windows Server 2003/2008(R2)/2012(R2)/2016(R2)/2019/2022 – AOMEI Image Deploy. With this software, you can deploy Windows 7 image to multiple computers simultaneously.
▶ Before deploying Windows 7:
◎ Please check and make sure the server computer and all client computers are on the same network segment of the same LAN.
◎ Please confirm the NIC (also known as network adapter) in all the client computers supports PXE boot.
◎ Note the standalone AOMEI Image Deploy only supports BIOS mode. If there are any computers require UEFI mode, you need to use the integrated AOMEI Image Deploy in AOMEI Backupper Technician or TechPlus edition.
Now, I will walk you through Windows 7 deployment step by step.
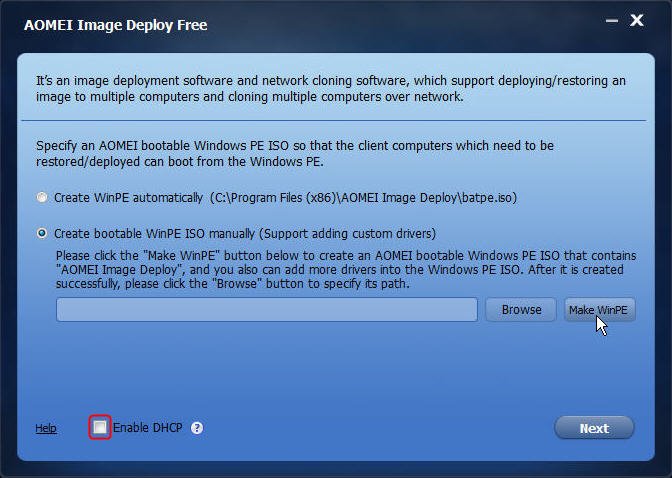
Step 1. Download, install and launch AOMEI Image Deploy on your server computer. Then choose a way to create a bootable WinPE ISO file to boot client computers. Tick Enable DHCP if you don’t have one.
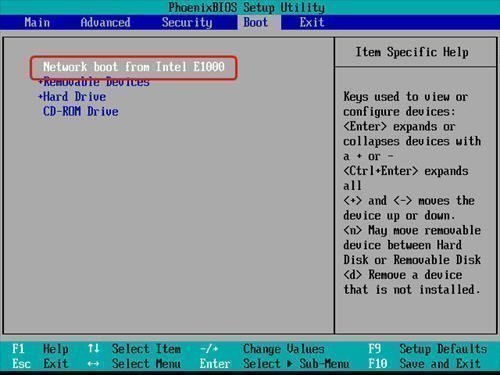
Step 2. After creating WinPE ISO image, leave the server computer alone. Then boot the client computer. Keeping tapping F2 or F8 once booting (The exact keys depend on different manufacturers). Enter the BIOS to change boot priority to network.
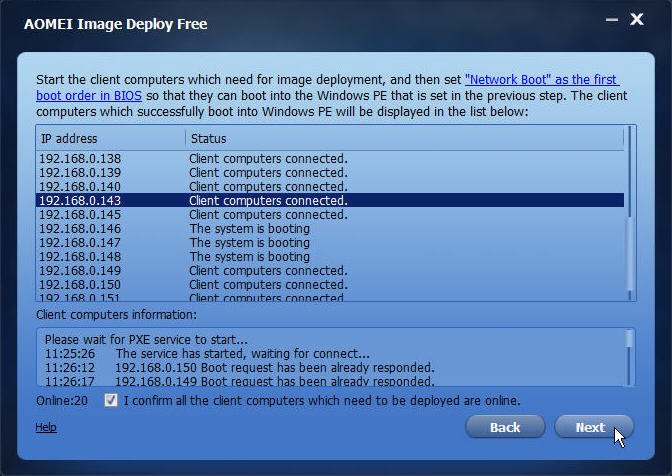
Step 3. After all target PCs boot normal, AOMEI Image Deploy on server PC will prompt you “Client computers connected” to the display list. Tick the box: I confirm all the client computers which need to be restored are online and click Next.
Step 4. At next Windows, click Browse to navigate the Windows 7 image backup. Then select the client computers that you want to deploy by ticking the box before their IP address. You can tick all to select all the client computers.
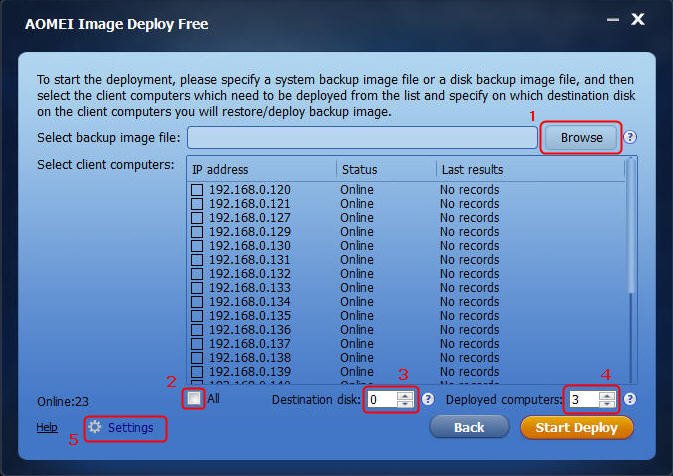
✍ Note: Please confirm the sequence number of the destination disks that are used for image deployment is the same. It is recommended to remove all other disks in the client computer but only keep the destination disk for image deployment.
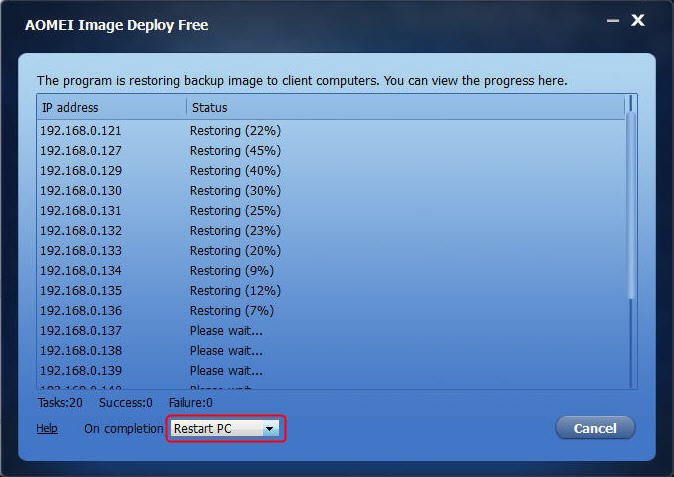
Step 5. Click Start Deploy after customized configurations have done. Then you can view the image deployment progress of each client computer. Besides, you can choose whether to shut down or restart the client computers after the deployment is completed.
✍ Tips:
✩ Please note that IP preset and deploying image to computers with different hardware is only available in AOMEI Image Deploy Technician Edition.
✩ To deploy Windows image to dissimilar hardware or deploy over 20 target PCs for Windows Server systems, you need to turn to AOMEI Image Deploy Technician version.
Conclusion
To make a summary, to save time and effort and to have uniform computer configuration, you can create a custom Windows 7 image for network deployment. AOMEI Image Deploy can help you to deploy image easily and quickly to multiple computers simultaneously through network.
Besides, Windows 7 image backup created by AOMEI Backupper can be also used as data recovery plan. If there is something wrong with your system, you can always restore it to its good state. You can also use AOMEI Backupper to backup only changed files on Windows 7.