Restore from a System Restore Point in Windows 10, 11(4 Ways)
As long as you have a working restore point, you can restore from system restore point in Windows 10/11 when your computer has problems related to drivers, software or Windows Update. Get specific steps in this article.
By Ivy Updated on October 13, 2023
What does the system restore point do?
System restore points is the snapshots of your Windows system files, certain program files, registry settings, and hardware drivers, which can help you restore your computer to a previous good state when it is running slowly or stop stop responding.
Also, you can undo changes if the recently installed drivers are damaged or corrupted, or the recently installed programs do not work, etc. Note that it neither deletes your personal data nor backs up them for protection, you need to create a backup for them if you don't want to lose your data.
For some reasons, the System Restore feature comes disabled by default in Windows 10. Thus, if you want to restore system from a system restore point in certain situations, such as, software installation problem, you need to enable system restore in Windows 10 first. Then, let's see below and learn eveything about it.
How to create a system restore point in Windows 10/11 for quick recovery
To create system restore point, you need to access the System Properties window. Here are three ways:
- From This PC: Right-click This PC on your computer desktop, select Properties and System protection.
- From Control Panel: Search Control Panel and select it. Then, select View by Large icons or Small icons > System > System Protection.
- From search result: Type system restore in the search box and then select Create a restore point.
Now, you may already see the System Properties window, follow the steps below.
👉 Create restore points automatically
Step 1. Under the Protection Settings, you will see all the available drives on your PC and the system drive will be highlighted. Select the system disk (all the items System Restore protects tend to be located on it) and click Configure.
Step 2. Then, you will see the Restore Settings and Disk Space Usage option. Tick Turn on system protection under the Restore Settings section and then set the percentage of Max Usage as 10% so as to reserve enough space for the restore point.
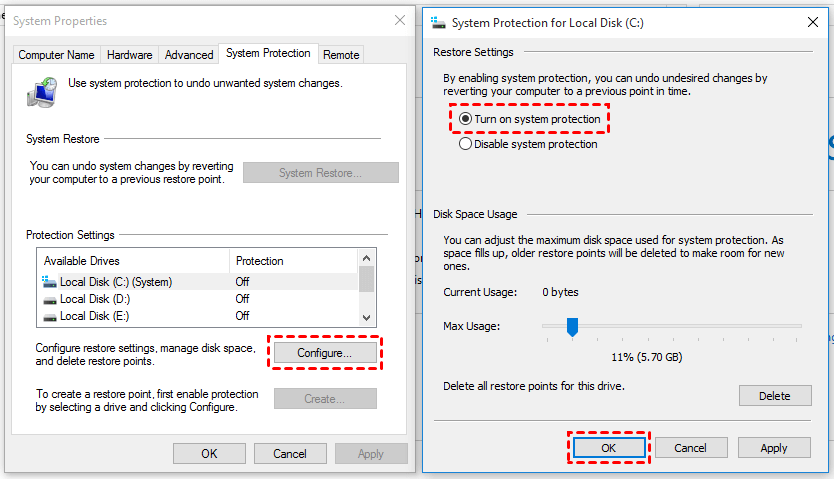
Step 3. Click Apply and OK to exit this window.
Now, you finish the steps of enabling system restore in Windows 10 and the system restore points will be created automatically before you install a new app, driver or Windows update. And the same is true for Windows 11.
👉 Create a restore point manually
But sometimes you need to create a restore point manually when you make changes to the registry or other software that causes system file errors, or you find system restore not working properly. Below are the steps.
Step 1. Go to the System Properties window, scroll down to the Protection Settings and then click Create at the lower location.
Step 2. Here you will be asked to type a description to help you identify and distinguish it from others, type a name for it and click Create.
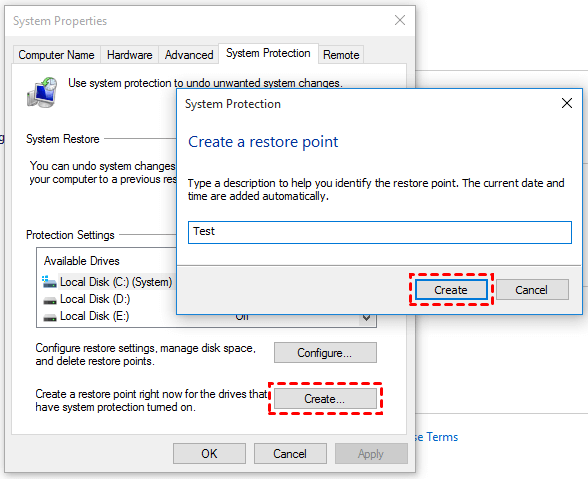
Step 3. Wait until you are told "The restore point was created successfully". Then, click Close.
How to restore from a system restore point in Windows 10/11
Then, just imaging you recently installed a new device driver, which makes your computer unstable. You want to uninstall it, but you cannot uninstall it properly or it damaged the system files during the uninstallation process.
At this time, you can try to restore system files and settings from a restore point in normal mode. If the problem you encounter is more serious, you may not be able to restore system in the normal mode. You can choose to Restore from a system restore point in safe mode, or using advanced options or installation disc. Pick the one in your situation and start to restore system from a restore point.
- Precaution: backup important files
- Way 1: Restore system from a restore point in normal mode
- Way 2: Restore computer to previous date in safe mode
- Way 3: Restore Windows 10/11 to an earlier date via Advanced options
- Way 4: Restore computer to early date using installation media
Precaution: backup important files
The System Restore feature will not backup your personal data and some users report they lose their data after recovery. Thus, before restoring, you need to backup important file with a free backup software like AOMEI Backupper Standard if you don't want to lose them during the restore process.
- It allows you to backup system, disk, partition or individual files per your needs.
- You can schedule automatic backup to get multiple versions with daily/weekly/monthly mode.
- The scheduled backup will run as incremental backup by default to reduce backup time and backup image size.
Follow the steps below to protect your data continuously.
Step 1. Download AOMEI Backupper Standard and install it on your computer. Then, launch it, click Backup and File Backup.

Step 2. Click Add File or Add Folder to select your important data. Then, select a backup destination to store them. If it's an external disk, please connect it first.

Step 3. Click Schedule Backup > Enable Schedule Backup to backup files automatically. You have 5 options, Daily, Weekly, Monthly, Event trigger, and USB plug in. Then, click Start Backup to backup files before restoring.
Way 1: Restore system from a restore point in normal mode
Step 1. Go to the System Properties window where you configure and create system restore point. Then, scroll down to the System Restore section and click System Restore.
Step 2. Here you will see the system restore wizard with a brief introduction. Click Next.
Step 3. Select the latest restore point(if possible), it will contain all items except for the software, drivers, or updates causing problems.
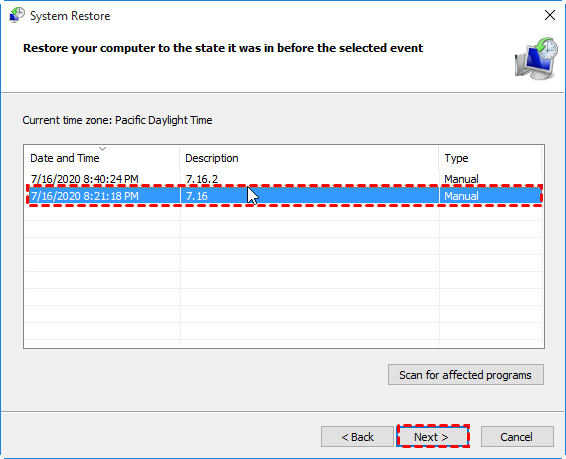
Step 4. To be confirmed, you can click Scan for affected programs. Then, you will see all the programs and drivers that will be deleted or restored. But the restored program or drivers might not function properly until you do a full reinstall.
Step 5. Then, you will go back to the window where you are asked to select a restore point. Select the latest one and click Next.
Step 6. Confirm the selected restore point and click Finish to start the restore operation.
It may take at least 15 minutes or more, when your computer goes back to the desktop, you are now in the selected restore point. You can check if the problem still persists.
Way 2: Restore computer to previous date in safe mode
The safe mode only runs the essential parts of Windows, and any problematic apps, drivers or settings will be disabled. Thus, you can try system restore in safe mode.
Step 1. Press and hold the "Shift" key while clicking the "Restart" option.
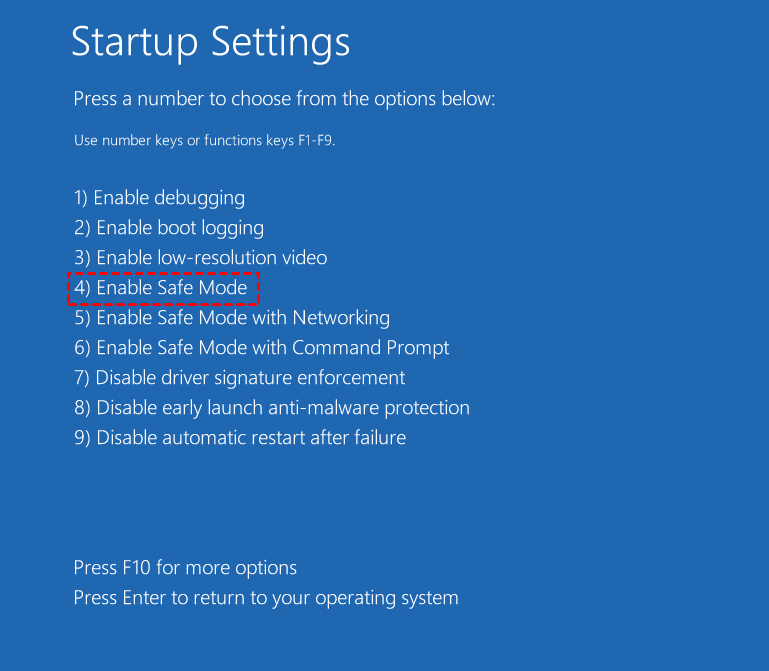
Step 2. Here you will see the Choose an option window, select "Troubleshoot" > "Advanced options" > "Startup Settings" > "Restart".
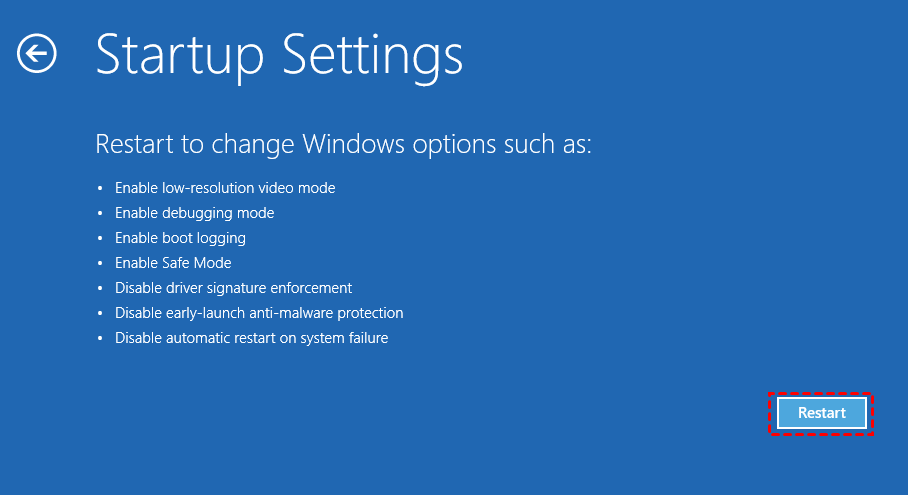
Step 3. Then, you will see all the startup settings, press "4" or "F4" to enable safe mode.
Step 4. Run system restore as it is in the normal mode.
Way 3: Restore Windows 10/11 to an earlier date via Advanced options
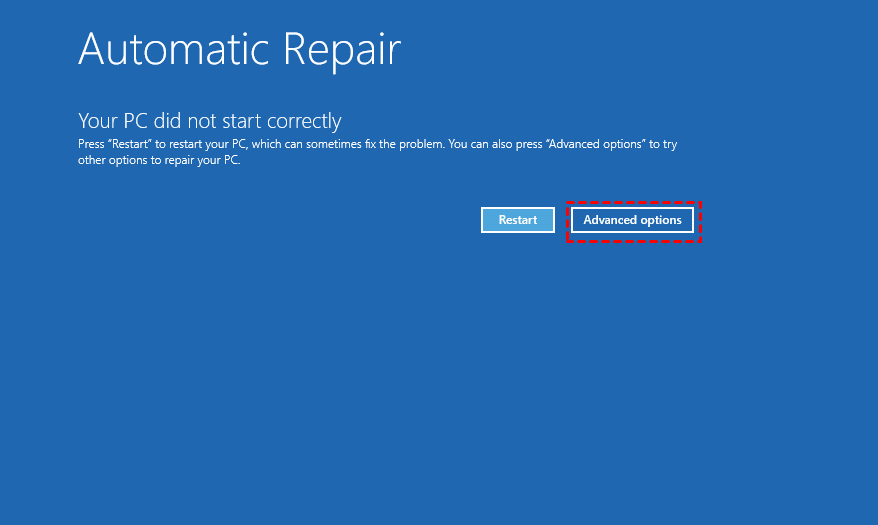
Step 1. Restart your computer three times and halt the process when you see the Windows logo.
Step 2. Then, the automatic repair process will be triggered in Windows 10/11. Wait until the process completes, click Advanced options.
Step 3. After that, you will see the Choose an option window, click Troubleshoot > Advanced options > System Restore.
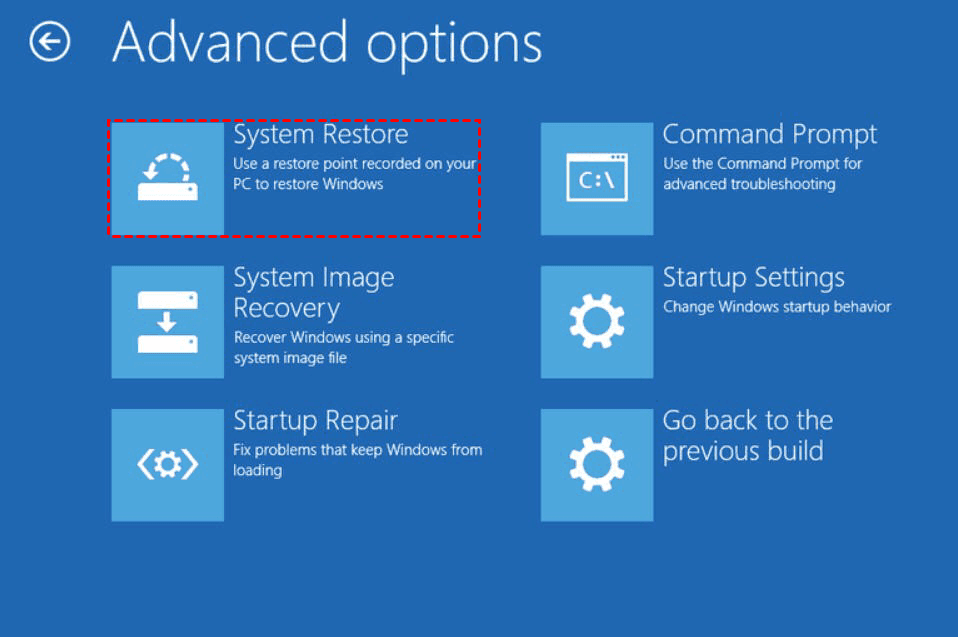
Step 4. Then, you will enter the System Restore wizard, select a restore point and scan for the affected programs before recovery.
Way 4: Restore computer to early date using installation media
If the above method does not work, you can still create an installation media and use it to restore your computer.
Step 1. Download the media creation tool from the Microsoft software download website and create installation media with it. Then, boot from it.
Step 2. In the initial Windows Setup window, click Next.
Step 3. Select Repair your computer.

Step 4. Then, you will access the Choose an option screen, select Troubleshoot > Advanced options > System Restore.
Step 5. In the System Restore wizard, restore system with the instructions.
System restore not working in Windows 10/11 – how to fix
Even if you are sure the system restore feature is enabled or you create a system restore point manually before changing any software that may cause system file error, there is a possibility that the system restore point is missing or no system restore point. Then, you can try the following methods to fix them.
Way 1: Check if system restore is disabled
System Restore may be disabled in certain situations after you enable it manually, for example, you upgrade your Windows 10. Thus, you need to check the status of System Restore.
Step 1. Go to the System Properties window.
Step 2. Scroll down to Protection Settings, check the protection of your system drive or other drives. If it's "On", the System Restore feature is enabled. If not, you need to enable it again.
Way 2: Increase the max disk usage
Low disk usage for System Restore may result "cannot create system restore point" error, even if it's enabled.
Step 1. In the System Properties window, click Configure.
Step 2. Then, you will access the configuration window. Scroll down to Disk Space Usage, drag the Max Usage bar to 10%.
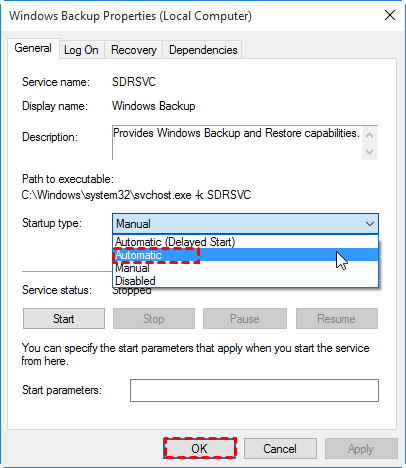
Way 3: Start all the necessary services
If the System Restore is not working properly in Windows 10/11, you can check if all the necessary services related to System Restore are enabled.
Step 1. Right-click the taskbar and select Task Manager.
Step 2. In the Task Manager window, select Services and click Open Services at the bottom.
Step 3. Find the following three services. Then, double-click it and set the startup type to Automatic.
Windows Backup
System Restore Service
Volume Shadow Copy
Way 4: Verify if the hard drive has problem
Hard drive errors may also lead to system restore not working in Windows 10/11. Thus, you can try chkdsk or system file checker (or both) to verify.
Step 1. Type cmd in the search box, select it and run as administrator.
Step 2. In the command prompt window, type chkdsk C: /f/r and hit Enter.
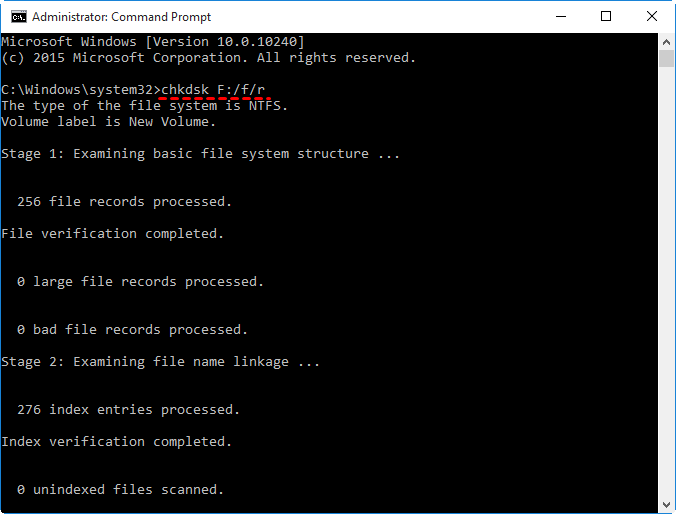
Notes:
-
/f parameter can fix any errors it finds.
-
/r can locate the bad sectors on the drive and recover readable information.
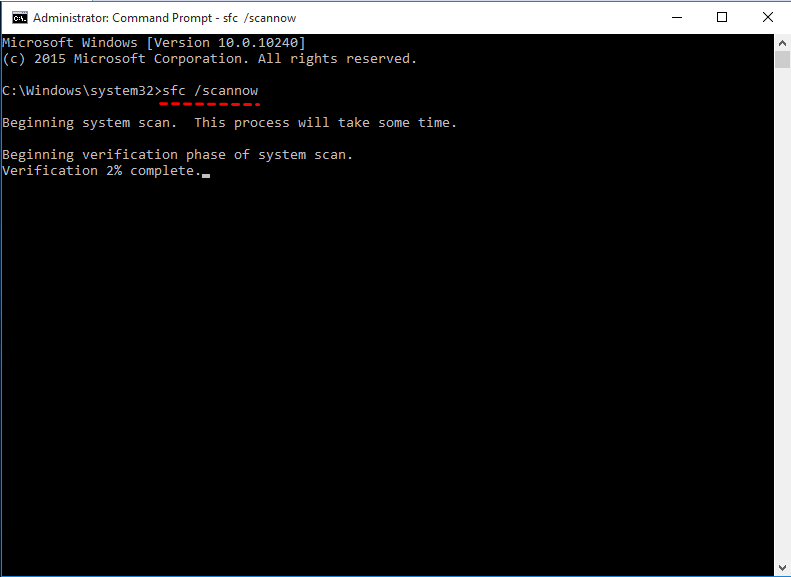
Step 3. Then, when disk check process completes, type sfc /scannow and hit Enter.
Wrapping things up
Now you know how to restore PC from restore point. Restoring from a system restore point is a good way to resolve problems related to driver issues, software installation or Windows Update. Sometimes if you find system restore is not working, try given solutions in this article.
Note that System Restore may not work for your personal files or the operating system. Thus, you need to backup important files or system per your needs, then you will restore them in a very short time. You could use free backup software AOMEI Backupper Standard or its higher version. Check the edition comparison page and select the one suitable for you.