Enable System Restore in Windows 10 for Quick Recovery
You will learn three things in this article, namely enable system restore in Windows 10, create restore point and restore system using it. Also, you will get an easier alternative way.
By Ivy Updated on October 20, 2022
What does system restore can do for you?
System Restore was first introduced as part of Windows ME (Millennium edition) and include in later Windows operating system, such as, Windows 7/8/8.1/10/11. It is used to track software installation and updates, driver changes, installed program and restore computer to earlier date when system crashes or system boot failed, etc owing to virus attacks, Ransomware, accidental deletion of system files, etc
By default, Windows will automatically create a record of changes concerned to a system or software event (called a restore point) once something changed on your computer. You still can create it manually as you like. Note it does not back up your user data such as documents, music, or movies.
But in Windows 10, the system restore feature is disabled. The reason may be it will occupy much disk space or condered as old feature or it's not the only quick restore feature, System Image Recovery or Reset this PC, for example.
Thus, before using Windows 10 system restore, you need to enable it first. It does not matter if you don't know how to enable system restore in Windows 10. This article will tell you everything you need to know.
How to enable system restore in Windows 10
Here you will learn 3 ways to turn on system restore in Windows 10, all of them can help you.
Note if you install the patches of Windows vulnerabilities released by Microsoft or other important updates, System Restore may be turned off automatically. Thus, please remember to enable it again after these events.
Way 1: Turn on system restore using System Properties
System Restore is hidden in the legacy Control Panel, so you can only access from it. To turn on system restore by the following steps.
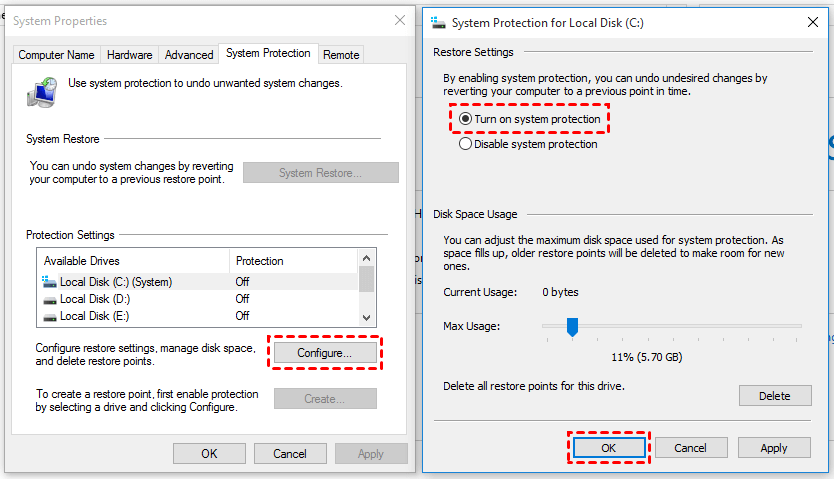
Step 1. Search for Control Panel and select it. Then, select View by Large icons or Small icons > System > System Protection.
Step 2. Here you will see the System Properties window. Select a local drive and click “Configure”.
Step 3. Under the Restore Settings section, tick “Turn on system protection”. Then, drag the Max Usage bar to specify the percentages of space for protection, 10% is sufficient. After that, click "Apply" and ‘’OK”.
Tip:
- If the percentages is too low, the restore points will be deleted when there is not enough space.
- Please pay attention to space of saving your restore point, user data and software.
Step 4. Then, you will go back to the System Properties window. You will see the protection of the selected drive is set to "ON".
Way 2: Enable system restore in Windows 10 using command line
Step 1. Type cmd in the search box, select it and Run as administrator.
Step 2. In the command prompt window, to enable system restore on the C: drive, type Enable-ComputerRestore -Drive "C:" and hit Enter.
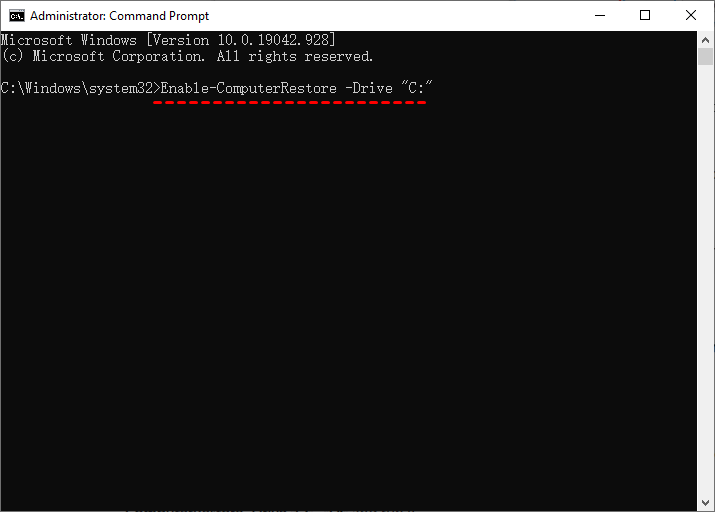
Note: C: is the drive letter of the system drive, you can replace it with other drive letters.
Step 3(optional). To enable system restore on more of your drives, you can add the drive letter at the end of this command, with commas between them. For example, to enable system restore on the C: and D: drives, type Enable-ComputerRestore -Drive "C:" , "D:" and run it.
Way 3: Enable system restore in Windows 10 using GPO
Note the group policy editor only available in the Windows 10 Pro, Enterprise and Education editions. If your Windows 10 is one of these version, check steps below to enable system restore in Windows 10.
Step 1. Type group policy in the search box and select the "Edit group policy" option.
Step 2. In the left panel, go to the location below.
Computer Configuration\Administrative Templates\System\System Restore
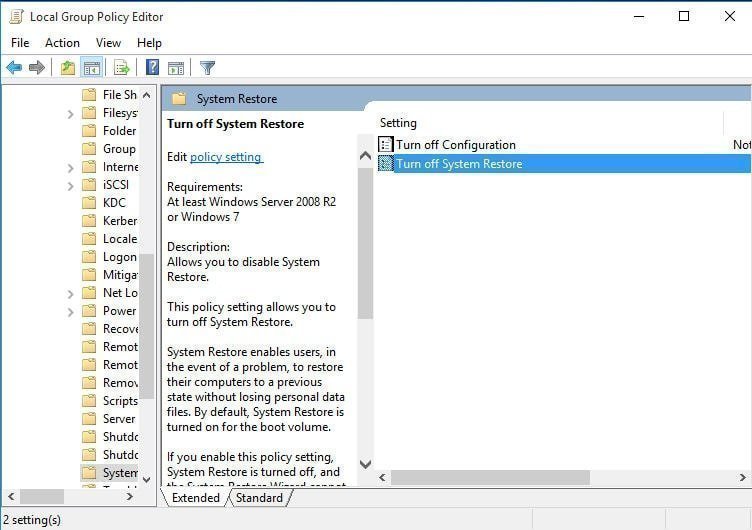
Step 3. In the right panel, you will see the Turn off System Restore setting. Double-click it and tick “Not Configured” or “Disabled”. Then, click "Apply" and "OK'.
Step 4. Click "x" to exit the local group policy editor.
How to create system restore point in Windows 10
As mentioned earlier, Windows will create a system restore point automatically when there is a Windows update, driver changes, etc. But you still can do this manually, especially when you want to make some changes in registry or other system files, etc.
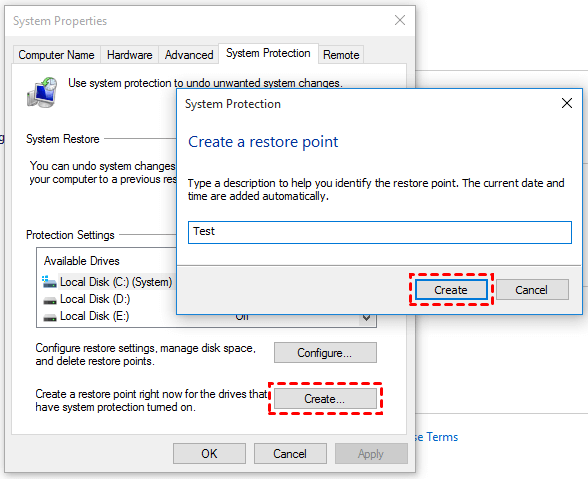
Step 1. Access the System Properties window again.
Step 2. Under the Protection Settings, click “Create".
Step 3. Then, you will be asked to type a description for it, please do so. Then, click “Create" again.
How to perform Windows 10 system restore to revert changes
Before performing system restore, you need to be sure that the partition or volume with system restore point is working properly. If it's corrupted, the system restore point will be invalid. Then, select one method and start the restore process.
Way 1: Use System Restore in normal mode
Step 1. Go to the System Properties window and click “System Restore”.
Note: If the system restore is grayed out, then it means that the system does not have any available restore point.
Step 2. Click “Next” in the Restore system files and settings window.
Step 3. Select the avaiable restore point and click “Next”. It's suggested to click “Scan for affected programs” to confirm which programs will be removed.
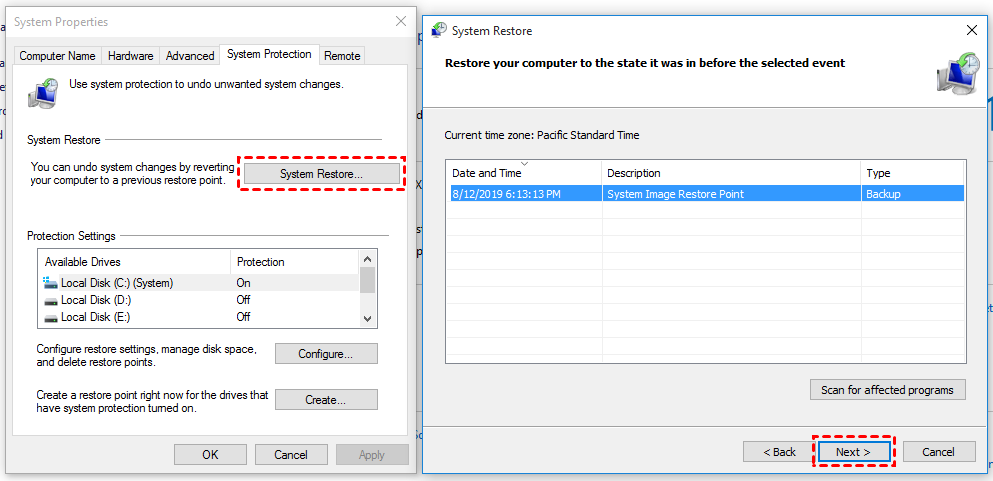
Step 4. Confirm your restore point and click “Finish” to restore computer an earlier date in Windows 10.
Way 2: Perform system restore in safe mode
Sometimes you cannot access the system restore feature due to certain reason. In this case, you can perform this operation in the safe mode.
It only load the operating system with a minimal set of drivers and services, no third-party software or drivers get loaded, thus bypassing the source of a problem.
Step 1. Press and hold the "Shift" key while click the "Restart" option.
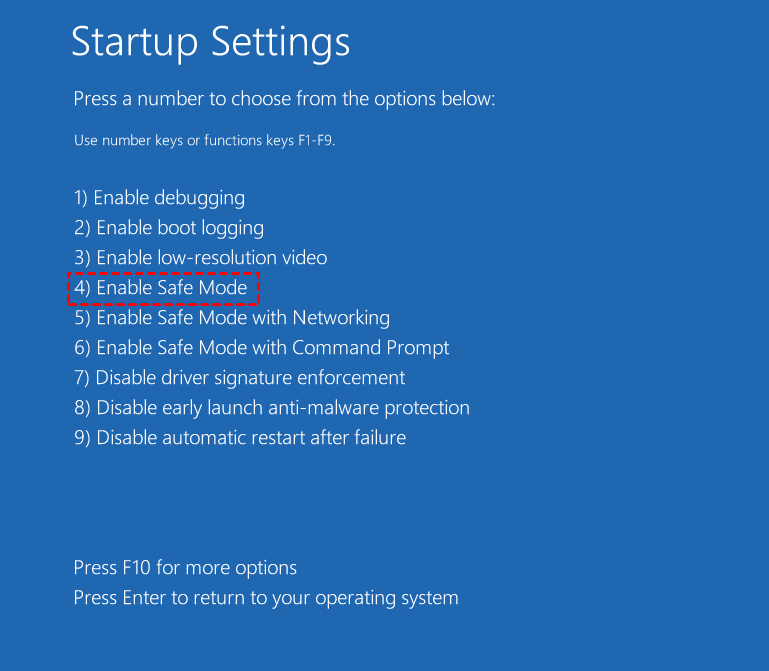
Step 2. Here you will see the Choose an option window, select "Troubleshoot" > "Advanced options" > "Startup Settings" > "Restart".
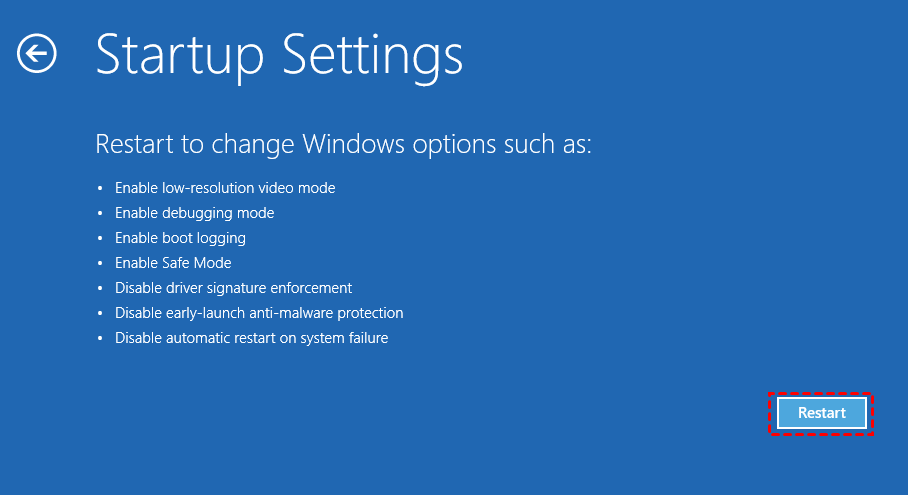
Step 3. Then, you will see all the startup settings, press "4" or "F4" to enable safe mode.
Step 4. Run system restore as it is in the normal mode.
Way 3: Restore system using Advanced startup
If your computer does not boot, you can use the advanced startup settings to perform system restore.
To access it, you need to start your computer three times and halt the startup when you see the Windows logo.
Note that this method may not always work. If it fails, you can boot your computer from the Windows 10 installation media, then click Next and Repair your computer.
Then, see steps below to restore system from advanced startup environment.
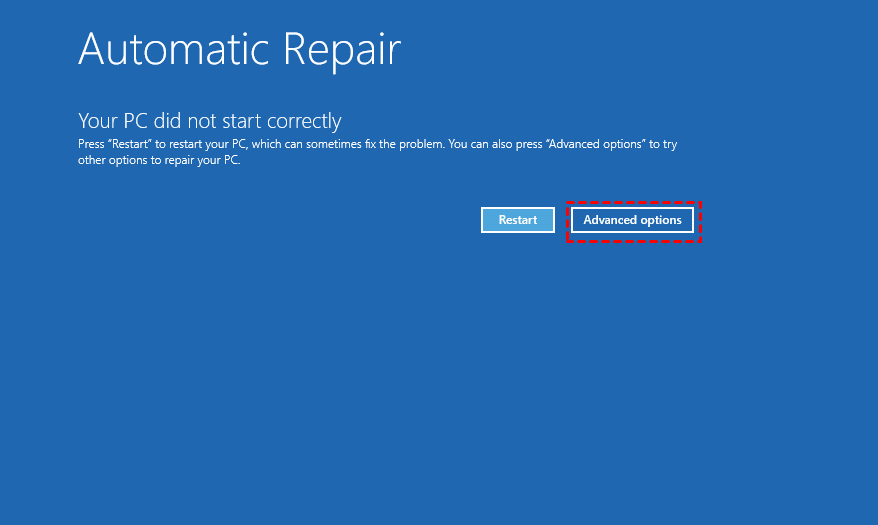
Step 1. In the Automatic Repair window, click the "Advanced option". Then, select "Troubleshoot" > "Advanced options" > "System Restore".
Step 2. Select your Windows 10 account. Then, you will be asked to type password for this account, just type it and click "Continue".
Step 3. Select an available restore point and click Next. Then, follow the on-screen instructions.
Way 4: Directly reset your computer to fresh version
If you don't have a working system restore point, you can choose to directly reset your computer to troubleshoot the computer failure.
To start Reset this PC, you have two ways:
From Windows: “Start” > “Settings” > “Update & Security” > “Recovery” > “Reset this PC” > “Get started”.
From boot: Boot the computer from installation disc, if you don’t have any, just creat a recovery drive > click “Next” in the Windows Setup window> “Repair your computer” > “Troubleshot” > “Reset this PC”.
Then, follow steps below to reset your PC.
Step 1. In the Choose an option window, select "Keep my files".
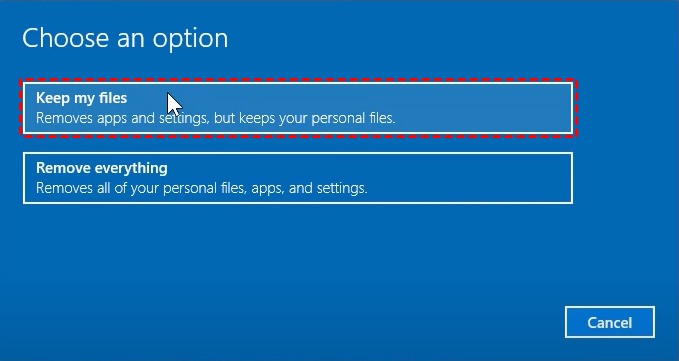
Step 2. Here you will see what changes will be made and click "Reset".
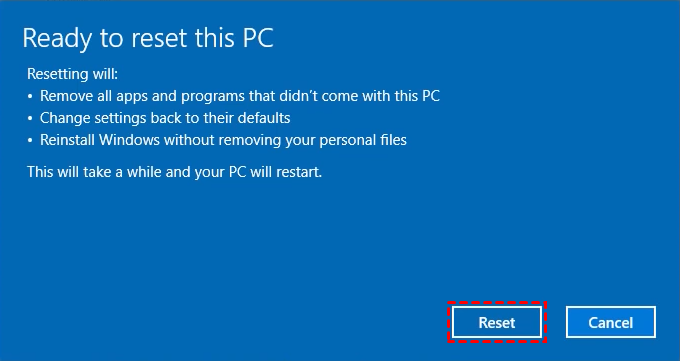
Step 3. Wait untill the process is complete. Access your computer and reinstall the programs you will use in the near future.
Alternative way to enable system restore in Windows 10
System Restore is quite different from the backup what we usually say, because it only works when your computer has smaller problem, such as, driver issues. If your system crashes, it will not work, because it does not backup all the system files required to start Windows. Also, it does not backup your personal data.
Thus, it's suggested to create a complete backup with a free backup software like AOMEI Backupper Standard. With it, you are allowed to backup system, disk, partition or files per your needs. Also, you can set schedule automatic backup to protect your data or OS continuously, such as daily, weekly, monthly, incremental or differential backup, etc.
It supports Windows 11/10/8/7/XP/Vista, so not only Windows 10, you can perform system backup & restore easily on other OS as well.
Then, let's get started to create complete system backup with AOMEI Backupper. In the first of place, download it and install on your computer. Also, please prepare an external hard drive or other storage device to store the image file.
Step 1. In the main page of AOMEI Backupper, click “Backup” and “System Backup” subsequently.

Step 2. The operating system and boot-related partitions are selected by default. Click the folder shapped button to select the backup destination.

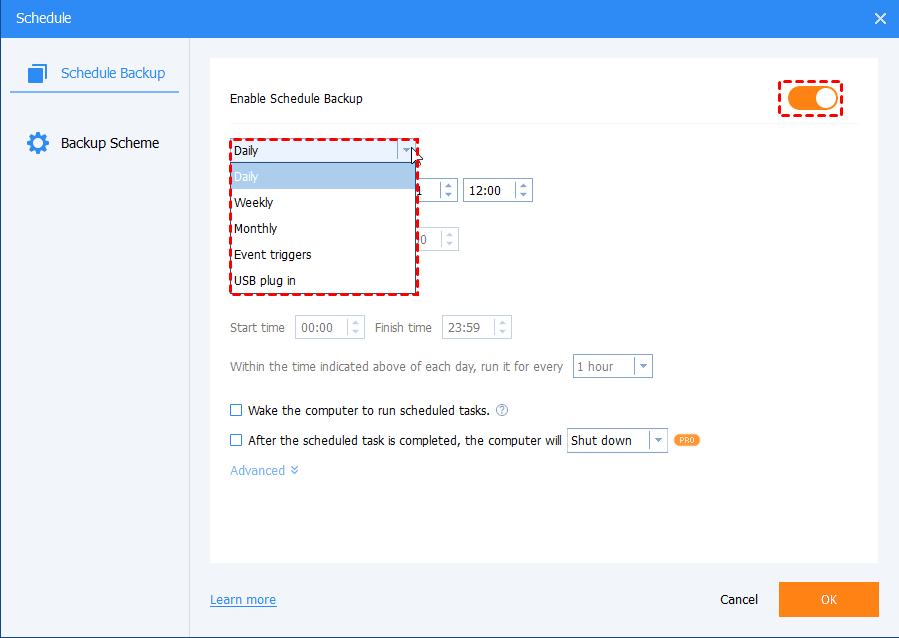
Step 3. Click "Options", "Schedule" to set backup settings. Then, confirm all the items you select and click "Start Backup".
Normal or high compression level: It allows you to compress backup image to a smaller one, thereby saving disk space. You can find it in the “Options”.
Daily/weekly/monthlybackup: It is to backup system regularlyat the set backup time, so you will have multiple backup versions.
Incremental/differential backup: It isable to backup only changed files so as to save disk space. Note the scheduled differential backup is available on the professional version or higher edition.
Tip:
- It's suggested to create a bootable USB or CD/DVD, thus you still can boot your computer even if it's unbootable.
- If you don't have extra storage device, you can directly add an entry of this software on your computer by creating Windows 10 Recovery Environment.
To restore system from backup image, you can use the following steps:
Step 1. Connect the external hard drive containing system backup and be sure it's recognized. Then, launch AOMEI Backupper Standard, click “Restore” and choose "Select Task" or "Select Image File".

Step 2 (optional). Select the system image in the following list if you choose "Select Task" in the Step 1. Then, click "Next". If you choose "Select Image File" in the Step 1, just skip this step.

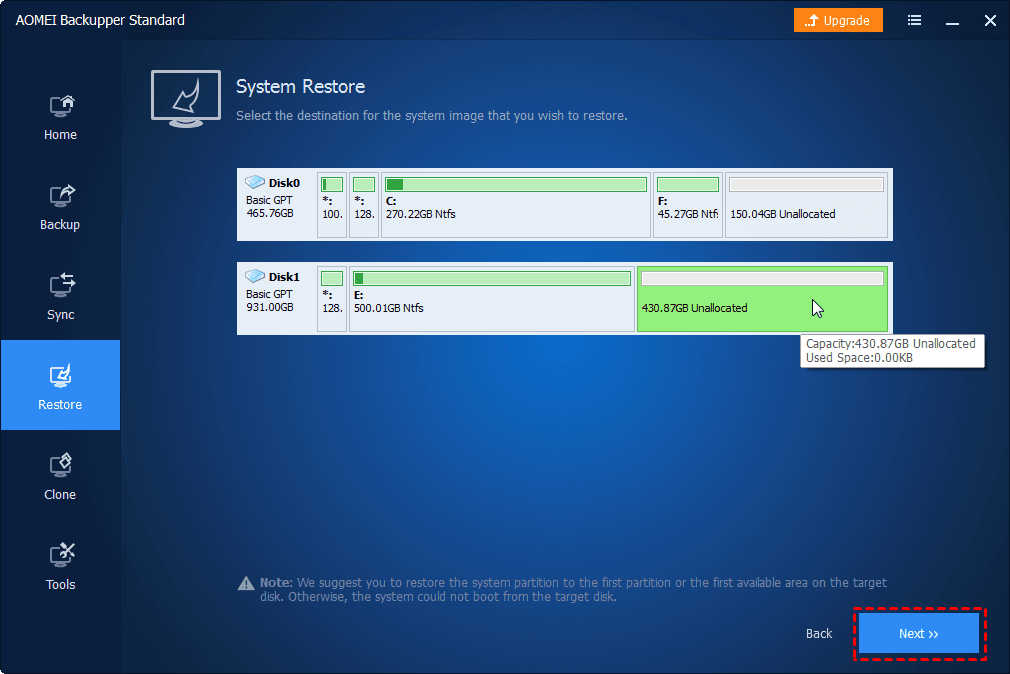
Step 3. Tick "Restore this system backup" and click "Next". To restore system image to new hard drive, you need to connect the external hard drive and tick "Restore system to other location" at the lower left corner.
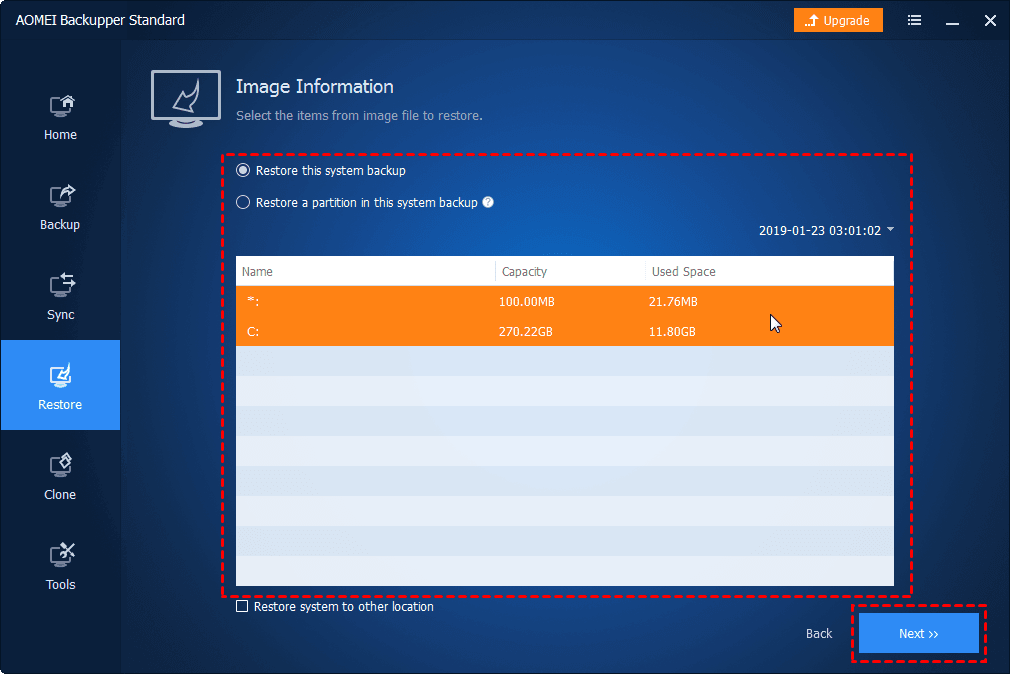
Step 4(optional). Select the external hard drive to receive the image if you tick "Restore system to other location" in the Step 3.
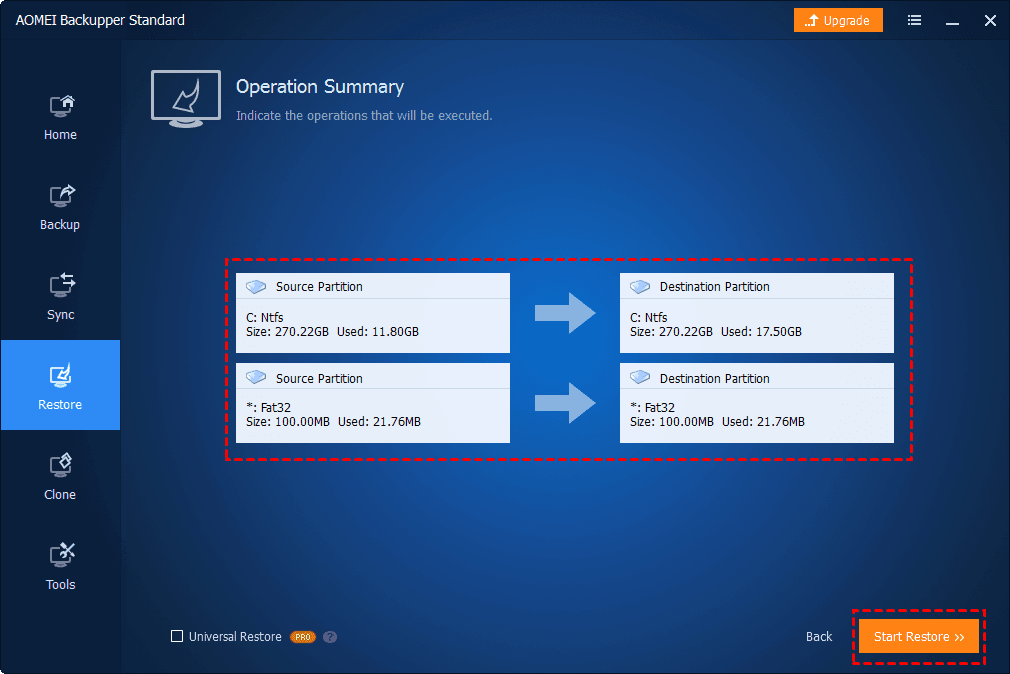
Step 5. Confirm the operations in the operation summary and click “Start Restore” to restore system. Then, you will see the Settings icon, to ensure your data is complete, it's suggested to tick the checkbox before “On completion”.
Tip: If you don't make a full backup ahead of time, you can create a backup on a working computer and restore system with dissimilar hardware.
Conclusion
It's necessary to enable system restore in Windows 10, which can help you restore computer to an earlier date by undoing changes made in software installation, Windows update, or others.
But you have to know that system restore not is not working when your computer crashes or your personal data lost. To protect your data or OS in a better way, it's suggested to create a complete system backup in Windows 10. Also, you can choose to backup entire disk or specific files.
In addition, it's still a free disk cloning software to help you replace laptop HDD with SSD, clone disk to larger disk, clone large HDD to smaller SSD, or migrate OS to SSD, etc. Some features are only available in the professional version, you can download it to have a try right now!