Custom Refresh Image in Windows 10 for Reset This PC
This article will show you how to custom refresh image in Windows 10 as the image to reset your Windows 10 PC without losing installed programs.
by Delia Updated on December 30, 2022
How can a Custom recovery image be helpful
Everyone has something saved on their computer that can bear to lose, especially those who have used the computer for a long time. After running Windows 10 system for some time, there are chances that you meet some serious issues, some of which cannot be repaired.
How do you handle it if that happens to you? In that case, you can refresh your Windows 10 installation or do a fresh install to fix some issues. Windows 10 has a built-in feature Reset this PC that helps you reinstall Windows with your personal files kept or removed.
How to use Reset this PC
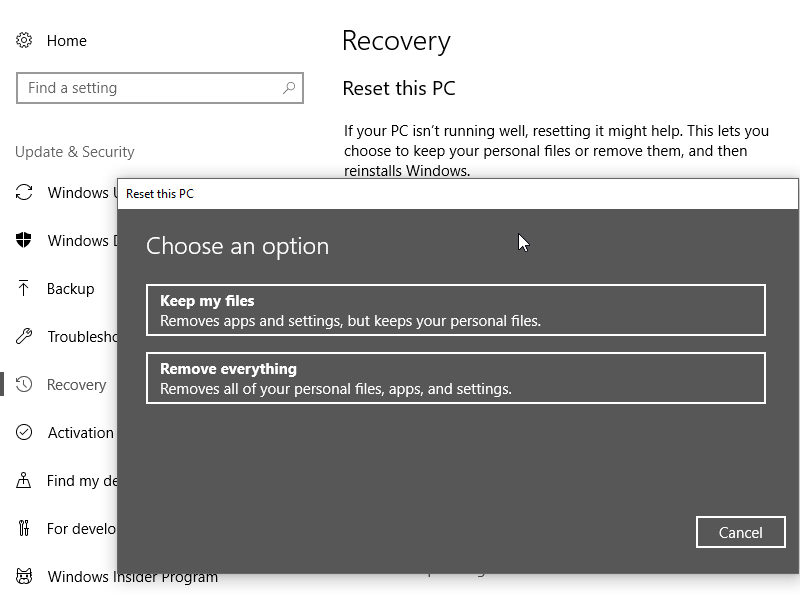
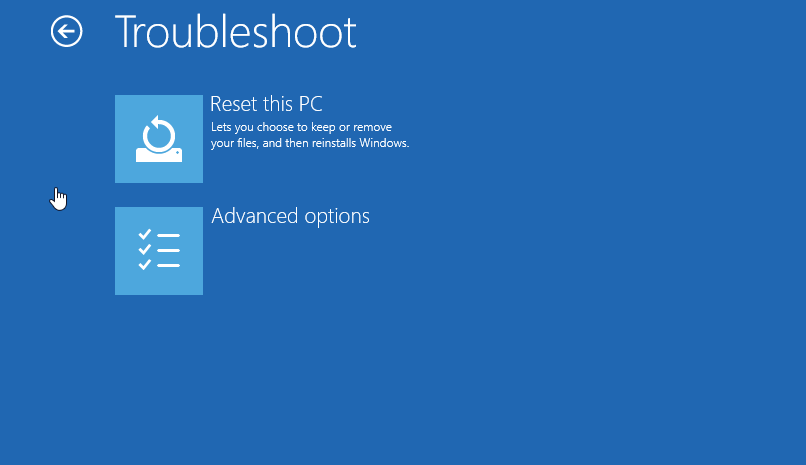
This will boot your computer into recovery mode and reinstall Windows, which will certainly fix all the system issues. To reset your Windows 10 PC, you can go to Settings > Update & Security > Recovery > Reset this PC. If your Windows 10 cannot boot normally, you can boot from Windows 10 recovery drive or installation disc to boot your PC and find the Reset feature in Advanced Options.
Will my files and apps get removed?
Windows 10 Reset PC provides two options, Keep my files and Remove everything. If you choose Keep my files, your personal files (C:\Users\current user folder) will remain intact. After the Reset, you can still use your account and password to login to Windows 10.
No matter which option you choose, all the installed programs and application will be removed. All your personal data will be saved in the directory c:\windows.old. if you need some of your old files, you look into the Windows.old folder and copy it out.
What if I do not want to lose installed applications?
Reset this PC is convenient to fix your system issues. However, even if you choose to keep your files, you have to spend much time installing and configuring lots of programs that you need. Therefore, it will be much more convenient if you can custom the image used for Reset this PC.
After you install all your loved applications and system is running well, you can capture this image and use for as the system recovery image. You can also capture more incremental image backups.
How to create Windows 10 custom reset of refresh image
To capture Windows 10 recovery image, you need to boot into Windows recovery environment. You can click Restart while pressing and holding the Shift key to boot into WinRE system. You can also boot your computer from recovery media or installation disk.
When your computer reboot after Shift + Restart or from recovery media, select Troubleshoot > Advanced options > Command Prompt. You may need to enter your account password to use command prompt.
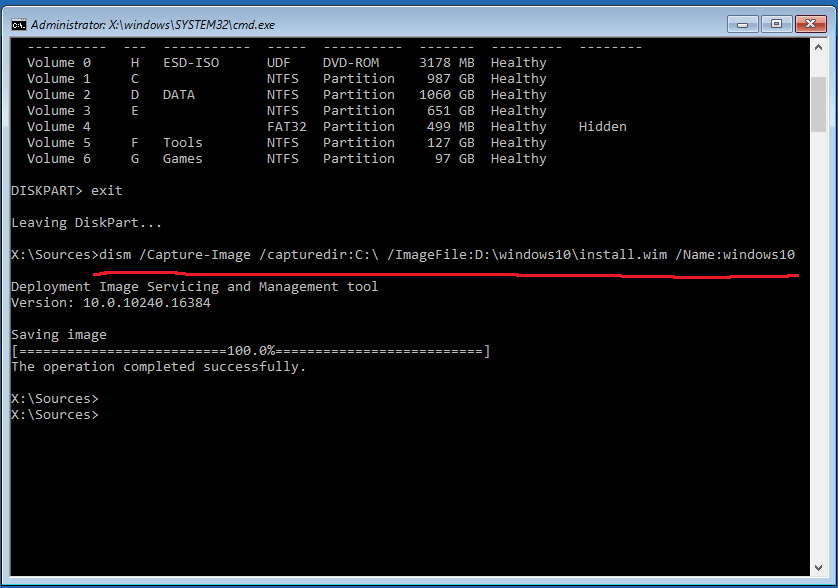
Within the command prompt window, type “dism /Capture-Image /CaptureDir:C:\/ImageFile:D:\windows10\install.wim /Name:windows10 /description:2018-01-10
” without quotes. This command means to backup current system to D:\windows10 folder and create image file install.wim. You need to change the location path based on your needs.
Parameters explained:
/Capture-Image- Capture a drive image to a new .wim file.
/CaptureDir- Specify the source directory, the location to be captured.
/CaptureFile- Specify target location to store the image file.
/Name- Specify a name.
/Description- Specify a description. If you want to create more than one refresh image, you can write a description to the image, so you will know which one to restore.
After installing new applications or Windows updates, you can add an additional image to the existing .wim file using /Append-Image option. This only captures the newly added files to the image file, which works like incremental backup.
As the above step, type the following command in a command prompt: “Dism /Append-Image /ImageFile:D:\windows10\install.wim /CaptureDir:C:\ /Name:windows10 /Description:2018-09-10”
When the recovery image is created successfully, run the following command in an elevated command prompt to let Windows 10 use the image you created to Reset this PC:
“reagentc /setosimage /path D:\windows10 /index 1”(without quotes, and you need to change the /path to where your windows custom refresh image is stored)

If Windows 10 Reset failed, you can use command “reagentc /info” to check if this recovery image is available.
If you are not familiar with command prompt or think this method is too complicated, you can use another tool with user-friendly interface to create a custom image for Windows 10 recovery.
Create a system image for Windows 10 recovery
It is reported that virus and ransomware are starting to target commonly used recovery image files. Is your custom reset image safe? It is hard to say. Also, Windows 10 update (like KB5001649) sometimes brings new problems and even data loss, if you make a backup in advance, you can avoid a lot of trouble. Therefore, it's recommended to create a Windows 10 system image with the free backup software, AOMEI Backupper Standard.
If you like easy to use backup tool, then AOMEI Backupper Standard is a perfect choice. The interface are designed to be very effective, which leaves little space for user error. Of course, each step has clear instructions.
You can refer to the steps below to create a system image
1. Download and install this Windows backup and restore tool.
2. Within its Home screen, click the Backup tab and select System Backup.

3. In the next screen, you can see related partitions has been automatically incuded as source data. You only need to specify a destination location (external hard drive, NAS, network drive, etc) to save the image backup.

4. Next, you will get the Operation Summary screen. From there, you can custom backup Options and set the Schedule Backup to run this task automatically. Then you can click Start Backup to start the backup.

Based on this backup image, you can also create multiple incremental backups as you keep adding files to this PC. When the backup is over, you can create a bootable media using USB drive or CD/DVD. This bootable media is able to boot all versions of Windows 11/10/8/7.
Conclusion
If your computer has issues, you can use this image backup as the custom refresh image for Windows 10 to fix all problems while keeping all your files and installed programs. If Windows 10 fails to boot, you can boot from the bootable disk to use the Restore feature to restore everything backup to the state when you have taken the backup.