How to Deploy Windows 7, 10, 11 Image over Network | Easiest
Want to deploy Windows 7/XP/10 image from network? This guide will show you how to (mass) deploy Windows image to PCs over network with free AOMEI Image Deploy.
by Lily Updated on November 1, 2023
Why deploy Windows 7 image over network?
Network Storage becomes popular in recent years even among PC users. More and more users would like to backup computer to NAS or network shared folders to save local disk space. Therefore, it is necessary to deploy the Win 7 image over the network because someone has a backup image saved there. For example, it is not uncommon to deploy Windows 7 system image to different hardware in people’s daily life.
What’s more, administrators in large or middle sized company need to deploy Windows image on a large scale now and then. Deploy the image from network saves the time of booting up each computer one by one as well as the time of creating bootable device for possibly dissimilar hardware. Another aspect for restoring Windows image from network would be in the situation the target PC neither has CD/DVD Drive nor supports booting from USB. Thus, to deploy Windows 7 image from network is the best solution, which will save budget and effort during the process.
Best tool to deploy Windows 7 over the network
Using either System Center Configuration Manager (SCCM) or Microsoft Deployment Toolkit (MDT), masses of complicated operations and command line types are inevitable. Sometimes, it is not the complex process scares you but the disastrous effect you may make during the process. As a result, finding reliable deploying software not only ensures the success rate but also lowers the potential risk.
AOMEI Image Deploy (AID) is a professional image deployment and network cloning software that strives to make complicated deployment processes simpler. It supports deploying images or restoring images to multiple computers over a network. No need to use CD/DVD or USB to boot target computer because it will create WinPE in the installation directory automatically. If there is no DHCP server in the LAN, just enable its built-in one.
Download this freeware to have a try.
How to deploy Windows 7 image over a network via AID
✍ Preparations:
◉ Create a system image backup or disk backup with AOMEI Backupper. If you are concerned about SID conflict errors, you can deploy the image without the SID.
◉ Select a fully functioned machine running Windows PC system or Windows Server system as server computer, and the machines that need to be deployed are called client computers. Please check and make sure the server computer and all the client computers are on the same network segment of the same LAN.
◉ Please confirm the NIC (also known as network adapter) in all the client computers supports PXE boot.
◉ Please confirm the sequence number of the destination disks that are used for image deployment is the same. It is recommended to remove all other disks in the client computer but only keep the destination disk for image deployment.
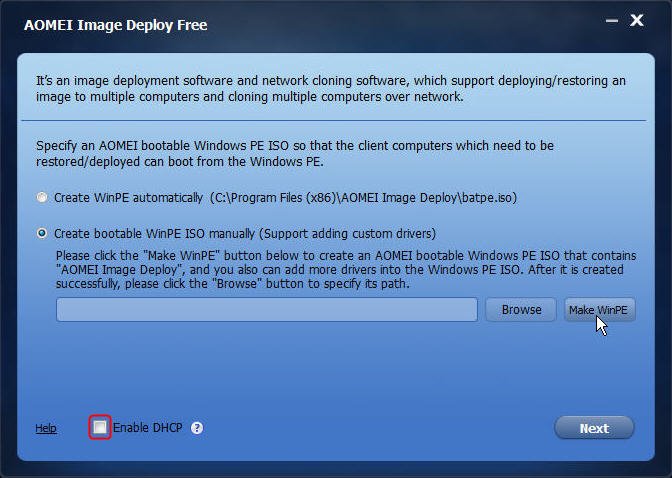
1. Install and launch AID on one of your PCs and use it as the master PC. Let AID to create WinPE ISO image for you. Or, select the second option to create the ISO manually if you want to add some drivers to the target PC(s). Check Enable DHCP box at the same time if you don’t have one.
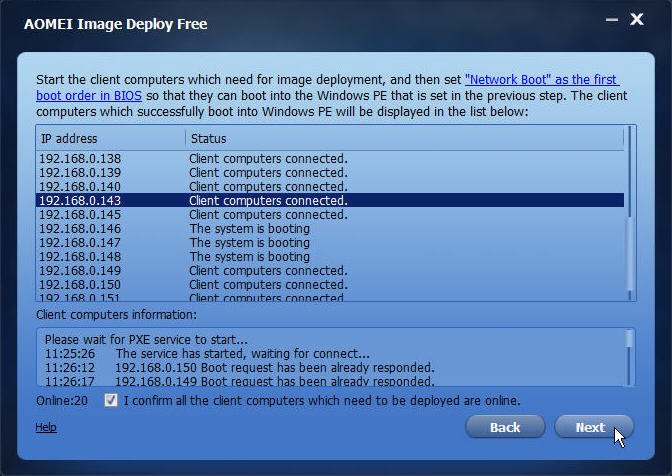
2. After creating WinPE ISO image, the AID will give you the message reading “The service has started, waiting for connect…” as follow.

3. Now leave this PC alone and start all the client computers and enter into BIOS to set the network boot (PXE boot) as the first boot device

4. After all target PCs boot normal, AID on master PC will prompt you “Client computers connected” in the display list. Tick the box beneath saying “I confirm all the client computers which need to be restored are online” and click Next.
5. Click Browse to navigate the Windows 7 image you stored on network before. You may configure more at will if you deploy image to multiple computers as the example did. Note that the “Destination disk” refers to the disk number on client PC(s) you will deploy; the “Deployed computers” refers to the PC amount you will deploy at a time.
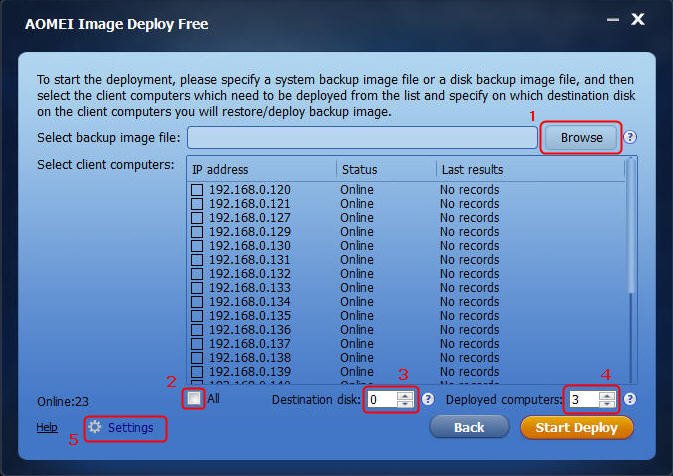
6. Click Start Deploy after personal configurations done. You may want to restart the client PC(s) after deployment. Go and turn over one of your favorite magazines to wait the process to be completed.
Tips:
- Please note that there should have one and only one DHCP server during the process, otherwise you may screw up the deployment.
- To deploy Windows image to dissimilar hardware or deploy target PCs amount overpass 20, you need to turn to AOMEI Image Deploy Technician version.
- This method also applies to Windows XP and Windows 10 image.
- If there are any client computers that use UEFI boot mode, you need to use AOMEI Image Deploy in the AOMEI Backupper Technician or TechPlus edition.
Conclusion
This is the strategy that needs only master PC, client PC and network storage with Windows image on in the process of deploying Windows 7 image over network. As covered, AOMEI Image Deploy (AID) is specialized Windows image deployment software so it is good Windows 10 deployment tool. Deploying Windows image to multiple computers is particularly important in upgrading operating systems in companies, AID definitely is the best choice for admins.