The Simplest Hard Drive Clone Tutorial in 2024 (Windows & Mac )
How to clone a hard drive in Windows or Mac? Two cloning utilities will be presented in this page – AOMEI Backupper Professional and Disk Utility.
by Ivy Updated on January 16, 2024
As you may know, hard drive clone is the course of copying all contents from one hard drive to another via cloning software or hardware. Usually we use it to upgrade current hard drive or do a disk backup. Maybe you would ask how to clone a hard drive in Windows or Mac. Luckily! Two simple and practical solutions will be shown below.
Preparations before cloning hard disk
Can’t wait to know the operation steps? Don’t hurry! Some preparations need to be done before cloning.
-
Connect the target drive to your computer. Make sure that it has enough space and can be detected by the computer.
-
Don’t forget to prepare a screwdriver if you are a laptop user. After cloning, the screwdriver can be used to replace the old hard drive.
-
All data on the new drive will be deleted during the cloning process. If you have some important data on the new hard drive, you’d better do a disk backup in advance.
-
Prepare a reliable cloning utility. If you don’t have such a program, please refer to the next section.
#For Windows: Clone Windows hard drive with AOMEI Backupper
To clone hard drive easily in Windows, it is suggested to use AOMEI Backupper Professional. Simple steps and intuitive interface make your hard drive clone effortless. This utility supports Windows 11/10/8.1/8/7/Vista/XP currently.
- This software will clone only used part of the old drive by default. Therefore, it enables you to clone larger drive to smaller drive as long as the smaller drive can hold all data on the larger drive.
- At the same times, it helps to clone and resize hard drive to fully use disk space and clone MBR to GPT without losing data or vice versa.
- In addition, it is capable to improve the performance of your SSD, such as, reading speed & writting speed, as well as prolong its lifespan.
Before cloning, you need to download, install and launch this software.
Step 1. Select Clone from the left side. Then click Disk Clone.

Notes:
- The Professional version supports cloning both data disk and system disk, from MBR to MBR, MBR to GPT, GPT to GPT or GPT to MBR.
- To copy only OS to new drive, please use System Clone feature instead.
Step 2. Select the Source Disk (here is Disk 0) you plan to clone. Then click Next to continue.

Step 3. Select the Destination Disk (here is Disk 1) to clone the source drive to. Then click Next to go on.
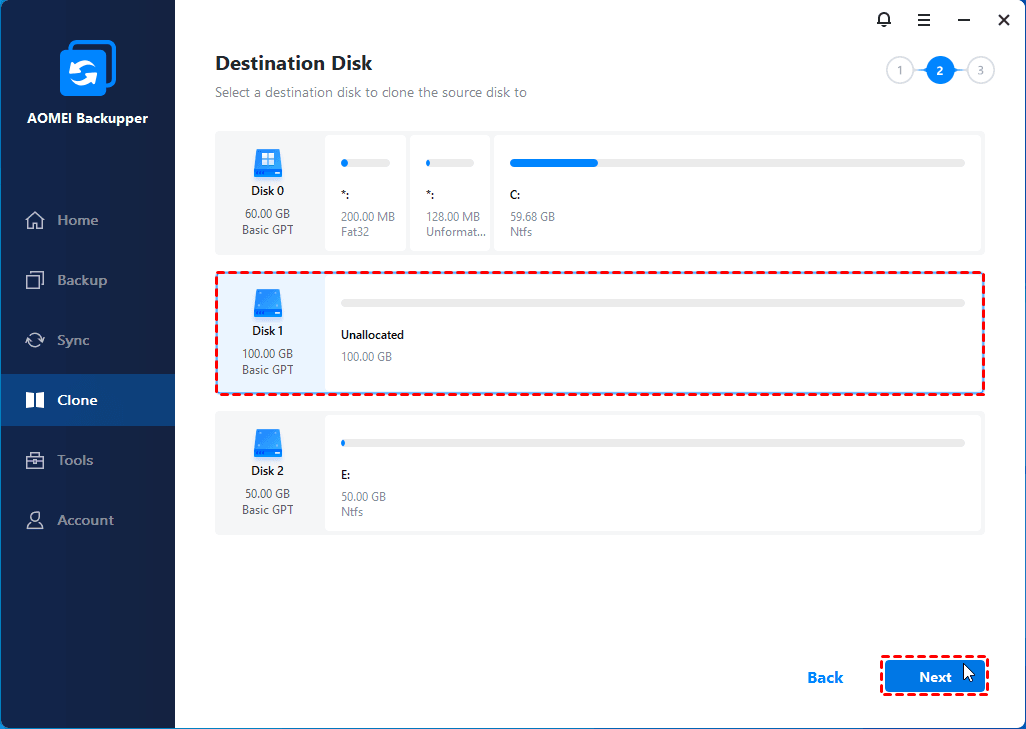
Step 4. Click Start Clone to execute after your confirmation.

Tips:
-
Edit Partitions allows you to resize partitions. Under this option, you can choose Copy without resizing partitions, Add unused space to all partitions or Manually adjust partition size. The last two features require you to upgrade to the Professional edition.
-
Sector by sector clone offers every sector cloning, whether it is used or not. You can use it to restore formatted and deleted data on the original hard drive. It requires that the size of the target drive must be equal to or larger than the source drive.
-
SSD Alignment can be used to accelerate the reading and writing speed of SSD. If you want to clone hard drive to SSD, it is strongly recommended to choose this option.
Step 5. Now, you need to change boot order in BIOS or replace the old hard drive to boot from the cloned drive. The second method is recommended.
So what else might be tried? Of course, Macrium Reflect 7 is also a good choice. See the official website for additional details. By the way, if you are a Windows Server user, please turn to AOMEI Backupper Server.
#For Mac: Clone Mac hard drive with Disk Utility
Disk Utility is a macOS and Mac OS X system utility that allows users to perform hard drives and storage drives related tasks. It's free and also comes built-in with every Mac OS. Disk Utility is designed to create clones, even though the application calls this process a Restore, just like restoring data from the source drive to the target drive.
With this utility, you can clone HDD to SSD or new HDD in Mac. Aside from hard drive clone, Disk Utility also works well on disk formatting, disk repair, integrity verification, etc. All the operation steps are also very easy to learn even for a beginner. Now, let’s learn how to use it!
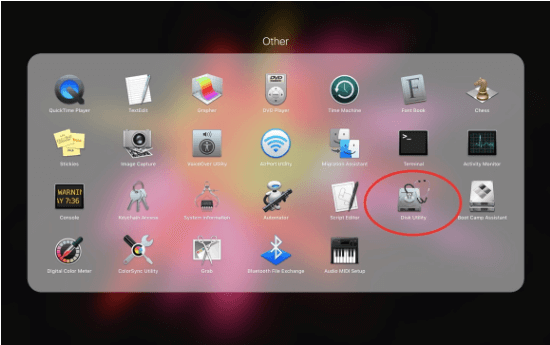
Step 1. Open Disk Utility on your Mac from Utilities or Applications.
Step 2. Click Erase from the top of the Disk Utility interface.
Step 3. Select a media, which you want as your backup or destination drive from the left side.
Step 4. From the Format drop down list select the format type as Mac OS Extended (Journaled). Then click Erase to remount the drive on the Desktop.
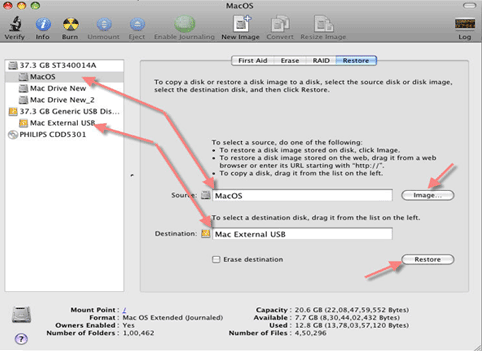
Step 5. Select Restore from the Disk Utility main window.
Step 6. Select the target drive, drag and drop it at the Source field.
Step 7. Select the destination drive, drag and drop it at the Destination field.
Step 8. Click Restore at the Disk Utility main window.
Tips:
-
As for the old hard drive, you can keep it as a backup or reformat the hard drive to take it as your secondary storage after cloning.
-
As a freeware, Steller can also be used to clone Mac hard drive. You can download it to have a try!
Now, you have learned how to clone a hard drive in Windows or Mac. Apart from copying hard drive to HDD or SSD, you may also need to clone SSD to new SSD or HDD. Fortunately, these goals also can be achieved through the detailed steps mentioned in this article.