Perform Lenovo ThinkPad 13 SSD Upgrade Safely (2 Ways)
You will get the best hard drive cloning software and a step-by-step guide to doing Lenovo ThinkPad 13 SSD upgrade safely.
By Ivy Updated on October 18, 2022
The Case
How to upgrade SSD for my Lenovo ThinkPad 13
I have just ordered a Lenovo ThinkPad 13 laptop, I am happy with all of the specific parameters except for the 256GB SSD drive, which seems too small for my daily use as my main computer. I wonder can I upgrade the 256GB SSD drive to a 1TB SSD. How can I upgrade successfully? Please give me some tips about this replacement, Thanks.
What SSD will be compatible with Lenovo ThinkPad 13?
As we all know, SSD is more portable and reliable to use due to its excellent performance. However, there are different SSD drives according to the connector interface. If you are not sure, you can refer to the Lenovo Thinkpad 13 specifics, in which says PCI-E SSD or M.2 SSD is compatible with ThinkPad 13. Or you can conduct your manufacturer.

M.2 SSD drive is a bare circuit as well as mSATA SSD. It supports both SATA and PCI-E interface. In other words, there are a variety of different width and length combinations, allowing for more flexibility in its usage. PCI-Express (PCI-E) SSD uses the PCI-E interface. The PCI-E SSD is the most expensive but also offers the best performance.
Compared with these two types of SSD drive, the M.2 SSD drive could be your best choice. Like Kingston UV500 M.2 SATA SSD, Samsung 860 EVO M.2 SATA SSD, they are quite affordable for ordinary people.
Upgrade Lenovo ThinkPad 13 SSD step by step (for all systems)
Generally speaking, the original SSD in Lenovo ThinkPad could be 128GB or 256GB, but it's not enough for daily use, especially in the long run. Thus, sooner or later, you need to upgrade Lenovo ThinkPad 13 SSD to larger SSD and use the new SSD as boot drive. To accomplish this goal, you need the help of a data transfer software. AOMEI Backupper Professional is a great choice and it provides you with two ways the following.
- Most direct way: Its Disk Clone feature allows you to directly clone SSD to larger SSD in all the Windows systems, without reinstallation, data loss and restoration. You only need to prepare a SATA or PCIe connector to connect the new SSD, depending on its interface.
- Traditional way: Its backup and restore feature allows you to create a disk backup and then restore image to new SSD. By comparison, this way requires double effort and one more storage device to store the backup image. The advantages of it are more concerned about data security and continuous protection.
And either way allows you to boost the performance of the SSD disk. If you want to make your computer run faster and smoothly, please download this software to have a try!
(Note: The clone features in free trial can be demonstrated only, please upgrade pro trail to enjoy. And this page offers 20% discount.)
Way 1. Upgrade Lenovo ThinkPad 13 SSD to Larger One with Disk Clone
Step 1. Launch AOMEI Backupper Professional, choose Disk Clone under Clone tab.

Step 2. Select the Lenovo ThinkPad 13 SSD as the source disk, press Next.
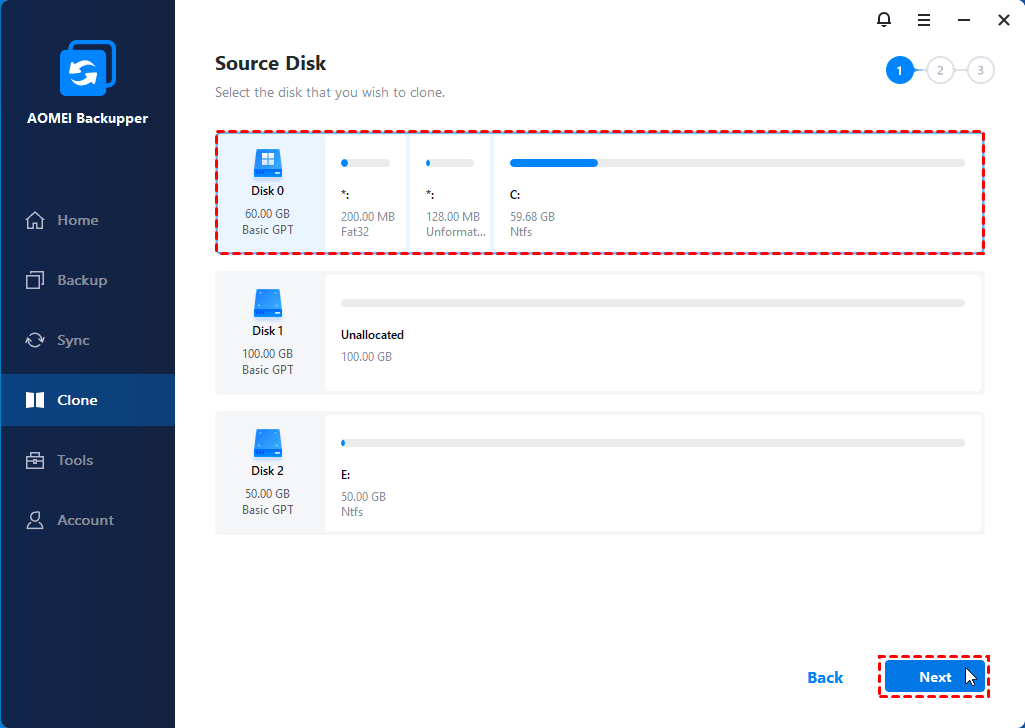
Step 3. Choose the larger SSD as the destination disk, and hit Next.

Step 4. Tick SSD Alignment to accelerate the reading and writting speed of SSD disk. Then, press Start Clone >> to upgrade SSD for Lenovo ThinkPad 13 easily.
-
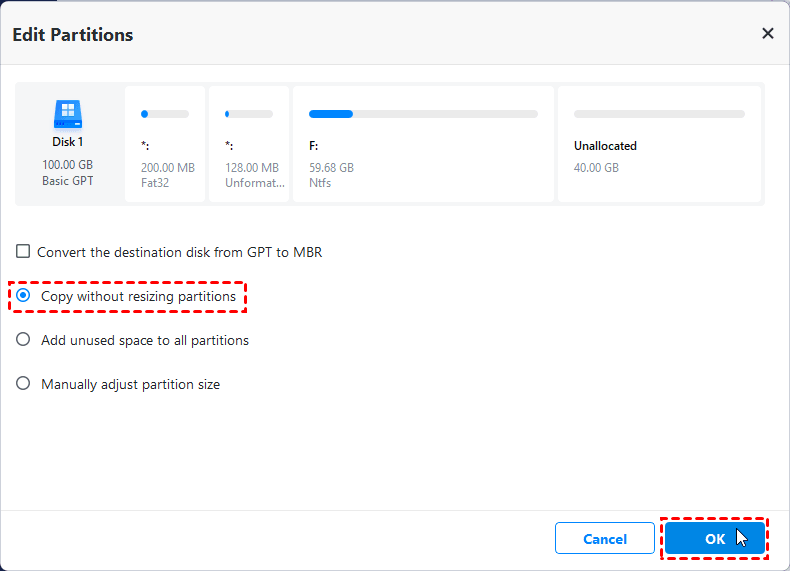
Copy without resizing partitions: Do not change anything.
-
Add unused space to all partitions: The destination disk partitions will be automatically resized to the entire disk, appropriate for the disk size.
-
Manually adjust partition size: Manually adjust the partition size and location by dragging the slider bar.
★ Tip:
✍ Sector by Sector Clone will clone all sectors on the source disk, including used sectors, bad sectors and blank sectors, and the spending time will be much longer. Uncheck this option will skip bad sectors, which helps you to clone failing hard drive easily to prevent data loss.
After the cloning process finished, please restart the computer to enter BIOS, change the boot order to boot from the cloned SSD; Or Shut down your computer, replace the smaller SSD with the cloned larger SSD, then boot from it.
Way 2. Lenovo ThinkPad 13 SSD Replacement with Backup and Restore Features
Before upgrading, please do the following:
-
Generate a new larger M.2 SSD drive that is compatible with Lenovo ThinkPad 13.
-
The extracting tool.
-
External hard drive to store disk backup image.
-
Create a WinPE bootable media created by AOME Backupper Professional.
Step 1. Backup System in Windows 7/8/10/11
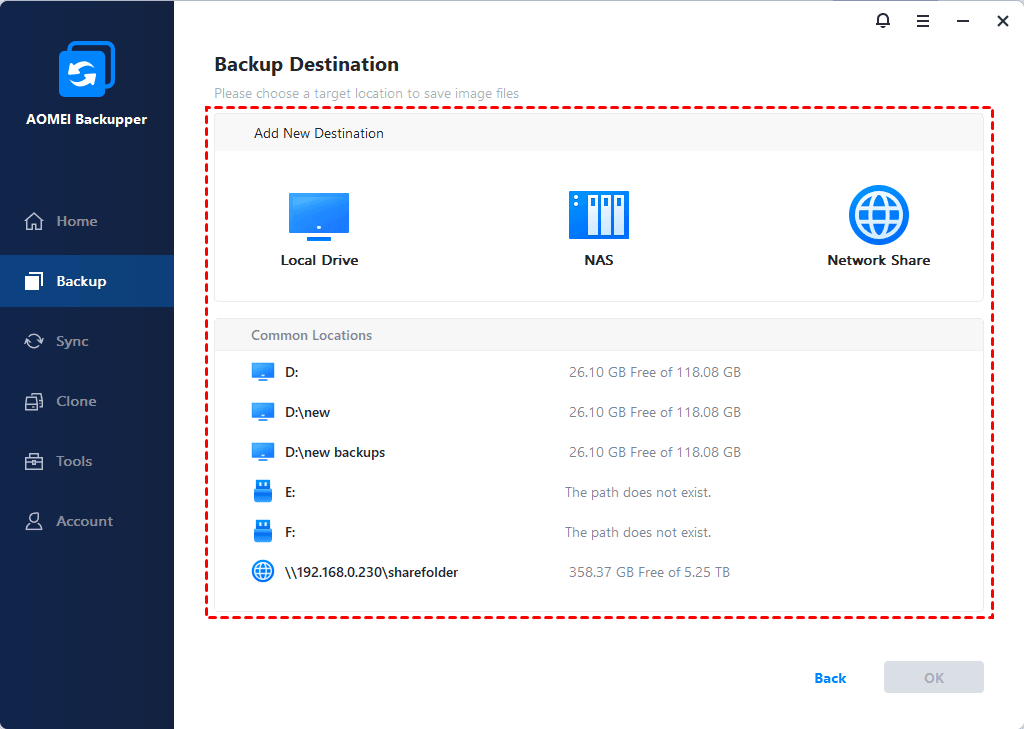
First, connect the external hard drive to your Lenovo ThinkPad 13. Then, install and run AOMEI Backupper Professional, select System Backup under Backup column.

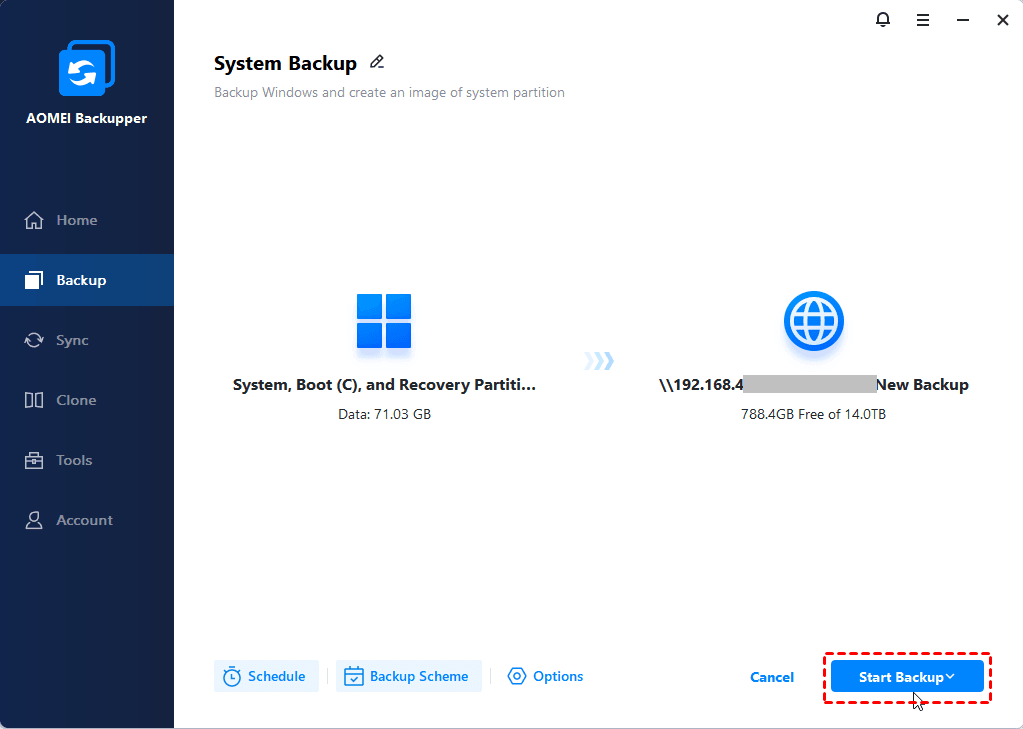
Second, edit the Task Name to differ from other backups. Then choose the external hard drive as target disk to save Lenovo ThinkPad 13 system image file,
Third, click Start Backup to Create Windows backup.
★ Tips:
✍ The partitions associated with system files, boot files will be automatically selected other than manually.
✍ Options allows you to comment, split, compress, encrypt the backup image, use VSS, sector by sector backup, etc.
✍ You could create a schedule backup to run this backup daily, weekly, monthly, event triggers, USB plug in with Schedule Backup.
✍ You could enable backup scheme to set backup method (full/incremental/differnetial backup) or delete old backup images to free up space automatically.
Step 2. Create Bootable Media to boot computer
After backing up data completed, create bootable media with this program. On its main window, select Home -> Tools -> Create Bootable Media, then follow the instructions to create bootable USB drive.

★ Tip:
✍ If you don't have CD/DVD or USB to create bootable media, try the Recovery Environment feature. It is to directly add a boot menu on the computer.
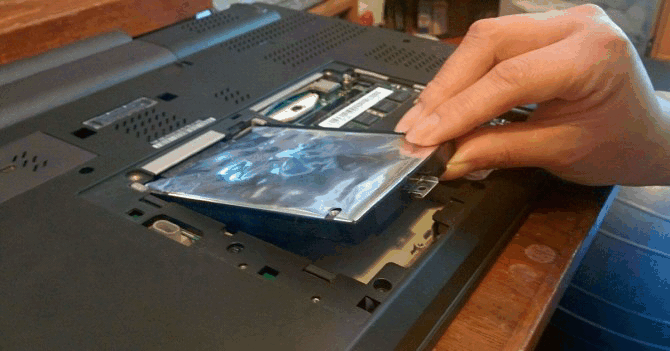
Then shut down your Lenovo Thinkpad 13, using extracting tool takes out the original SSD drive carefully, then put the new larger M.2 SSD drive into the slot and make sure the M.2 SSD connected successfully. At this moment, boot your Lenovo ThinkPad 13 with the bootable USB drive into WinPE environment.
Step 3. Restore System to Larger M.2 SSD
Your computer will automatically run AOMEI Backupper Standard once entering WinPE environment. Then you could restore system backup to the new larger M.2 SSD drive, please make sure you have connected the external hard drive with the system backup image:
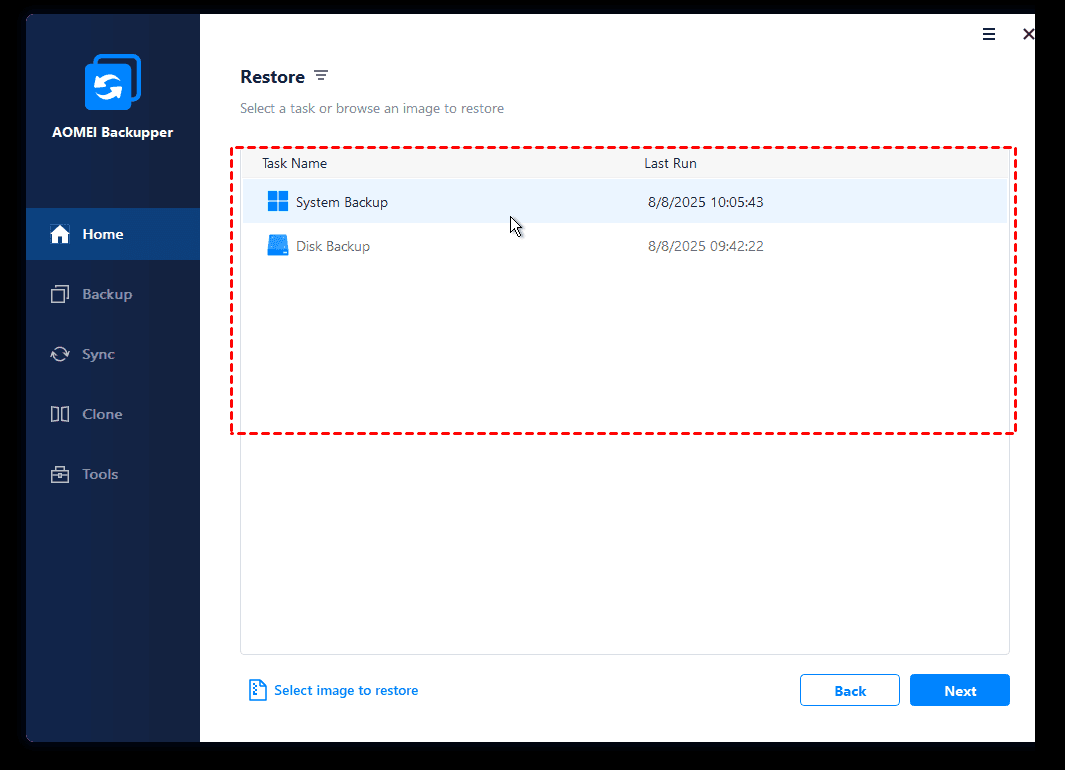
1. On the Restore tab, click Select Image File to choose the disk backup image.
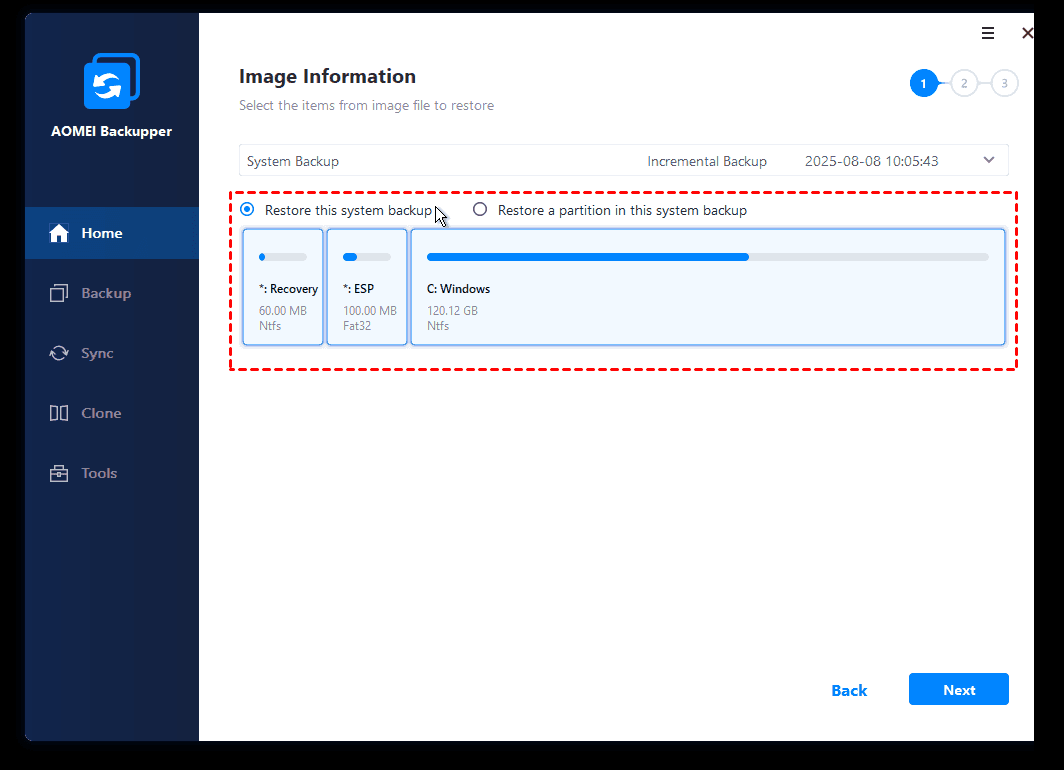
2. Choose Restore this system backup, and hit Next.
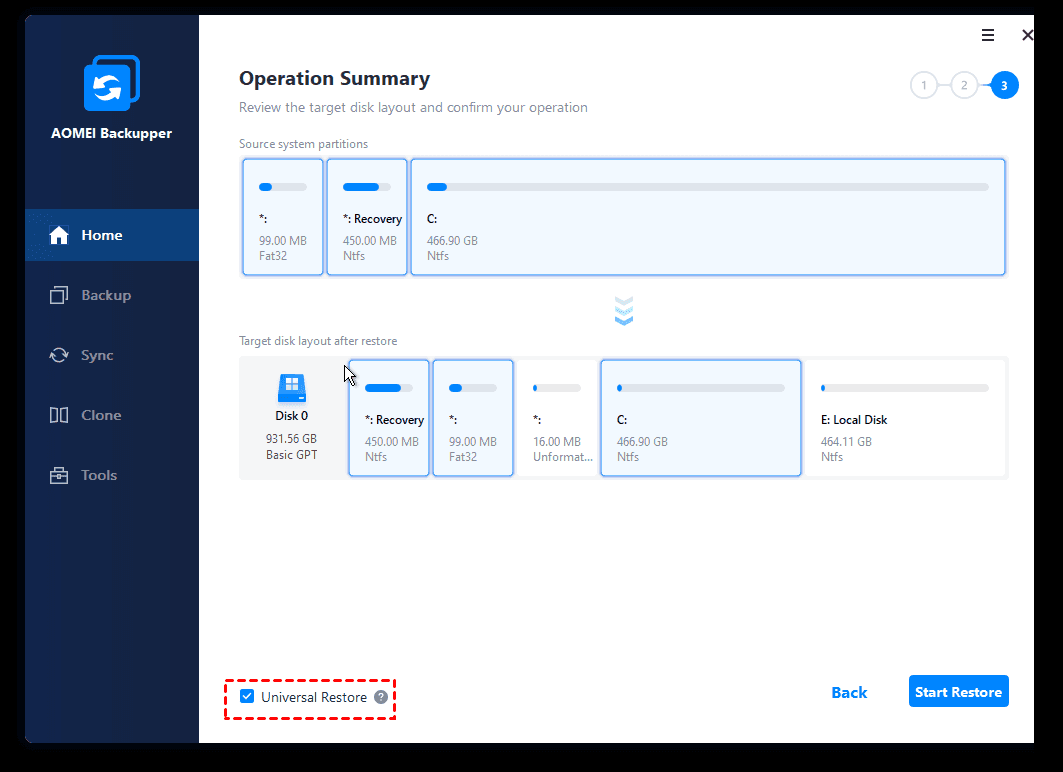
3. Preview the operations and click Start Restore to restore all the data to larger M.2 SSD drive.
★ Tips:
✍ This software allows you to restore system to new hardware as long as you check the Universal Restore feature.
✍ And you still can use it to deploy system image to multiple computers simultaneously on the same network segment. You need to use image deployment software in the technician or techplus edition of AOMEI Backupper.
Summary
There are two ways provided to perform Lenovo ThinkPad 13 SSD upgrade with the help of AOMEI Backupper Professional. You can choose one of them according to your first thoughts. If you want to upgrade Lenovo ThinkPad 13 SSD as soon as possible, try cloning method. But if you just want to make an exact copy of it, try backup and restore method.
Besides, you could enjoy more advanced features, such as, migrate Windows operating system to SSD, clone dynamic disk in Windows 10, schedule backup Windows 10, real-time sync, etc. All in all, it's worth trying the software for SSD upgrade or data protection!