Backup Photos to Google Drive | 4 Ways
Here are 4 useful methods to help you backup photos to Google Drive to protect your precious memories. Sroll down to learn them in detail.
by Ivy Updated on November 10, 2022
Need to Backup Photos to Google Drive
In our daily life, the majority of people will take photos, especially on an important day. And all of the photos are full of the wonderful moment which you want to treasure as among the very best. To prevent losing your great memory, you need a safer way, like cloud backup. One of the best ways is to backup your photos to Google Drive. But why Google Drive?
Compared with other devices, Google Drive is much safer and can reduce the risk of data loss. Once you backup data using corresponding software released by Google or other company, it will automatically backup to the web-based Google Drive. And you can access your Google Drive only if there is a network. Also, there is no risk of data loss owing to Hard Drive Failure, System Crash, etc.
Then, keep reading below and learn how to auto backup photos to Google Drive from Android? Here are 4 useful ways, you can choose one per your needs. Please remember to create a Google Account and download Google Photos or Google Drive on your Android Phone.
How to Easily Backup Photos to Google Drive
You will learn 4 methods to backup photos to Google Drive, namely using Google Photos, Google Drive app, Android Backup Service, free backup software. To backup photos on your Android phone, try the previous three methods. If the photos you want to backup are on your computer, you can directly the fourth method.
Method 1: Backup Photos to Google Drive using Google Photos
Step 1. Open Google Photos app on your Android Phone.
Step 2. Click Menu at the top left corner.
Step 3. Click Setting to summon the next window.
Step 4. Click buttonat the right side of Google Drive, and then click Photos to upload your photos.
It's very useful. But you may feel upset by a feature namedauto collage creation. This feature cannot differentiate photos which have been edited and which have not. At last, there are 3 to 4 of the same photos.
If you want to restore deleted photos, you can navigate to Google Photos app > Menu > Trash, then touch the photos you want to restore and select Restore at the top right corner. And it will be restored to your Google Photos library and added back into any albums it was in.
Method 2: Upload Photos to Google Drive Automatically using Google Drive app
Step 1. Turn on Wi-Fi of your phone or cellular connection.
Step 2. Open your Google Drive.
Step 3. Tap the Plus icon at the corner, and then you will see a new window.
Step 4. Click Upload to add photos.
Step 5. Add photos from Android phone, and then tap Done after you select all the photos you want to automatically upload to Google Drive. At last, wait for the final result.
Google Drive can help you upoad files. But you may feel upset by its uploading and downloading speed. When a large amount of people upload and download photos at the same time,the speed will slow down.
Method 3: Backup Photos to Google Drive using Android Backup Service
Step 1. Go to Settings. This is the gear-shaped icon on your Android phone. It offers you the ability to backup your data with Android Backup service. This is especially useful if you need to erase the data on your current one.
Step 2. Go to Personal. This will allow you to manage and review your personal info, privacy settings and account history settings.
Step 3. Choose Backup and Reset
Step 4. Tick the Checkbox of Back up my data and enable automatic backup.
Method 4: Auto bakcup photos to Google Drive using AOMEI Backupper Standard
Here you will use free file sync software AOMEI Backupper Standard to backup photos to Google Drive, which can save much space for your phone and greatly reduce the sync time. It has an intuitive interface, so all users can use it smoothly, even the novices.
In addition, here are some useful features of it. Please stay for a while and check it yourself.
-
Sync all photoes, even the edited.
-
Support multiple sync locations: You can sync folder to network drive, cloud drive, NAS, external hard drive, USB flash drive, etc.
-
Work well in schedule sync: You can sync files in daily/weekly/monthly.
-
Compatible with all the Windows system: You can sync files in Windows 11/10/8/7/XP/Vista.
Step 1. Download Google Drive app on your computer and then connect your Android phone using the USB cable. Be sure they are well configured.
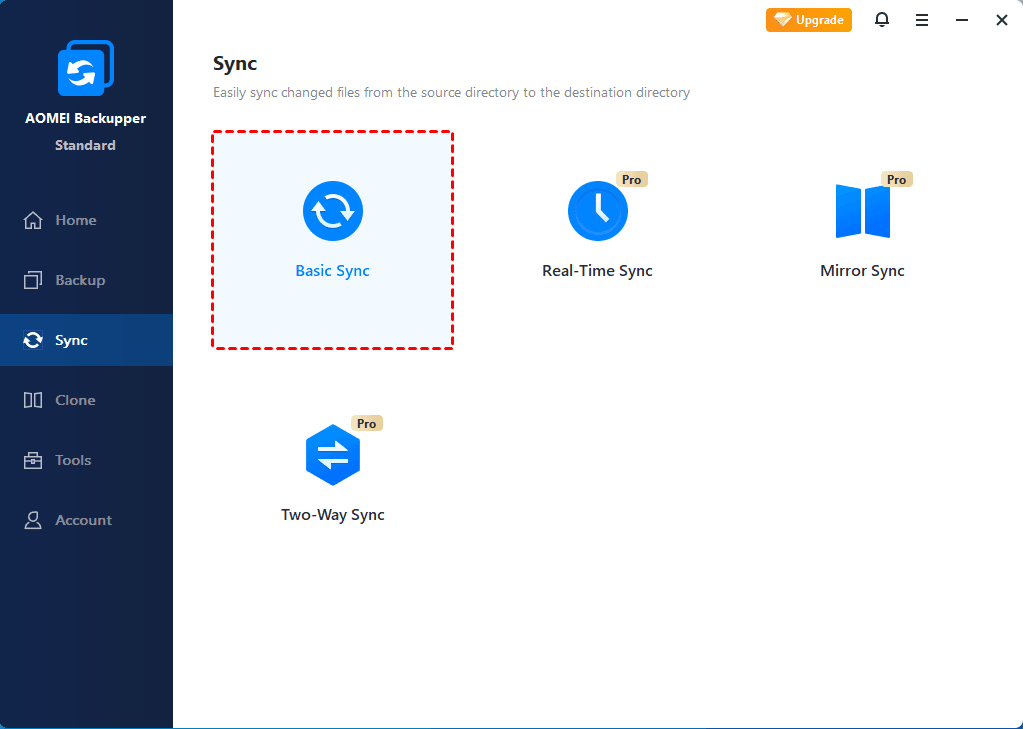
Step 2. Download free file sync software - AOMEI Backupper and install it on your computer. Then, launch it and click Sync and Basic Sync.
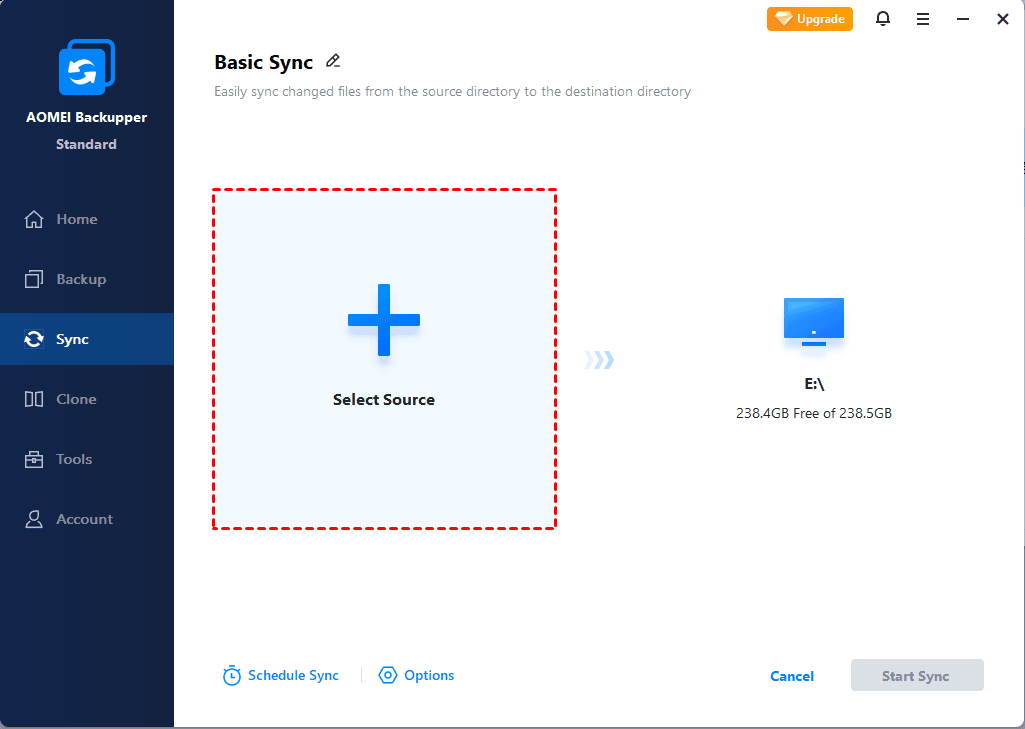
Step 3. Click Add Folder > Computer/This PC subsequently and then select photos from Android phone.
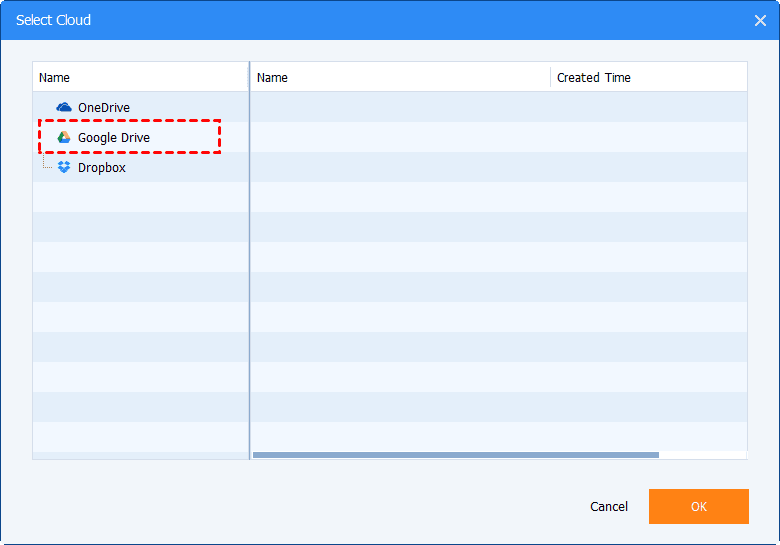
Step 4. Click drop-down menu and Select a cloud drive to access the next window.
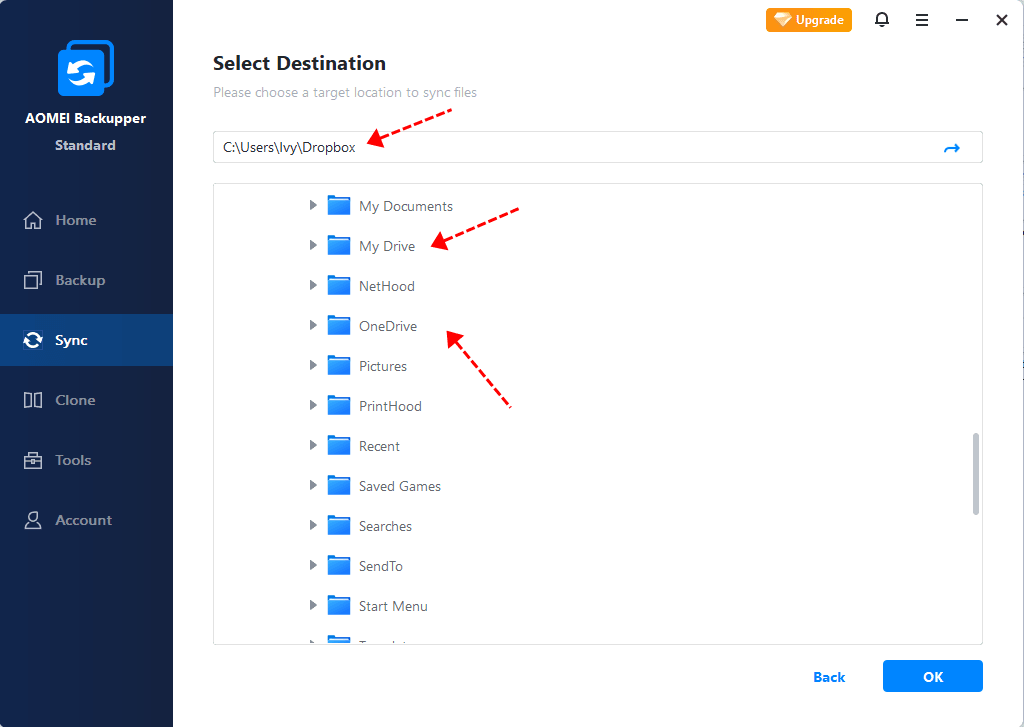
Then, select Google Drive as backup destination and click OK to confirm.
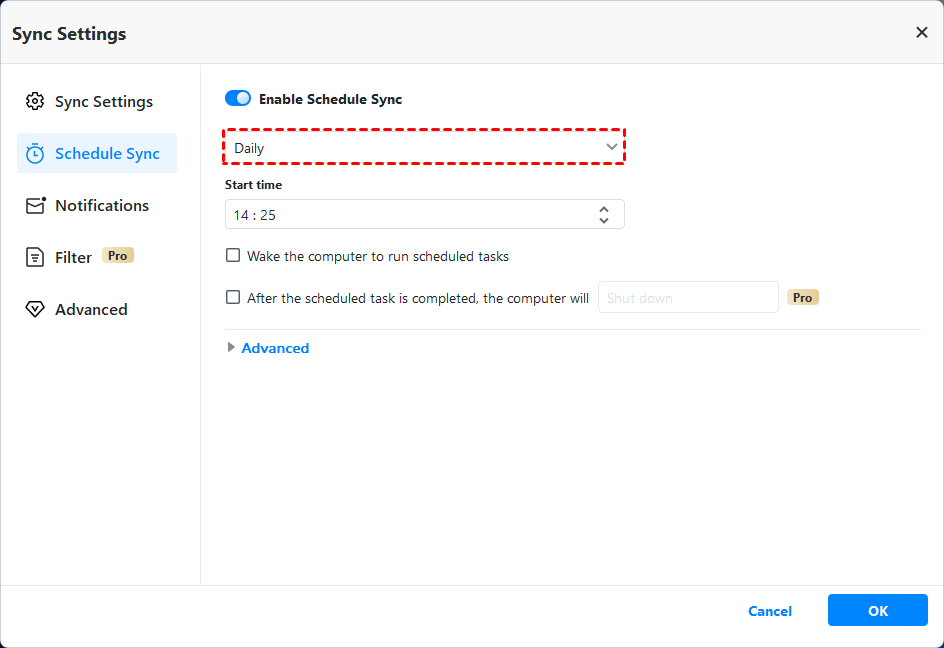
Step 5. After that, you will go back to the Basic Sync main page. Click Schedule and select daily/weekly/monthly to auto sync files. Then, confirm all the selected items are correct and click Start Sync to backup photos.
Notes:
✦ Don’t modify the source folder name of the schedule sync task, or the program cannot synchronize the selected folder anymore.
✦ The core of "Basic Sync" is one-way file sync, which only sync changes from source folder to destination folder. And it will not transfer the deleted files automatically, you need to set it in "Options".
✦ If you want an easier way to sync all changed to the target folder including the deleted files or folders, you could consider using "Real-Time Sync", "Mirror-Sync" or "Two-Way Sync" in AOMEI Backupper Professional.
✨ Bonus tip: backup photos to AOMEI Cloud
Apart from the cloud drives offered by third-party providers, you can also backup photos to AOMEI Cloud. It offers you 1TB free storage for 15 days after you sign up for an AOMEI account.
What do you need to do after backup?
Now, you may already backup photos to Google Drive successfully, but it's not over. You still need to check if your photos are backed up or manage the backed photos.
Check if your photos are backed up
Step 1. Open the Google Photos app.
Step 2. Tap Photos. You will find this at the bottom
Step 3. Photos that are not backed up will have an icon, which looks like a cloud, struck diagonally.
Find and manage the backed up photos
Step 1. Open Google Drive app.
Step 2. Tap Menu at the top left corner.
Step 3. Tap Backups and choose any backup you want to manage at the next window.
Conclusion
Backing up photos to Google Drive is one of the best ways to protect your photos. And it reduces the risk of losing your great memory with these photos. You can choose a way you like from above.
Honestly, if you don't want install any app on your phone, after all, the phone memory is inherently small, you could use free file sync software AOMEI Backupper to complete this process on your computer.
It supports automatically syncing your photos per day/week/month. And it also has strong compatibility in backup storage, so you can backup your photos on various storage devices like Android phone, USB Flash hard drive, NAS, cloud drive, etc.