Best Xcopy Alternative in Windows 11, 10, 7, XP (Video Tutorial)
Looking for the best Xcopy alternative for Windows 11, 10, 7, XP? Check this out to learn powerful alternative to Xcopy when facing Xcopy not working error.
by Delia Updated on November 14, 2023
🌟 Video Guide: How to Copy Files with Xcopy Alternative
About Xcopy Command in Windows
Xcopy command is similar to the Copy command except that it has additional switches to specify both the source and the destination in detail. You can copy file(s) and directories including subdirectories from one location to another location. The most used command syntax would be: XCOPY source [destination] [options]. And there are plenty of options and switches for different demands. You can type XCOPY /? to learn more information.
Another similar command would be xcopy32 command which is not intended to be run directly when you input it. It is suggested to choose Xcopy command no matter what version of Windows or MS-DOS you have. Xcopy is useful in particular when copying files from CDROM to a hard drive because it will remove the read-only attribute automatically.
The Xcopy command is available from within the Command Prompt in most current operating systems such as Windows 10, Windows 8, Windows 7, Windows XP, Windows Vista and Windows 98. The Xcopy command is also DOS command available in MS-DOS. Click Windows Xcopy Command to see more.

Why Need Xcopy Alternative in Windows 11/10/7?
So powerful as Xcopy is, why do you need the Xcopy equivalent? According to its user feedback, copying files failed due to Xcopy not working sometimes. In some cases, Xcopy halts because of “Insufficient Memory” error or invalid number of parameters.
Usually, Xcopy failes to copy files with return error code number from 0 to 5. Among which, code 2 and code 4 are the most common seen codes. Based on the document of Microsoft, code 2 means the user pressed CTRL + C to terminate xcopy, which can be corrected easily.
And the code 4 represents initialization error occurred. There is not enough memory or disk space, or you entered an invalid drive name or invalid syntax on the command line. In that case, you can initialize disk in another way or try another drive name and syntax.
Xcopy will not copy open files as it does not use Windows Volume Shadow Copy service, which makes it a poor choice in backing up living operating system volumes. As a result, Xcopy alternative for Windows 10/7 plays an important role in remedying these flaws. It makes things easier and more efficient.
Best Alternative to Xcopy for Windows
AOMEI Backupper Professional, comes with AMBackup.exe, is an easy-to-use command line backup and recovery solution for Windows PC users. It allows you to backup files from one location to another location including external hard drive, USB flash drive, Cloud drive desktop folder, network share and NAS in Command Prompt.
Backing up living operating system volumes and open files (hot backup/clone/sync) with incremental/differential backup is available as well.
You have choices to compress and split backup image, and password encrypt backup images during the backup process. You are able to restore these backups to computer even if it has dissimilar hardware. Command Line Clone is also an outstanding feature of the software.
The Basic Sync feature in AOMEI Backupper will help you copy files to target location with schedule modes in simple steps. For users who do not familiar with Command Line operations, the graphical user-friendly interface is a good assistant.
Following parts will emphasis on how to backup files from one location to another using CMD and how to sync files from one place to another in graphical user interface. Let’s take a closer look.
How to Copy Files with the Alternative to Xcopy in Windows 7/10/11?
In the first place, install AOMEI Backupper on your computer. It will be helpful if you note the installation path of AOMEI Backupper.
Backup System to another Drive
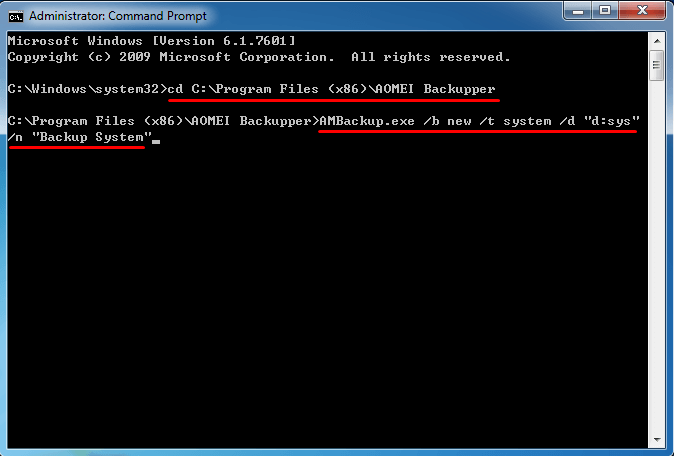
- Click Start and type command prompt. Right click Command Prompt from the list and select Run as administrator.
- At the prompt, type cd + the installation path of AOMEI Backupper, e.g. cd C:\Program Files\AOMEI Backupper and press Enter.
- Type AMBackup.exe /b new /t system /d "d:\sys" /n "Backup System" and press Enter. That means create a system backup task named “Backup System” and place the image to a folder named sys in D drive.
- (Optional) You can make incremental or differential backup for selected backup items. For example, type AMBackup.exe /b inc /s “d:\sys\system.adi and press Enter to backup system incrementally.
- (Optional) To backup files to shared folder in network path, type AMBackup.exe /b new /t part /s E /d "\\192.168.0.100\Share\Imgfile.adi” /n "BackupToShare" /u "admin" /p "123456" and press Enter. It will backup E drive to the network path \\192.168.0.100 which with an “admin” username and a “123456” password.
- To restore a system image, please type AMBackup /r /t system /s "\\192.168.0.222\system backup\system backup.adi" /u "admin" /p "admin" /a and press Enter. It will restore the system image named “backup.adi” on NAS share to the original location using partition alignment to optimize for SSD.
Descriptions:
-
[/b] Specify the type of backup. It will be used with one of the followings: new, inc, dif, full to create different task.
-
[/r] Restore the backup of system/disk/partition/dynamic volume.
-
[/t] Specify the type of source. It will be used with one of the followings: system, disk, part.
-
[/d] Specify the destination path for saving the backup image.
-
[/n] Assign a name for the backup task to distinguish it from others.
-
[/u] Username of selected network path or NAS.
-
[/p] Password of selected username account.
-
[/a] Align partition to optimize for SSD.
Tips:
- For more information about syntax and options, please visit AOMEI Backupper CMD Help.
- Except for comand line backup, you still can backup files with File Backup or Cloud Backup.
Copy files to another location
- Launch AOMEI Backupper GUI. Connect the external drive if necessary.
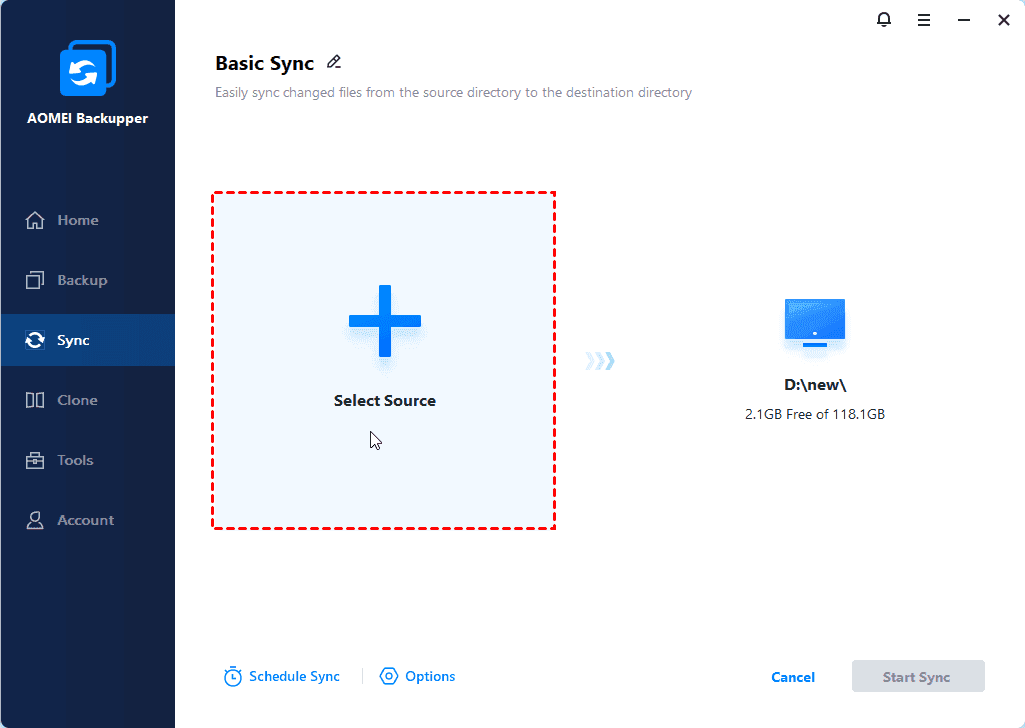
- Click Sync tab and scroll down to find Basic Sync option. Click it.

- Click on Add Folder and then add the files you want to copy.
- Click to select the destination path you want to copy files to. Cloud drive, shared folder and NAS are available.
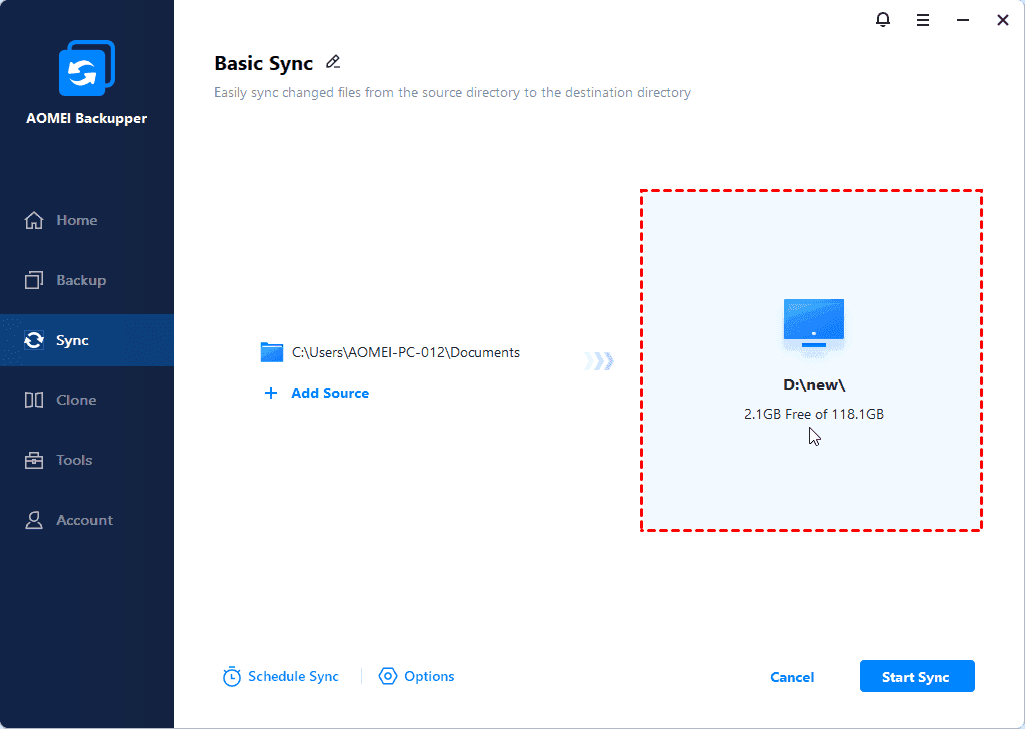
- (Optional) Click Options to set up email notification. Click Schedule to set sync mode from Daily, Weekly, Monthly, Event-trigger and USB plug in modes.

- Finally, click Start Sync to start the task immediately or later.
Tips:
-
Basic Sync is one-way sync file, besides you could perform two-way sync, mirror sync, real time sync.
-
It cannot synchronize files or folders to CD/DVD/Blue-Ray.
Conclusion
It is a wise move to choose Xcopy alternative when you facing Xcopy not working or fails to copy files issue. AOMEI Backupper is able to copy files from one location to another in another way. For Windows Server Operating Systems users, AOMEI Backupper Server is of much more help.
In addition to the synchronization function, AOMEI Backupper also embeds functions such as clone, backup, and restore to fully protect your data and computer. With its help, you can upgrade your hard drive on Windows with just a few clicks and ensure a safe boot after cloning.