How to Backup QNAP to Another QNAP NAS Easily (2 Free Ways)
How to backup QNAP NAS to another QNAP NAS easily? You probably know Hybrid Backup Sync which contains the remote backup and sync features, but in practical use, here's a free alternative could help you better.
The advantages of QNAP to QNAP backup
QNAP is known as a network attached storage (NAS) device manufacturer, and QNAP to QNAP backup refers to backing up files in QNAP NAS to another QNAP NAS. But what's the point to do that while NAS is already a reliable storage device?
First of all, QNAP NAS is not indestructible. It faces the risk of damage caused by artificial or non-artificial reasons just as other physical devices. In other words, your data stored on NAS isn’t 100% safe. Backing up a QNAP NAS to another could provide a double insurance and a shortcut to restore important files when accident occurs.
Second, if there’s an on-going job needs to be done by different people, or you want to keep the data on two NAS exactly the same for information consistency and promptness, backing up QNAP to QNAP is a good way to share files. Furthermore, you can even perform NAS mirror backup or set up a schedule to run the backup regularly.
How to create QNAP to QNAP backup with Hybrid Backup Sync
Hybrid Backup Sync (HBS) should be familiar to every QNAP NAS user. It integrates backup, restore and sync features to transfer files from QNAP NAS to local, remote or cloud storage for comprehensive data protection and disaster recovery.
Using it to backup QNAP to QNAP, you should install it on both NAS: Log into each QNAP NAS as administrator > Go to "App Center" > Find or search "Hybrid Backup Sync" > click "Add To QTS".
Note: you must have firmware QTS 4.2.0 or newer versions for using Hybrid Backup Sync.
◆ On the destination QNAP NAS:
Click "Backup Server" > Choose "RTRR Server" > Tick "Enable Real-time Remote Replication Server" and enter the password > "Apply" the settings and click "OK" to confirm it.
◆ On the source QNAP NAS:
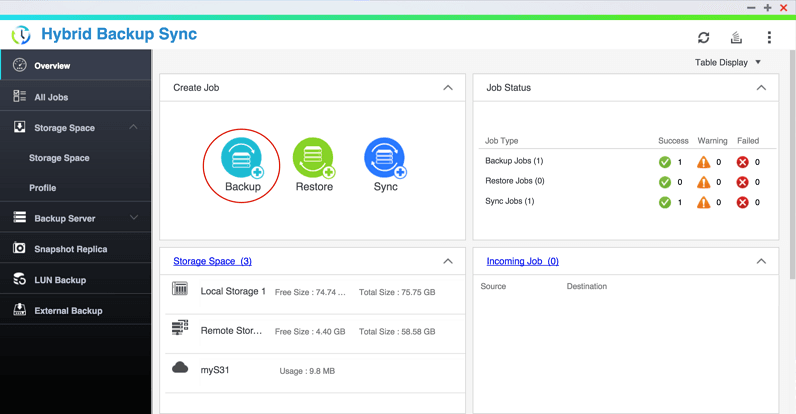
1. Select Backup on the main interface. If you want to copy the QNAP NAS with original format to another NAS, you can also choose Sync.
The difference between Backup and Sync: Sync will create an exact copy of source data that can be used directly, and Backup will create an image file, which takes less space and requires a restoration before using.
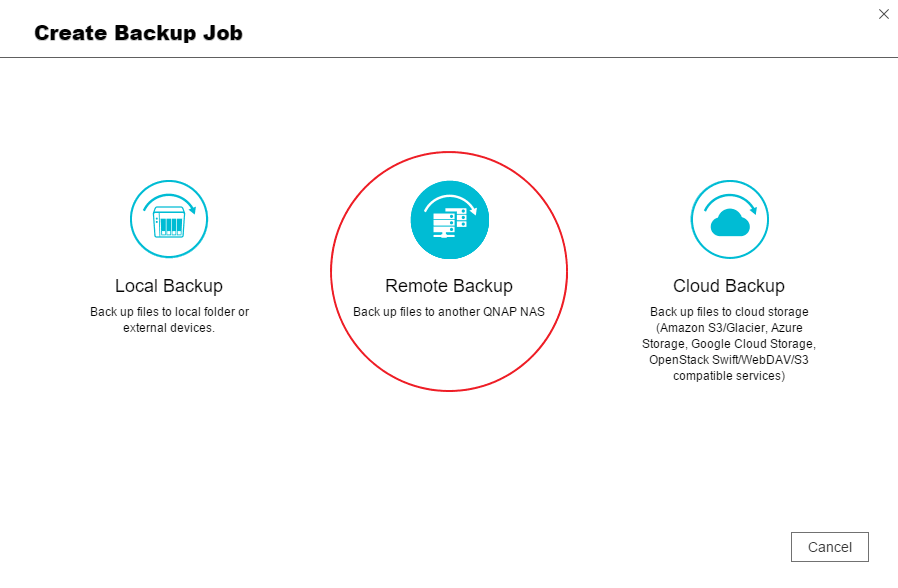
2. Choose Remote Backup to back up files to another QNAP NAS.
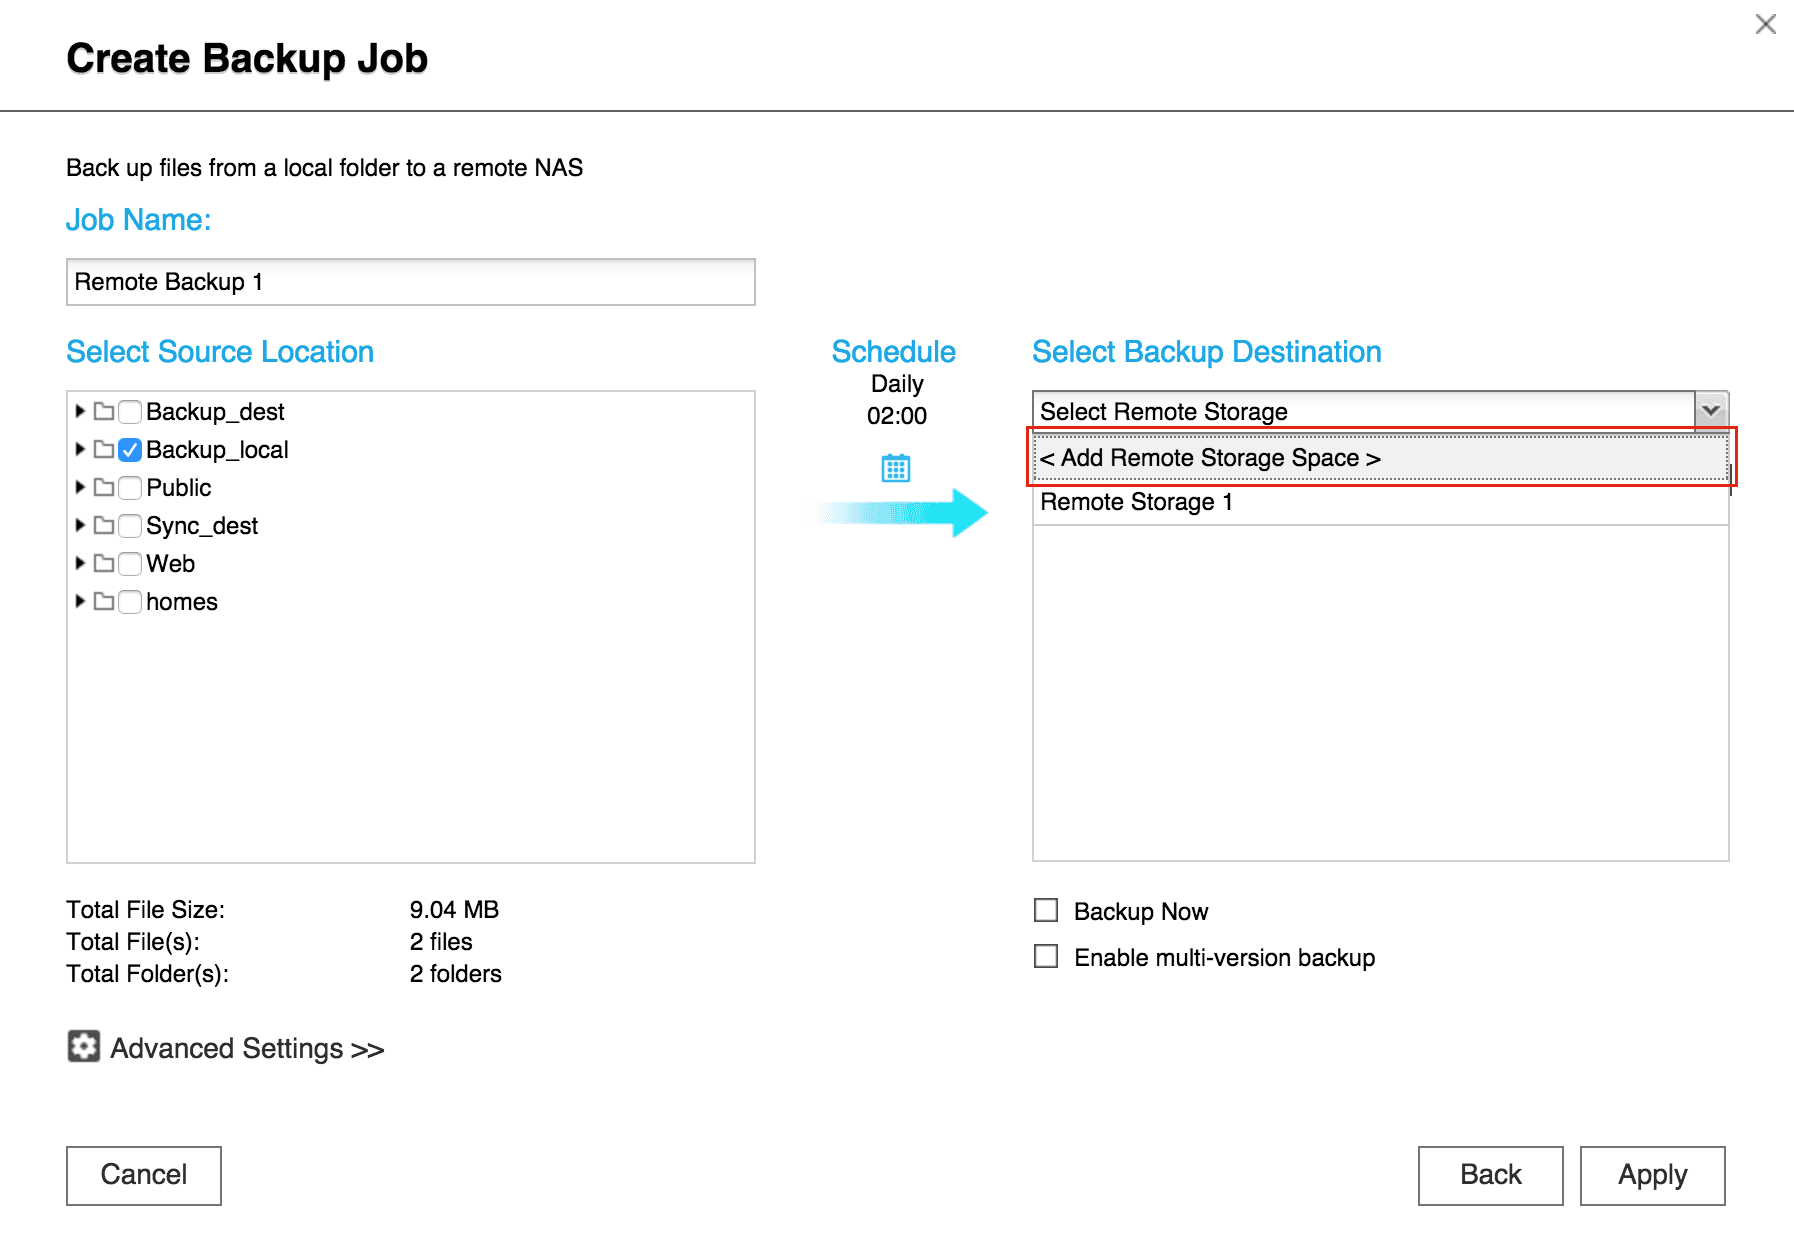
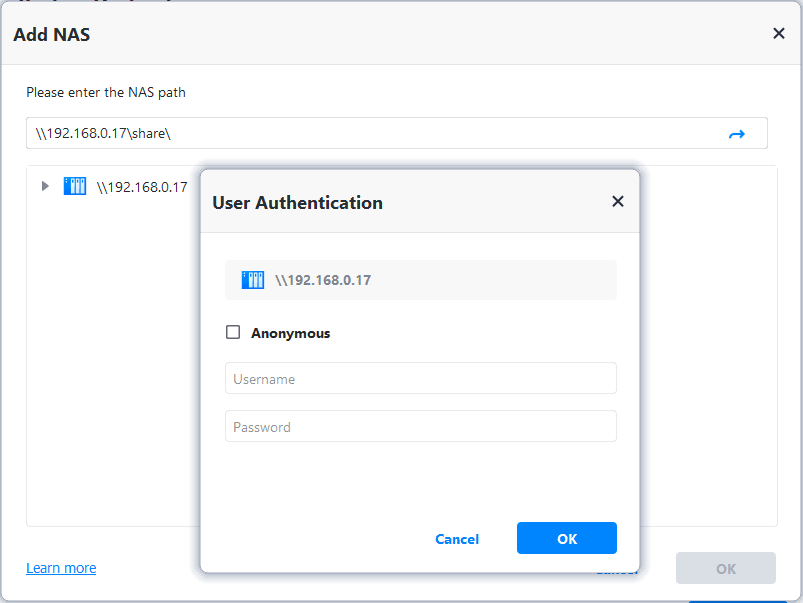
3. Select source files that you want to backup, then select the backup destination as another QNAP NAS. If you haven’t add it as a storage space, click Add Remote Storage Space to enter required information.
4. Then select the destination directory, confirm the operation and click Apply. Optionally, you can set up a Schedule to run the QNAP to QNAP backup automatically, or tick Backup Now to execute the task immediately.
As you can see, the operation to backup QNAP NAS to another isn’t very simple. You need to configure the settings on both sides, and since Hybrid Backup Sync is mainly designed for QNAP NAS, there are many limitations if you want to backup files to or from other storage devices.
Therefore, you could try following solution as an easier alternative.
Easier alternative to backup or sync files from QNAP NAS to another
AOMEI Backupper Standard is a backup freeware working on all Windows PCs. It provides a simple way to complete data protection and disaster recovery tasks in an intuitive interface, and the functional advantages are also obvious.
♦ It supports various storages such as internal/external drive, USB, NAS and cloud. QNAP to QNAP backup is one of its practical cases. You can also backup QNAP NAS to Synology NAS, backup Synology NAS to USB drive, etc.
♦ In addition to schedule backup, there are many other backup options allowing you to do intelligent or exact backup, compress or split the backup image, choose backup modes among full/incremental/differential - therefore you can also perform a QNAP to QNAP incremental backup.
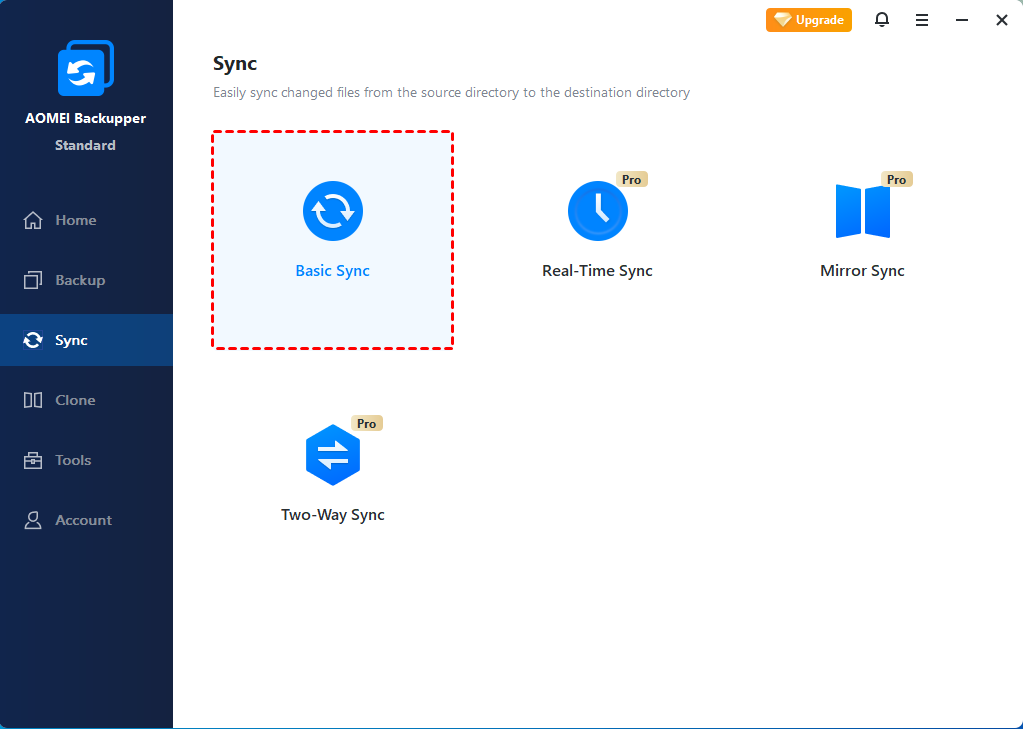
♦ If you want to create an intact copy of the data in QNAP NAS to another QNAP NAS, the Sync feature in AOMEI Backupper can serve you well. If you upgrade to Professional edition, you can also sync changed files in real time.
NAS to NAS backup and NAS to NAS sync are both supported by Standard edition, you can try following steps to complete the data transferring easily.
◆ How backup QNAP NAS to another QNAP NAS:
1. Install and open the tool, go to Backup tab and choose File Backup.
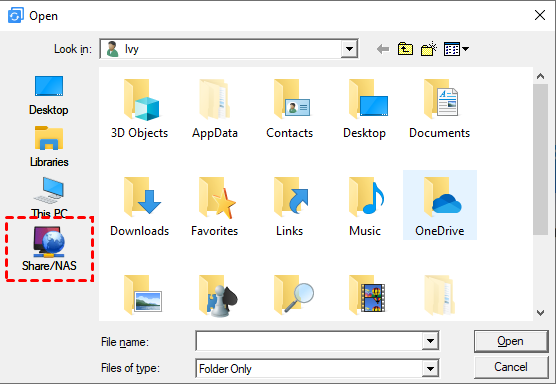
2. Choose Add File or Add Folder according to your need. Click Share/NAS in the popping-up window and hit Add Share or NAS Devices to enter the required information of the source NAS.
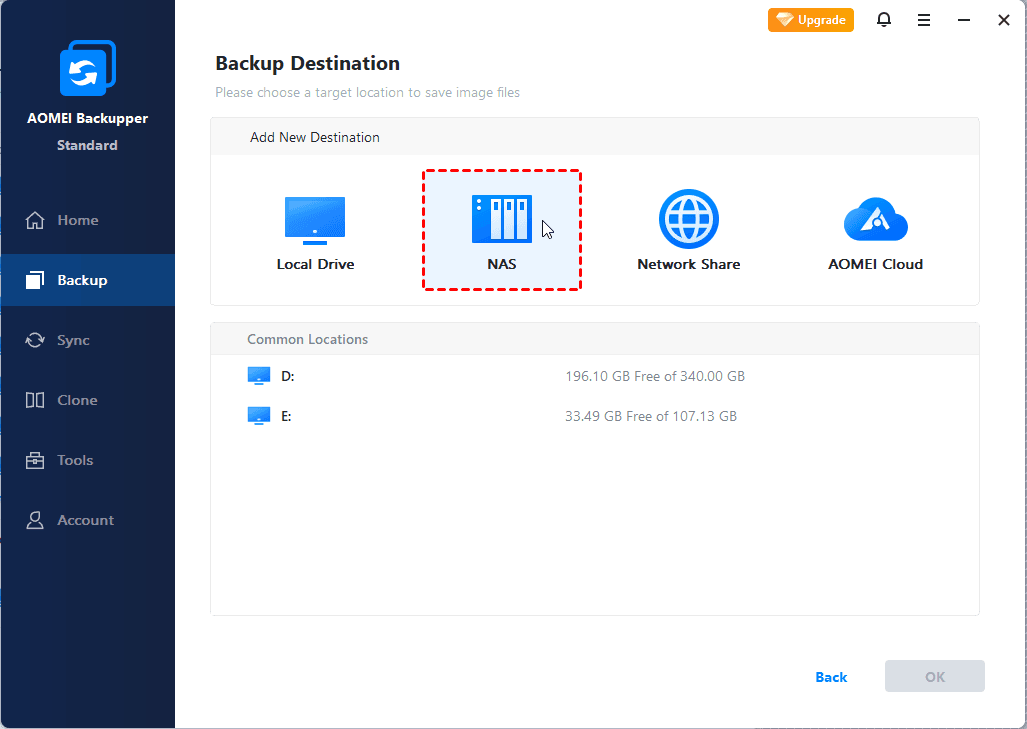
3. Click on the destination select box, add the target NAS in the same way, then click Start Backup.
Other helpful features:
Options - choose intelligent or exact backup mode, specify compression level, split image file, comments, email notifications, etc.
Schedule - create automatic backup on basis of Daily/Weekly/Monthly. In advanced editions, you can also choose schedule as Event triggers/USB plug in.
Scheme - set up backup methods (Full Backup or Incremental Backup or Differential Backup.) and delete older backups automatically. Differential backup and automatic backup cleanup are vailable in advanced editions.
◆ How to Sync QNAP NAS to another QNAP NAS:
1. Navigate to Sync tab and choose Basic Sync.
2. Click Add folder > Share/NAS > Add Share or NAS Device to specify the source NAS.
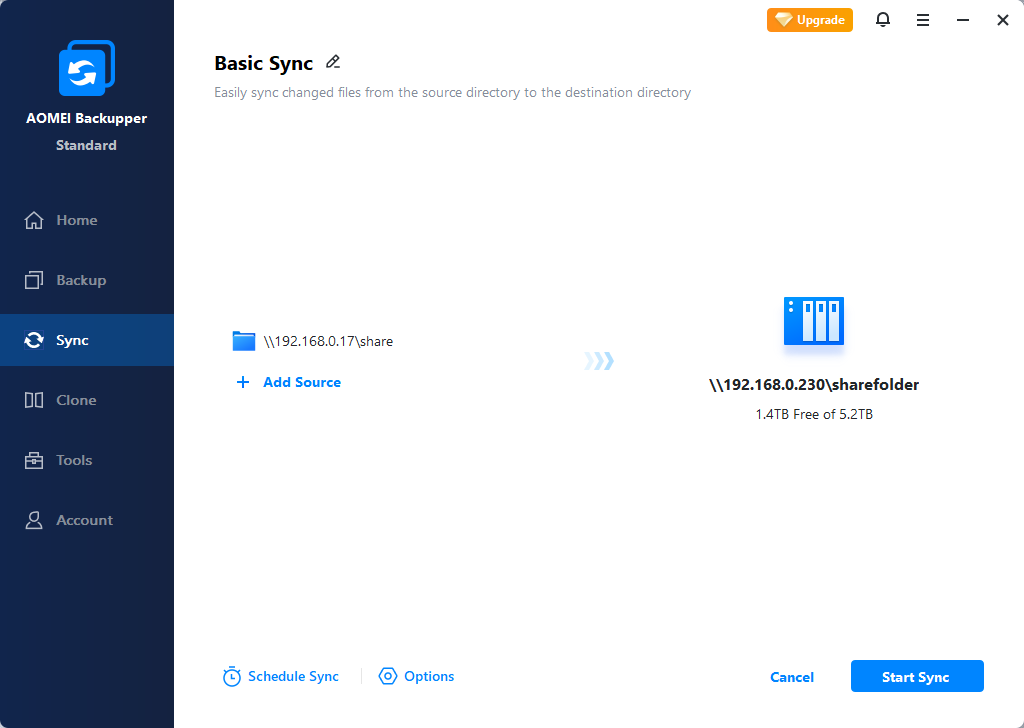
3. Click on the destination select box, add target NAS in the same way, then click Start Sync.
Other helpful features:
Options - verify integrity, sync deletions, comments, email notifications, etc.
Schedule - auto sync files from source to target Daily/Weekly/Monthly. Event triggers and USB plug in are available in advanced editions.
Related tips:
-
Alternative to add network location or NAS device: Tools > Storage Management > Add Share or NAS Devices.
-
If you upgrade to advanced editions, you don’t have to create a schedule to run sync task automatically. Instead, you can choose Real-Time Sync to synchronize any changes in source NAS to target NAS in real time. Meanwhile, if you want to sync any changes in source NAS or target NAS to the other side, Two-Way Sync is a better choice.
-
If you want to backup QNAP NAS to Windows PC, just select a local directory as the destination. As for cloud drives, you can click the down arrow beside the destination select box, and choose Select a cloud drive, then select a cloud service accordingly.
-
If you have an AOMEI account, you are able to backup files to AOMEI Cloud. You can enjoy 1TB free storage for 15 days after you sign up for an AOMEI account.
Conclusion
Compared with Hybrid Backup Sync, AOMEI Backupper is a more compatible and simple solution to do NAS to NAS backup or sync. You can use it to backup QNAP to QNAP, Synology to Synology, or between different brands of NAS and even different kinds of storage devices.
The free version of AOMEI Backupper already covers most of your practical needs. For more powerful and convenient features, you can upgrade to higher editions. Even if you are a Server user that need to backup Windows Server to NAS device, the Server edition can perfectly suit your situation.
