Quick Fixes to SMART Hard Drive Error BIOHD-8 in Windows
BIOHD-8 is a SMART drive error code. If you happen to encounter hard drive error BIOHD-8 and don’t know how to deal with it, you can learn a quick guide from this page.
by Lily Updated on June 16, 2023
💡 Quick Navigation:
About hard drive error BIOHD-8
The BIOHD-8 error is an S.M.A.R.T. drive error code that tells the hard drive is failing and cannot be connected properly. It is often found on HP computers and other computers which use the SMART hard drives. Here is a real case about error code BIOHD-8 on HP Pavilion desktop:
“Hi, I have a HP P6045 desktop PC which is now only starting in safe mode. I have run the F9 diagnostics and it returns a BIOHD-8 hard drive error. I've looked through different threads and they either point to replacing the hard drive or the motherboard. What’s the best to do? All data is backed up and the machine is usable. I can get to windows explorer etc but it’s in safe mode. Thanks in advance!”
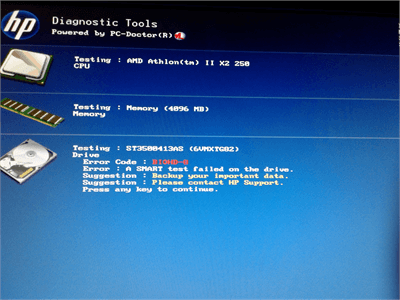
How comes error BIOHD-8? Fragmented establishment of Windows programming, faulty hard drive and virus infection can be the possible causes. What should you do when you encounter hard drive error BIOHD-8?
Backup important data when error BIOHD-8 occurs
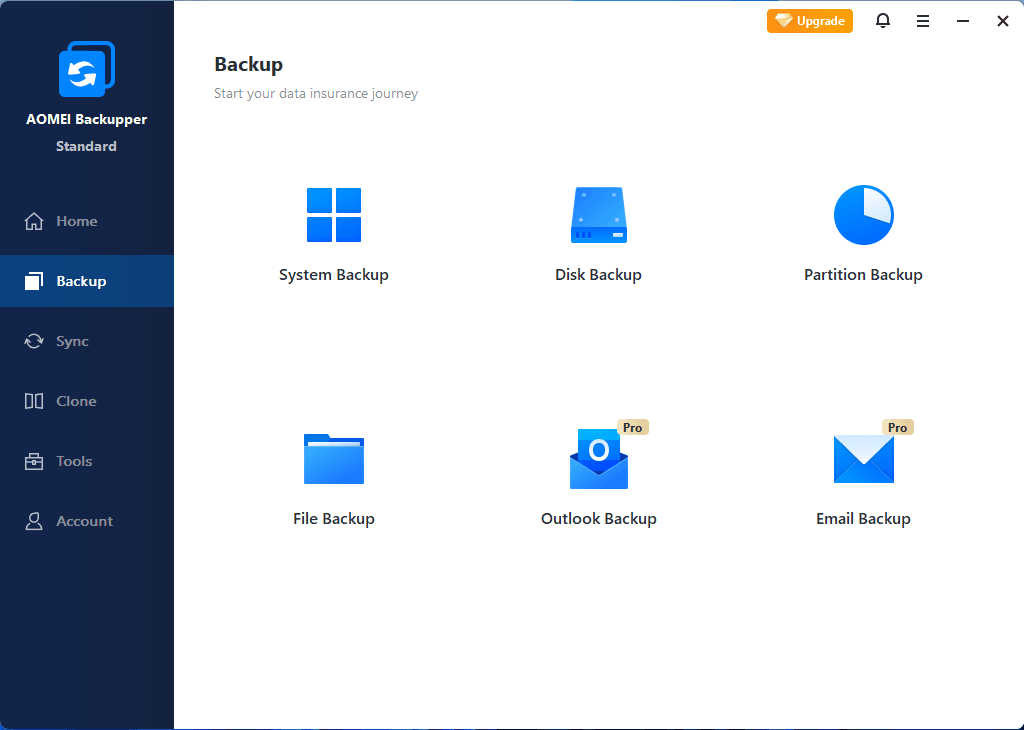
As the on-screen information suggests, the first thing you should do when error BIOHD-8 occurs is to backup your important data. Here I’d like to recommend the best free backup software for Windows PCs—AOMEI Backupper Standard. Compared to Windows built-in backup tools, it offers more flexible backup solutions with advanced options.
◈ There are five types of backup available in AOMEI Backupper: System/Disk/Partition/File/Cloud Backup, which can meet your different needs.
◈ You can schedule backups to run automatically in case that you may forget to backup new data on your computer.
◈ You are allowed to create bootable media to help you backup hard drive without booting Windows.
It is suggested to backup your data to an external hard drive or network location. Thus, the backup image won’t be affected by hard disk errors. When you need to retrieve your lost data, just go to Restore > Select Task/Select Image File and follow the wizard to complete the recovery process.
How to fix error code BIOHD-8 in Windows 7/8/10/11 easily
After you have backed up your important data, you can proceed to fix hard drive error BIOHD-8. There are two quick fixes for your reference:
Fix 1: Check hard disk errors with the CHKDSK utility
1. Insert the Windows installation disc and boot from it.
2. Choose the correct time and keyboard type and click Next.
3. In the next screen, choose Repair your computer.
4. If you are running Windows 7, then select Command Prompt from the System Recovery Options window. If you are running Windows 8/10, then select Troubleshoot > Advanced Options > Command Prompt successively.
5. In Command Prompt, input chkdsk C: /r and press Enter. C: is the letter of the drive where Windows is installed.
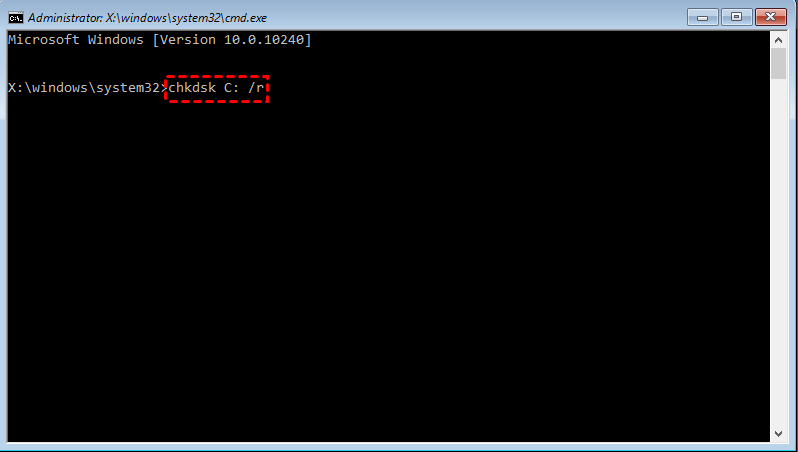
6. Exit Command Prompt and restart your computer to see if error BIOHD-8 is solved.
Fix 2: Replace old hard drive
If Fix 1 doesn’t work at all or it just works temporarily, then you can only replace the old hard drive with a new one. To avoid Windows reinstallation after hard drive replacement, you may transfer Windows to new hard drive in the beginning. Then, follow the steps below to finish hard drive replacement. Take HP Pavilion desktop computers as an example:
✐ Note: Make sure the computer is disconnected from power before starting.
1. Removing the old hard drive.
-
Remove the side panel and the front bezel.
-
Remove the two screws that secure the hard drive cage to the computer and save the screws.
-
Push down on the latch to the side of the hard drive cage, and slide the cage up. Lift the cage part way out of the computer.
-
Press the connector latches and remove the power cable and the data cable from the hard drive.
-
Fully remove the cage from the computer.
-
Remove the four screws (two on each side) that secure the hard drive to the cage and save the screws.
-
Slide the hard drive out of the cage.
2. Installing the new hard drive.
-
Slide the hard drive into the cage and align screw holes.
-
Place the four screws (two on each side) to secure the hard drive in the cage.
-
Connect the power and data cable to the rear of the drive.
-
Locate the three tabs on the back of the hard drive cage and the four tabs on the side of the hard drive cage.
-
Align the tabs on the back and side of the cage with the slots on the computer, and slide the cage down until it snaps into place.
-
Place the two screws that secure the hard drive cage to the computer.
-
Put back the front bezel and the side panel.
✍ Tip: If you are using HP Pavilion laptop, please follow the instructions here.
Summary
Now you know how to deal with hard drive error BIOHD-8—backup your important data first, and then repair disk errors with the CHKDSK utility or replace the old hard drive with a new one. AOMEI Backupper Standard can not only be used as professional backup software but also free SSD migration tool. To enjoy more advanced features like system clone, dissimilar hardware restore, etc, you may upgrade to AOMEI Backupper Professional.