Disk Backup vs Clone: Which One to Choose and How to Do it
With need of data protection or migration, you maybe choose to make a backup or clone of your hard drive. But which option is better for you, and how to do it on Windows?
by Delia Updated on December 20, 2022
Introduction of Backup and Clone
If you are concerned about data protection topics, you may have often heard the concepts of backup and clone. They both create a copy of your hard drive (or OS, or certain volumes) in a broad sense, but they are not identical in terms of practical application and results.
Backup, or image backup, usually means creating a compressed image file of your source data. This backup file takes less space than an exact copy and facilitates data archiving - you can apply some schedules or schemes to build an automated backup system. However, the backed up data cannot be used without restoration.
Clone, refers to copying the complete content of a hard drive to another drive. The data that has been cloned to the destination disk will remain intact and available, which also means that it will take up more disk space. Also, disk cloning is usually a one-time operation that needs to be operated manually and carefully.
This is the basic definition of backup and clone. There are many more factors to consider before you decide which method to choose. In the following article, I will introduce the difference between backup and clone in detail, and show you how to perform disk backup or disk clone on Windows computer.
Comparison: Backup vs Clone Difference
Before going any further, I would like to use a simple chart to make the comparison more visual:
|
|
Applicable data |
Flexibility |
Common purpose |
Built-in utilities? |
Need restoration? |
|
Backup |
Disk/OS/Files |
Higher |
Data protection |
Yes |
Yes |
|
Clone |
Disk/OS |
Lower |
Disk migration |
No |
No |
✎Backup can be divided into system backup and file backup, capable of adapting to various daily data protection. Whether you are worried about losing important files due to mishandling, viruses & malware, or computer crashing due to hardware damage or system errors, making a backup in advance is the most surefire preventive means.
For example, you can create a copy of your current disk, and then store the data to other storage devices. Thus when the original data on the hard drive is accidentally deleted or not accessible, you can easily restore it from the archive copy - the same goes for system restoration.
✎Clone targets not the protection of individual data, but the migration of an entire operating system or disk. Since cloning doesn't require the process of restoration, it's much easier than backup & restore in terms of data migration.
For example, if you want to replace HDD with SSD, or upgrade SATA drive to NVMe and keep everything on the old drive intact, then disk cloning is the easiest way to go.
At this point, you should have come to a conclusion whether you should choose disk backup or disk cloning. But how can you implement them on Windows 11/10, or earlier OS like Windows 8/7?
How to Perform Backup and Clone Respectively
Experienced users of Windows should know some of the data protection tools that come with the system, but what about cloning? Can you use built-in tools to achieve it? Let's take a look at each of them.
>> Backup Method in Windows
Simply put, if you are running Windows 7 and above version, you can use Windows Backup and Restore to do the data protection job. It includes both options to "Set up backup" and "Create a system image", which should cover most of your data protection needs.
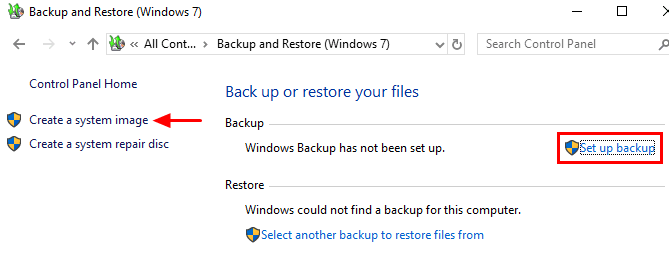
By using Backup and Restore, you can back up either files, volumes or system image to internal/external drive or network. But since it is a relatively old function, it may not work well with latest OS and device. If you've ever used it, you will find it error-prone and time consuming.
Another option for automatic data backup is File History. It was first introduced in Windows 8 and inherited by later OS. If you only want to auto backup files to external drive in Windows 10, this may be a convenient option.
Then you can select your attached external hard drive as the backup target, and click More options customize the backup settings, such as backup frequency, retention period, folders to add, folders to exclude, restore files, etc.
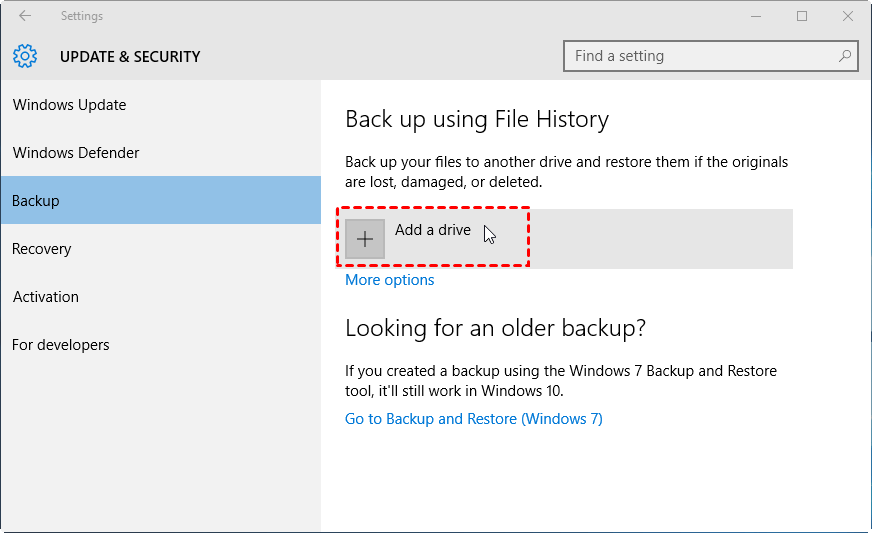
As you can see, this option is aming at auto protection for certain folders. If you have more flexible backup needs, it may not be the best answer. Besides, this option has been weakened in Windows 11: you cannot add non-preset folders to backup to external hard drive.
✎Since both utilities have their own shortcomings and may not meet your backup needs in some cases, you may also consider a specialized backup solution with more comprehensive and efficient features.
>> Clone Method in Windows
The truth is, Windows does not come with a disk cloning tool. The closest option is probably creating a full system image and then restore to target disk. If you want to experience real "cloning" and enjoy the convenience, you need to turn to 3rd-party disk cloning software.
Fortunately, there are some free cloning tools on the market, so you don't have to worry much about the budget. In the following section, I will introduce an effective freeware that can be used for both backup and cloning.
Best Freeware to Help You Backup or Clone Disk in Windows
Although there are many differences between backup and clone, they are not two opposing options. Sometimes you need to backup data; sometimes you also need to clone disk or partition. Like this, choosing a software supports both of the features can be a better option.
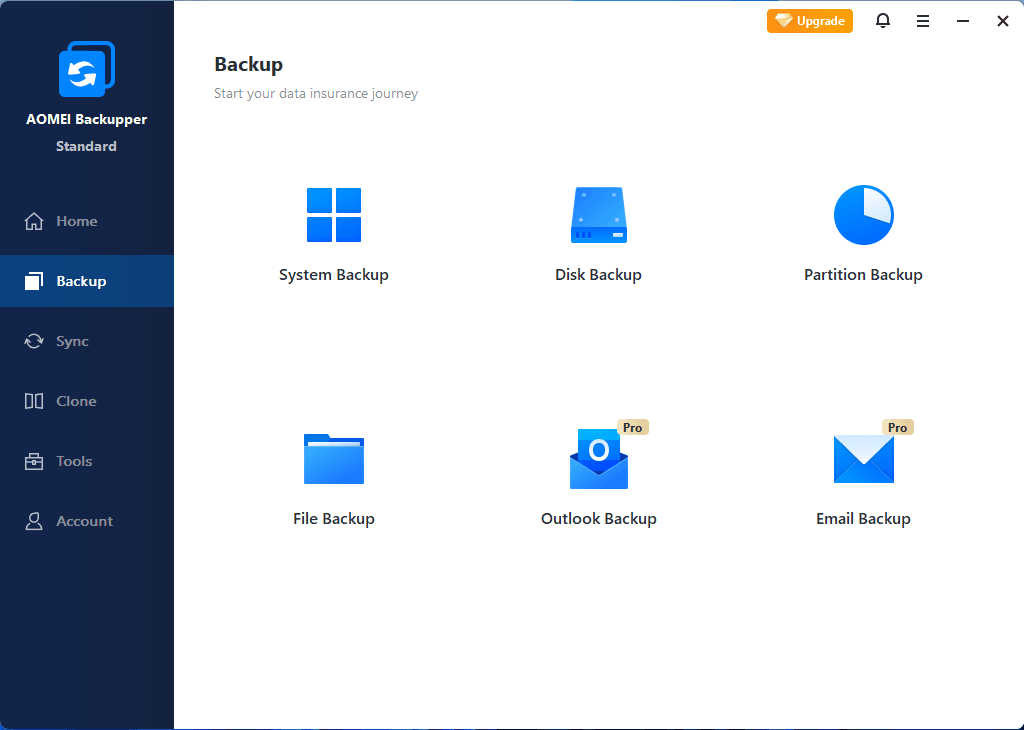
AOMEI Backupper Standard provides all-around backup and clone functions, easy-to-use interface, and more useful data protection tools to help you use Windows computer more securely.
Backup options: System Backup, Disk Backup, Partition/Volume Backup and File Backup.
Clone options: Disk Clone, System Clone (available in Professional edition), Partition Clone
Supported platform: Windows 11, Windows 10, Windows 8.1/8, Windows 7, Windows Vista, Windows XP.
Backup storages: Local disk, external hard drive, USB flash drive, NAS, network share, cloud drive, etc.
Useful options: Full, incremental or differential backup, scheduled backup, comment, backup compression and encrypt backup, SSD alignment, sector-by-sector clone
For example, when you purchase a new SSD, use the software to clone HDD to SSD, and then replace it physically. After your computer can boot from the cloned new drive successfully, you can continue using AOMEI Backupper for regular system or file backup, thus you don‘t need to worry about data loss or system failures.
You can hit the button below to download this freeware for disk backup or cloning.
*For disk clone, the Standard edition supports all data disks (both MBR and GPT). If you want to clone a disk with system installed, please turn to Professional edition. Here's a free trial of it.
How to backup hard drive with AOMEI Backupper
AOMEI Backupper includes comprehensive backup features, you can choose any option you need to proceed. Here I will take Disk Backup as an example to backup everything in the hard drive. If you want to back up operating system only, you can choose System Backup instead.
Steps to create disk backup in Windows 11/10/8/7:
1. Launch AOMEI Backupper Standard after installing. Select Backup -> Disk Backup.
2. Click + Add Disk button to select the source disk. Then select the destination disk to store the backup image file.

3. Click Start Backup to perform disk backup, and wait it to complete.
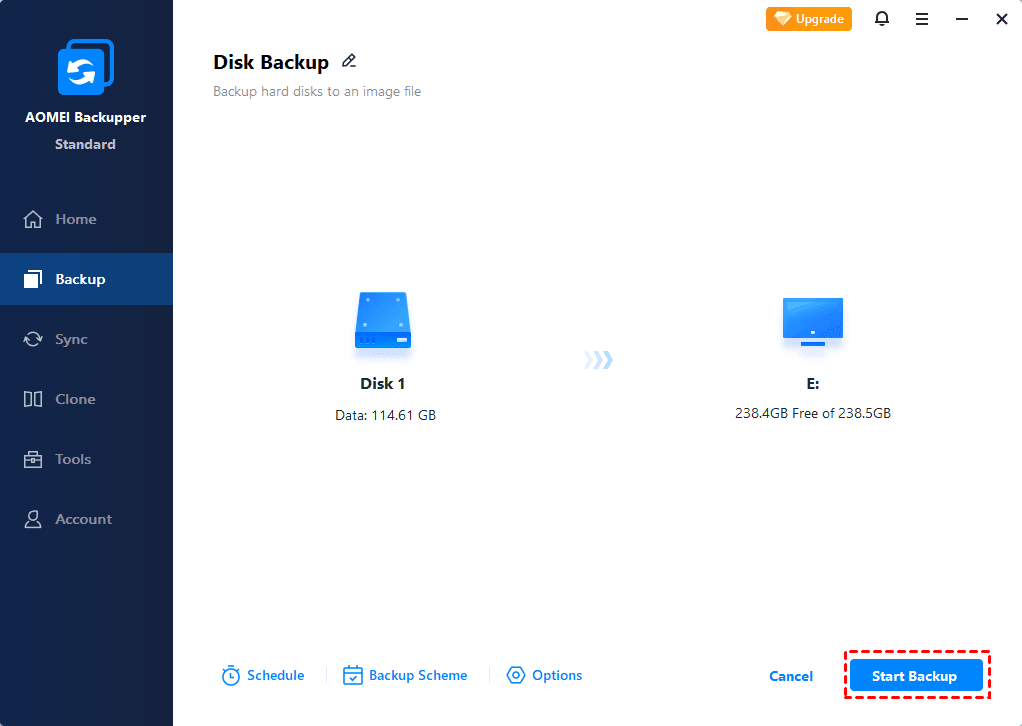
✎Before start the backup, you can also click the bottom options for further customization:
- Options: Enable email notification, comment, split, compress the backup image, or select a backup mode, etc.
- Schedule Backup: Backup disk daily, weekly, monthly. Also, you can try Event trigger, or USB plug in on AOMEI Backupper Professional.

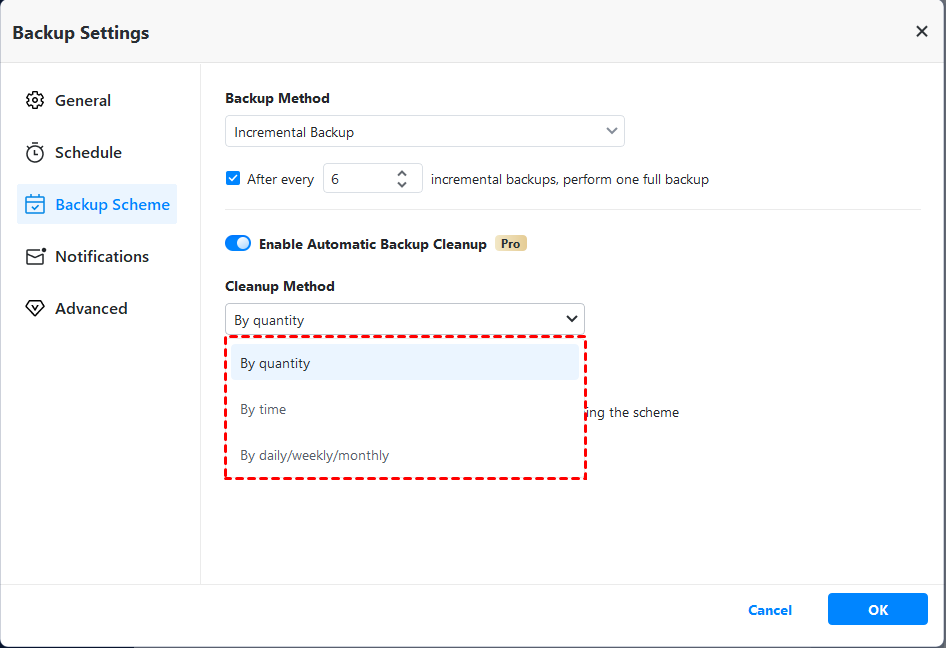
- Backup Scheme: Choose "Backup Method" (full/incremental/differential), and "Enable Automatic Backup Cleanup" (available in Professional edition) to delete old backup file automatically.
How to clone disk with AOMEI Backupper
AOMEI Backupper runs in intelligent-sector mode by default, which means it will only clone used sectors and skip unused or logically bad sectors. This allows you to clone larger drive to smaller drive as long as it has enough space to hold all the existing data.
But if the target disk has larger capacity, you can also choose sector-by-sector clone to copy every sector, no matter used or not. Thus you can create an exact clone of the source drive, even including the hidden partition.
*Here I will show you how to clone a data disk with the free Standard edition. If you want to clone a system disk, please upgrade to Professional edition, and the remain steps are all the same.
Steps to clone disk in Windows 11/10/8/7:
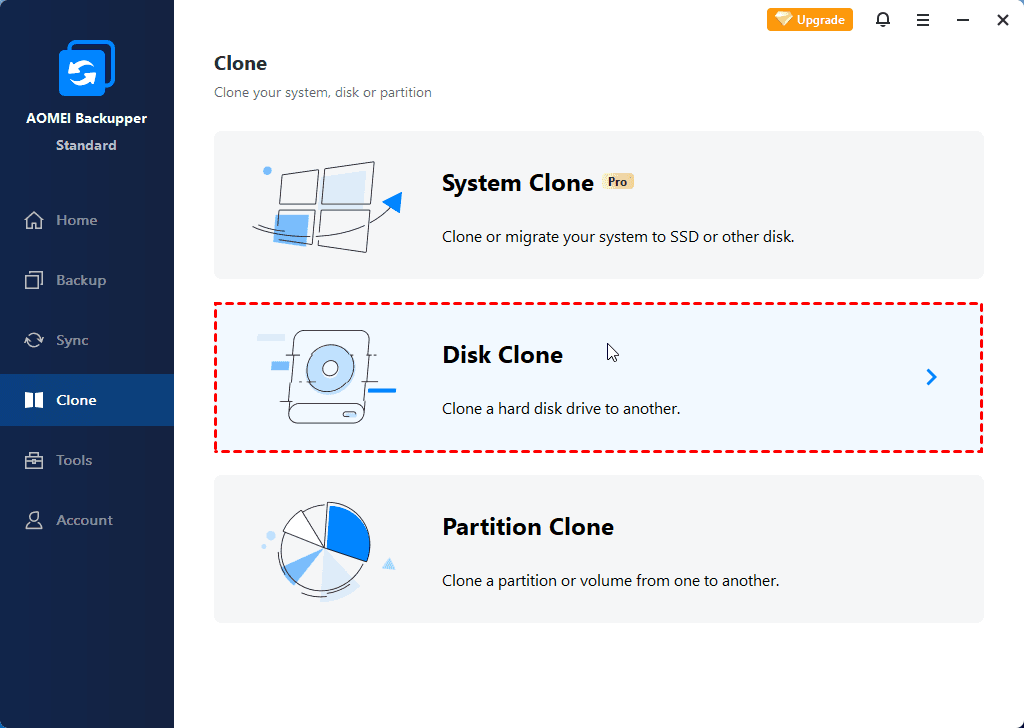
1. Connect the target drive to your computer and make sure it can be detected by Windows. Then launch the software and navigate to Clone tab, choose Disk Clone if you want to migrate everything to the target drive.
Note: The cloning process will overwrite everything on the target drive. If you've stored some important data on it, please make a backup first.
2. Select your source disk, move to next page and select the connected target drive as well. Click Next to continue.
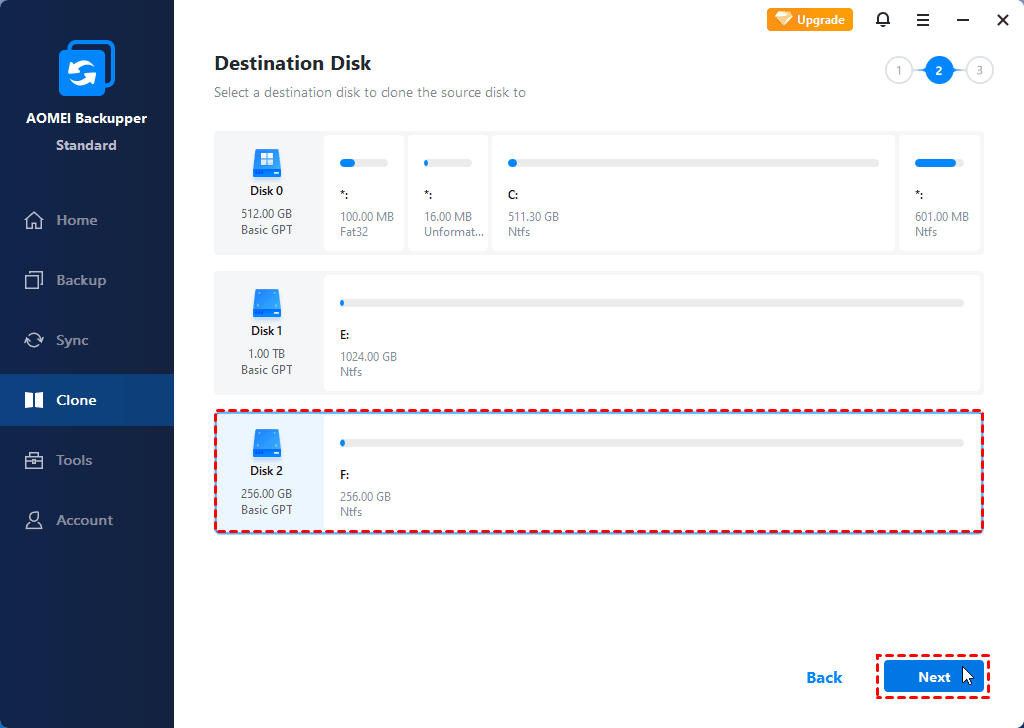
3. Confirm the operation and Start Clone, and the migration will start.
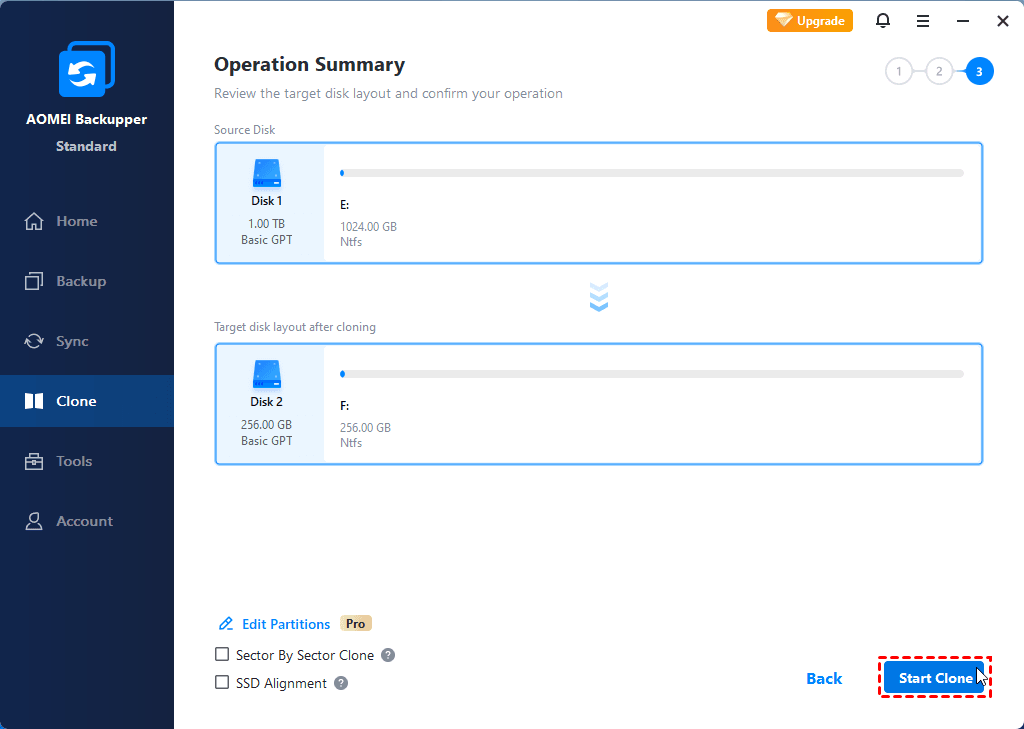
✎Here are also some additional options that may be helpful to you:
SSD Alignment: If your target drive is an SSD, this will accelerate its reading/writing speed and prolong its lifespan.
Sector By Sector Clone: When cloning to a larger drive, you can tick this to copy all sectors no matter used or not.
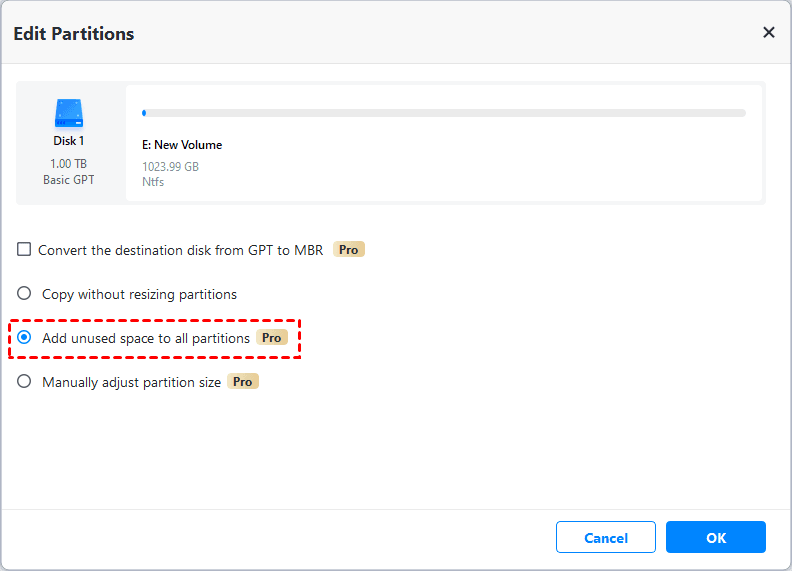
Edit Partitions (supported by Professional edition): To make full use of disk capacity after cloning disk to larger disk, you can try the following 3 options:
- Copy without resizing partitions: It will not resize the partition size.
- Add unused space to all partitions: Reallocate the unallocated space to each partition of the target disk.
- Manually adjust partition size: Extend unallocated space to any partition on the destination disk you want. And it requires you to manually adjust the size of the partition.
*How to boot from the cloned system disk
For a normal data disk, there is nothing extra to do after the cloning is done. But if what you cloned is a system disk with Windows installed, there are also boot issues involved afterwards.
After the bootable cloning is complete, you can shut down the computer and physically replace the old hard drive with the new one; if it has more than one slot, you can also keep the old drive as a second storage.
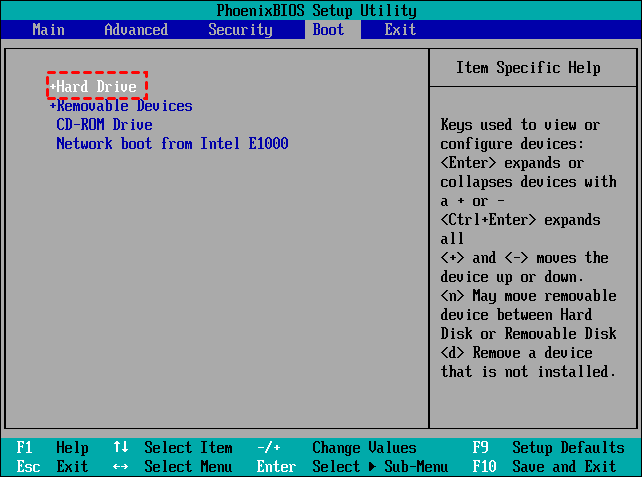
If it does not boot properly, you can restart the computer, press the required key (could be DEL, F2, F12, etc.) to enter BIOS. *The specific key depends on the manufacturer and model, which you can directly search in Google. Then, make sure the cloned new drive is set as the first boot option, and press F10 to save the change.
If your computer boot from the new drive successfully, then you are free to decide what to do with the old hard drive. You can either discard it or keep it as a storage device. AOMEI Backupper also integrates a disk wipe feature to help you clean a hard drive completely.
Summary
Backup vs Clone, both are common means of data protection, and both have their own benefits and applicability scenarios. Instead of choosing one or the other, it is better to find a solution that supports both.
AOMEI Backupper is such a program that can help you perform hard drive backup or disk clone easily and securely. Not only the basic functionality, it also includes more useful features to safeguard your data. For example, you can create a bootable media in case of boot failures, wipe the old hard drive after a disk replacement/upgrade, sync files/folders in real time, restore system to another computer with dissimilar hardware, etc.