7 Best Free Ways to Transfer Photos from PC to iPhone
Is there an easiest way to transfer photos from PC to iPhone? Of course! Just read this detailed article and you can know how to operate the process on Windows desktop/laptop.
By Kathy / Updated on October 27, 2023
Can you transfer photos from PC to iPhone?
It's common for people to store photos across various devices, including computers, cameras, and mobile phones. Sometimes, when you switch to a new iPhone or need to get your pictures after editing them on computer. Then it’s necessary to transfer photos from PC to iPhone.
However, moving files between iPhone and Windows seems complex due to system restrictions. Fortunately, there are several methods available to migrate iPhone photos to a Windows desktop or laptop, including using FoneTool, iCloud and more.
How to transfer photos from PC to iPhone
Now we will introduce 7 ways for you to help you easily move and access your precious PC images on your iPhone. And FoneTool might be the best way to finish the process.
Method 1. The best way to transfer photos from PC to iPhone without iTunes for free
Some people are used to moving files from Windows to iPhone with iTunes/iCloud. But these ways appear troublesome when you need to get a large number of files at a bad Internet speed or you forget your Apple ID.
When you need to save photos on PC to iPhone, FoneTool can give you the easiest steps to make it.
This remarkable tool allows you to add photos from a Windows desktop or laptop to iPhone models like iPhone 15/14/13/12 through a USB cable. It offers a range of advantages to meet diverse needs, including:
- User-friendly software: The easy-to-use interface helps all people achieve data transfer between PC and iPhone easily.
- Fast transfer speed: There's no Wi-Fi connection or any cellular data consumption. So you can move thousands of photos to your devices in minutes.
- Support multiple file types: Except for photos, it also allows you to import videos, contacts, music, etc. to your iPhone in various formats.
- Selective and preview transfer: You can preview items on computer and choose to move all photos or specific files you need.
- Full compatibility: FoneTool supports various iOS devices including iPhone 4 to iPhone 15, iPad and iPod Touch, as well as the latest iOS 17/16.
Now you can download the software on your Windows PC and get the best way to transfer photos from PC to iPhone according to the step-by-step guidance below.
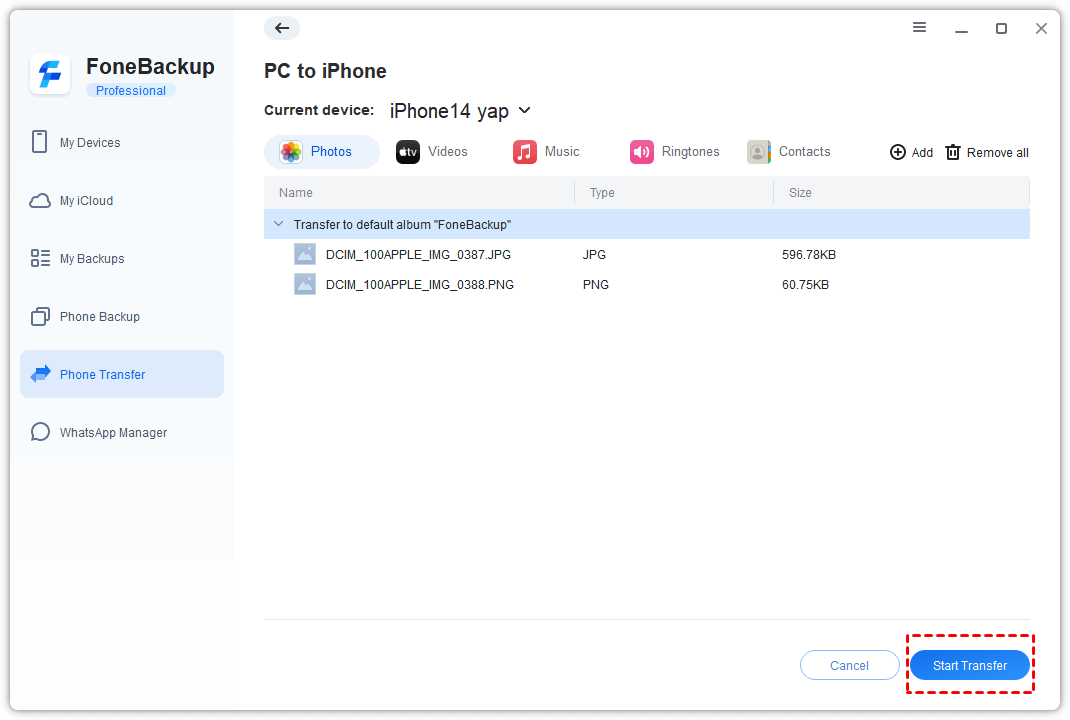
Step 1. Run FoneTool and connect your iPhone to the computer with a USB cable. If asked, tap Trust on iPhone.
Step 2. Choose Phone Transfer > Select PC to iPhone and click Get Started.

Step 3. Tap the blank box to add photos you need from the computer.
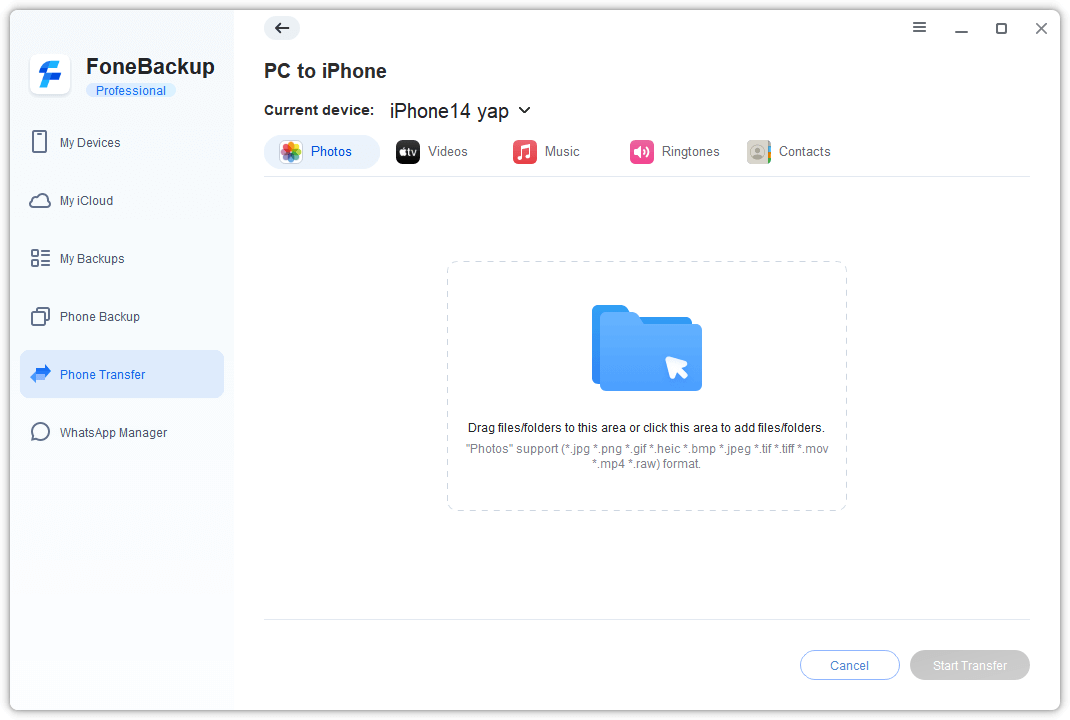
Step 4. Click Start Transfer to begin the task.
From the detailed steps, now you can know why FoneTool is the easiest way to transfer photos from PC to iPhone.
Method 2. Import photos from PC to iPhone with iTunes
As a traditional method to move files between Windows desktop/laptop and iPhone, iTunes is also useful for importing data from your computer to iPhone. But it's essential to be cautious about data loss in the synchronization process, because iTunes might overwrite your data in some situations. Here's a guide on how to put computer photos into your iPhone:
Step 1. Connect your iPhone to your computer via a USB cable. Download and install iTunes from the Microsoft Store if you haven't already.
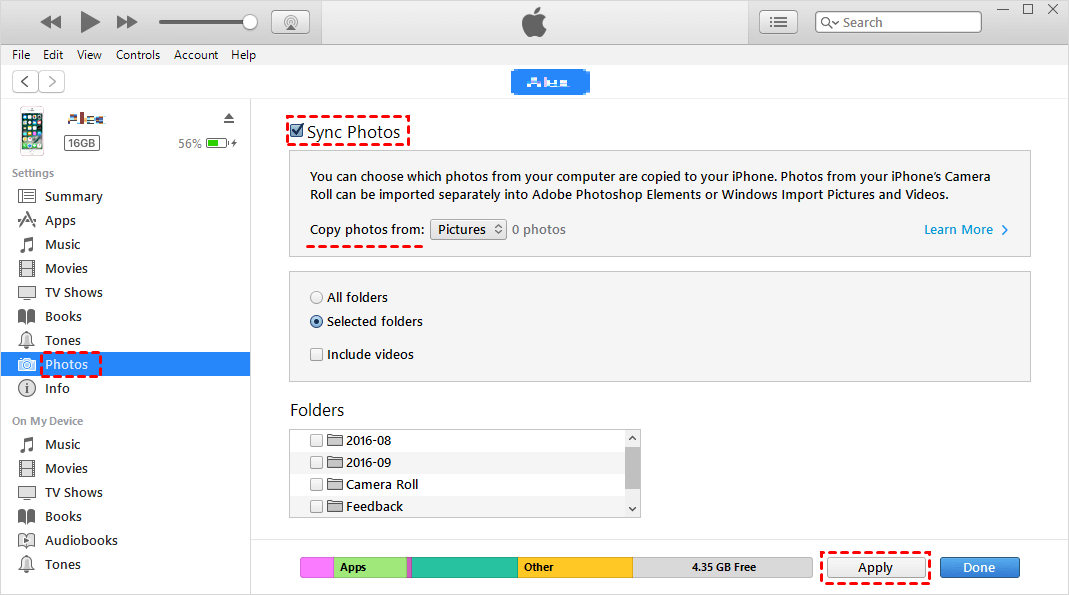
Step 2. Open iTunes and click on your device icon. Then, select the Photos header.
Step 3. Check Sync Photos option and select Choose folder from the drop-down menu and tap the folder containing the photos you wish to export.
Step 4. Click Apply to begin the syncing task.
- Notes:✎...
- If you have enabled iCloud Photos on your iPhone, you need to turn it off before you sync photos with iTunes.
- Enabling iCloud Photos after syncing photos to your iPhone from iTunes will prompt a message stating "Photos Synced from iTunes will be Removed." Then the original photos will remain on your computer, while the iPhone copies will be deleted.
Method 3. Move photos from PC to iPhone with iCloud
iCloud Photos gives you another way to send photos from your Windows PC to iCloud Photo Library for easy access on your iPhone. Now follow these simple steps to finish the process:
Step 1. Download iCloud for Windows on your PC, then install and run it.
Step 2. Log in with your Apple ID and click on the Options button next to Photos.
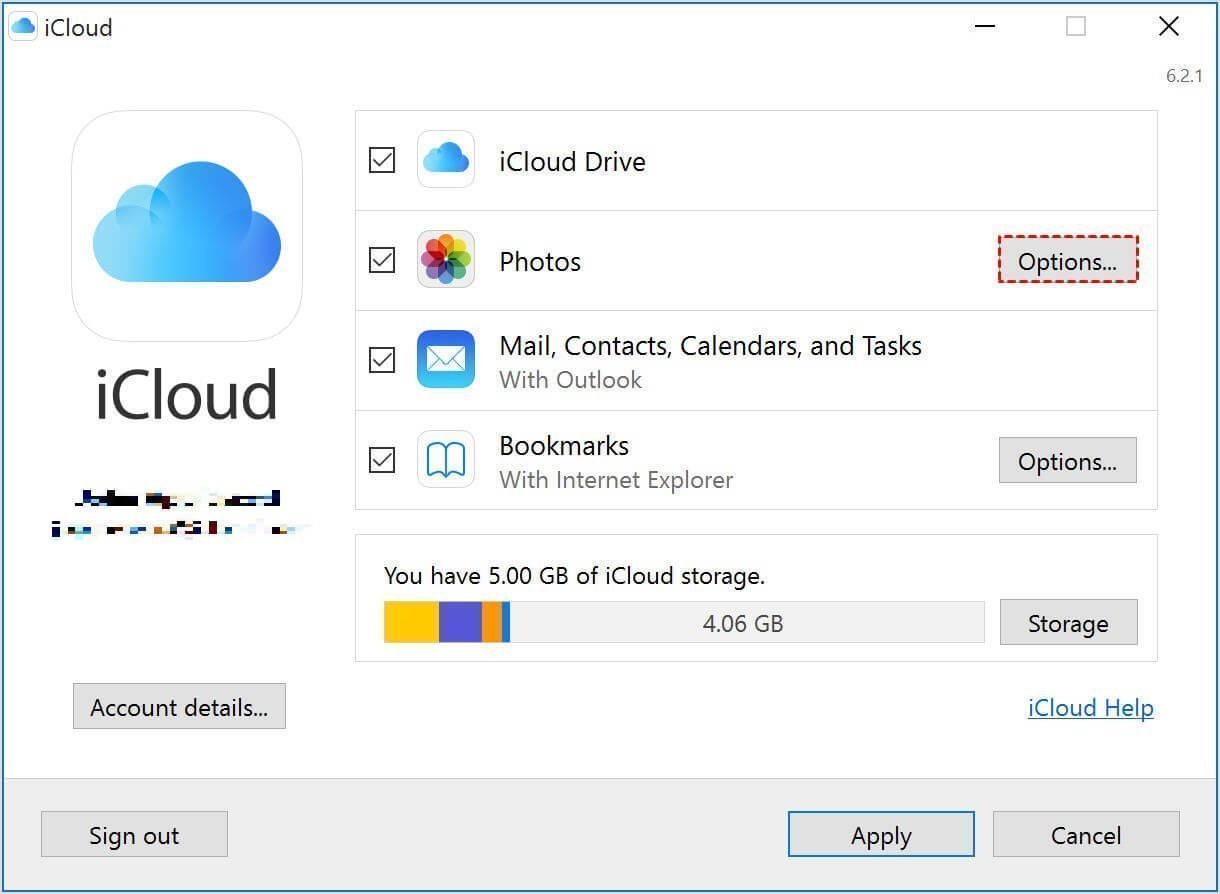
Step 3. Choose iCloud Photo Library, click Done and then Apply to confirm your choice.
Step 4. Launch iCloud Photos in File Explorer. Select Upload photos and videos, then choose the photos you want to migrate to your iPhone.
Then the pictures should promptly appear on your iPhone as well as any other device linked to the same iCloud account.
However, if you encounter any delays or the photos don't appear as expected, check if iCloud Photos is enabled on your iPhone by going to Settings > Your Name > iCloud > Photos > iCloud Photos.
Then you can download them to your iPhone easily. If you encounter any issues in the downloading process, you can use other ways to access your PC photos on iPhone.
Method 4. Add photos from PC to iPhone using Google Photos
When it comes to how to transfer photos from PC to iPhone without iTunes/iCloud, cloud services such as Google Photos, DropBox and OneDrive can also help you share photos. And here we will take Google Photos as an example.
Step 1. Open your computer's browser and visit https://photos.google.com/. Sign in using your Google account.
Step 2. Create a new album on Google Photos and upload the desired photos from your computer to the album.

Step 3. Open your iPhone, go to the App Store and download the Google Photos app. Sign in using the same Google account as on your computer.
Step 4. The photos from your Google Photos album will sync to the Google Photos app on your iPhone. From there, you can easily download the photos to your iPhone for offline access.
Method 5. Migrate photo from PC to iPhone with File Explorer
Windows File Explorer provides a convenient way for users to access and move photos and videos from their PC to iPhone using a USB cable. And you don't need to install any third-party software.
Step 1. Connect your iPhone to your PC using a USB cable > Unlock your iPhone and grant permission to "Trust this computer" if prompted.
Step 2. Go to your PC, Choose Internal Storage > Find the folder or create a new one to save the photos > Select the photos you wish to save to iPhone on PC > Copy and paste them into the designated folder on your iPhone.
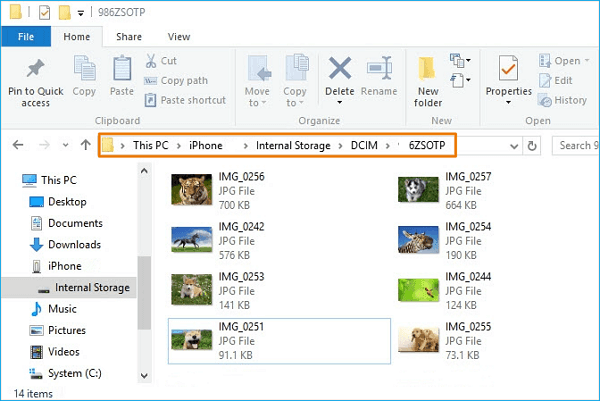
Step 3. Once the process is complete, you can view and access the targeted photos in the Photos app on your iPhone.
Method 6. Export photo from PC to iPhone with Email
Sending photos via email is also possible, but this method is limited to moving only a small number of photos. The quantity of photos you can send depends on the attachment size provided by your email service.
- Gmail accepts attachments up to 25 MB in size.
- Yahoo Mail allows attachments of up to 25 MB.
- Outlook has a maximum attachment size of 20 MB.
- Hotmail permits sending files up to 10 MB.
- Mail.com allows a maximum size of 50 MB per attachment and 10 MB per file.
- AOL supports attachments up to 25 MB per email.
You can decide whether to use email to send photos based on the size of the photos/videos you want to move and the attachment limitations provided by your email service provider. If need, you can follow the steps below to accomplish the action.
Step 1. Create a new email address with your name and password > Log in to your old email account on your computer.
Step 2. Compose an email from your old account and use your new email address as the recipient > Select the photos you wish to send and attach them to the email.
Step 3. Access your new email address on your iPhone and locate the incoming email from your old account in the Inbox section. Download the photo attachments to your iPhone to access them.
Method 7. Send photos from PC to iPhone with Bluetooth
You can also use Bluetooth to migrate your photos when your computer supports Bluetooth connection. And Here’s how:
Step 1. On your iPhone, open the Settings app, then tap on Bluetooth and toggle it on.
Step 2. On your computer, tap on the Start button, then select Settings, and choose Devices.
Step 3: Select Add Bluetooth & Other Devices.
Step 4. Your computer will start scanning for nearby devices with Bluetooth enabled. Choose your iPhone from the list to pair the devices.
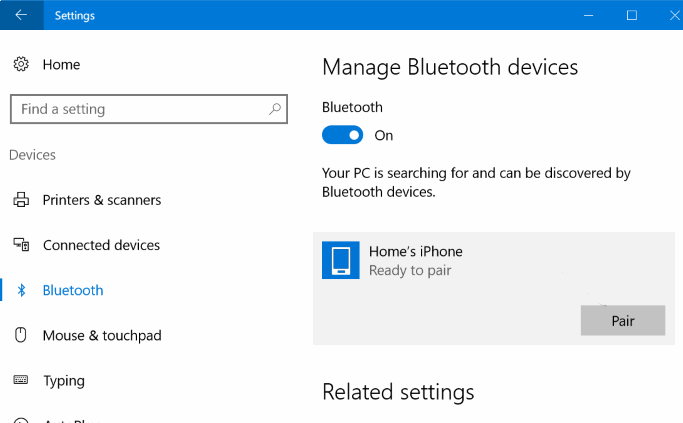
Step 5. Tap Send or receive files via BlueTooth > Send File > View and choose the pictures you need to send > Click Next > Finish.
Then your pictures will be imported to your iPhone.
Conclusion
The above 7 methods give you guidance about moving photos from your computer to iPhone. FoneTool can assist you with selective photos transfer while iTunes and iCloud only support syncing all photos. And if you just add a few pictures, the other 4 ways also work.
Then you can know, FoneTool will be the best way to transfer photos from PC to iPhone when you need to send a large amount of pictures. It’s free, fast and professional. Besides, it can also help you transfer photos from iPhone to iPhone easily.