Causes and Fixes to Windows Detected A Hard Disk Problem
This article illustrates the possible reasons and corresponding solutions to the Windows detected a hard dsik problem in Windows 11, 10, 8, and 7. Let's get started below.
by Ivy Updated on November 25, 2022
The content of this article:
-
Ultimate Way to Fix Windows Has Detected a Hard Disk Problem
-
Disable Windows Detected A Hard Disk Problem to Prevent This Prompt
Windows Detected A Hard Disk Problem Error
"I have a Toshiba Satellite laptop with Windows 10 installed. It is 3+ years old and the hard drive is Toshiba HDD. Last night I turned on my laptop and I got a black screen on start-up saying: SMART Failure Predicted on Hard Disk.
I pressed F1 to continue, and the computer was starting up normally. A few minutes after the start-up was finished loading, I got this warning message: Windows detected a hard disk problem. Backup your files immediately to prevent information loss…What does it mean and what can I do to fix it?"
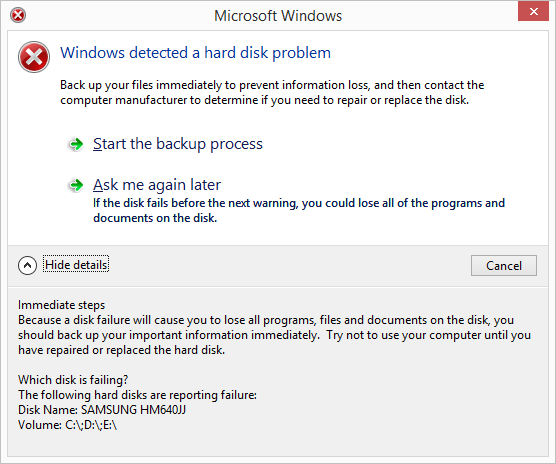
Windows detected a hard disk problem error means that your computer is going to die, and your computer may take a longer time to load than it ever did or stuck and stop responding with increasing frequency.
If you do not backup data on the hard disk, you will lose all the programs and documents on the disk, even the hard disk problem preventing Windows from starting. Please do as recommended and fix the windows detected a hard disk problem according to the corresponding reasons.
Backup Your Hard Disk Immediately as Recommended
It’s an emergency to backup your data on your hard disk if your computer encounter the Windows has detected a hard disk problem. However, It’s proven that the Windows built-in backup software - Backup and Restore is not flexible and reliable enough.
Hence, it’s highly recommended to use the professional yet free backup software - AOMEI Backupper Standard to backup the entire disk. Windows 11, 10, 8.1, 8, 7, Vista, XP (including 32-bit and 64-bit) are supported. Just download it to have a ty!
As a matter of fact, you have more than one way to backup your hard drive.
-
Backup hard disk to external hard disk or network drive, and then restore to the new hard disk.
-
Clone hard drive to another one to transfer everything, including Windows operating system, installed programs, settings, personal files, etc.
Below we will show you the two ways. Note the second is available on the AOMEI Backupper Professional or higher.
Way 1: Backup Hard Disk that Has A Problem
The first way is to backup and restore the data of the hard disk that Windows has detected a hard disk problem. You need to prepare an external disk or network drive to store the backup image temporarily. Please follow the steps below carefully:
Step 1. Launch AOMEI Backupper Standard, Choose Backup > Disk Backup subsequently.

Step 2. Click + Add Disk to choose the hard disk that shows the error: Windows detected a hard disk problem. Rename the Task Name if need be.

Step 3. Pick the external hard disk as the destination, and press the Start Backup >> button to backup the hard disk that is going dead. By default, this software only backup the used sectors of file systems, which will skip bad sectors automatically if there are any.
Way 2: Safely Clone Hard Disk to Another One [Advanced]
You can directly clone hard disk to migrate data if it does not contain Windows. If it has, please upgrade now and enjoy the cloning features. Before starting, please install the new hard disk, depending on your situation in the following:
- if your computer has more than one hard drive slots, you could directly install the new hard disk to your computer with power cable or sata cable.
- if there is only one hard drive bay, you could connect the new hard drive as external hard disk via the hard disk enclosure. Please be sure it can be detected by Windows.
Then, follow the steps below to clone hard disk to another one in simple steps.
1. Click the Upgrade button at the upper right corner and buy AOMEI Backupper Professional. Then, it will send you a license code, and type it in the Register box under Settings.
2. Reload this software and choose Disk Clone under Clone tab.

3. Choose the hard disk with Windows detected a hard disk problem as the source disk, and click Next.

4. Select the new hard disk as the destination, and hit Next.
5. Press Start Clone >> to clone hard disk to another one safely. By default, it only clones the used sectors and skips bad sectors automatically.

★ Tips:
☂ Edit Partitions allows you to adjust the partition size manually or automatically to fully use the storage space on the destination disk if you’re cloning disk to larger disk. And it also has the ability to convert disk type, from MBR to GPT or vice versa.
☂ SSD Alignment is capable of optimizing the overall performance for the SSD. Tick it if your destination disk is an SSD.
☂ Sector By Sector Clone permits you to clone all sectors on the destination disk, and requires the destination disk is larger than the source disk. Tick this option will make the Edit Partitions invisible.
After disk cloning is completed, you can Then, restart your computer to let it boot from the new hard drive automatically. If not, please replace the hard drive that Windows detected a hard disk problem in Windows 11/10/8/7 with the new one, and boot from it, that’s all.
Why Windows Has Detected a Hard Disk Problem?
After backing up your data on the hard disk that shows the error: Windows detected a hard disk problem, you may want to fix the problem now. Don't be in a hurry, before that, you need to find out the causes of your problem. Here we summarize some possible causes:
-
cable issue;
-
Hard disk failure;
-
Registry error;
-
Logical error;
-
File system corruption;
-
Bad sectors on hard disk;
-
Virus attack;
-
Human error, etc.
After learning the possible reasons, you may have a clue of why your computer encounter Windows has detected a hard disk problem. It does not matter if you don't know, here we will introduce you to some quick fixes to it, just try it one by one.
Windows Detected a Hard Disk Problem - Fix Quickly
Here are 3 quick fixes to Windows has detected a hard disk problem, and you may be surprised by the first fix - reconnect the power cable and SATA cable of the hard disk. This may be due to the power cable and SATA cable is always connected and not plugged out, and then there is poor contacts after several years. It's said this works well. Just try it first and then other 2 methods.
Quick Fix 1. Reconnect power cable and SATA cable
1. Shut down your computer completely and take out the computer panel, leaving the disk visible.
2. Disconnect the power cable and SATA cable of the hard disk with the Windows detected a hard disk problem, and then connect it back.

3. Change the SATA port as well if there are extra. Reboot your computer and see if this problem still persists.
Quick Fix 2. Repair hard disk error with System File Checker (SFC)
1. Input cmd in Windows search box, right click the Command Prompt, choose Run as administrator.
2. Input the sfc /scannow command, and press Enter.
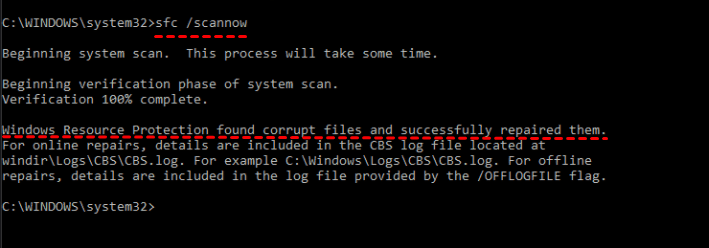
3. It will begin to scan system and repair the corrupted files automatically. And you may receive different messages in the following:
- Windows Resource Protection did not find any integrity violations. It means that there is no any missing or corrupted system files.
- Windows Resource Protection found corrupt files but was unable to fix some of them. In this case, you need to repair the corrupted files manually and the details are included in the CBS.Log %WinDir%\Logs\CBS\CBS.log.
4. If there is no problem, reboot your computer and see if this problem still exists.
Quick Fix 3. Check Disk Error with CHKDSK
1. Press Windows + R key combination to open Run window.
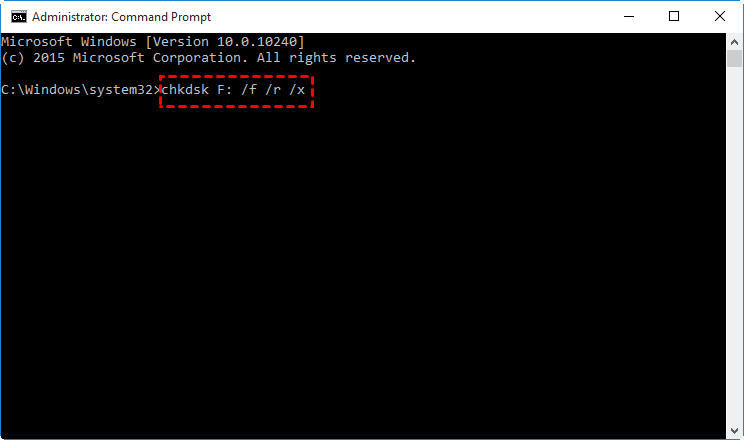
2. Type the chkdsk C: /f /r /x and press Enter.
-
/f: fix any errors it finds.
-
/r: locate the bad sectors on the drive adn recover readable information.
-
/x: force the drive to dismount before the operation.
3. Reboot your computer and see if this problem still exists.
Ultimate Way to Fix Windows Has Detected a Hard Disk Problem
If the hard disk that shows the Windows detected a hard disk problem cannot be fixed quickly, the ultimate way is to replace hard drive with a new one. You have two ways in the following:
Way 1: Restore disk image to new hard drive and use it as the boot drive. It requires you have a disk backup.
- Open AOMEI Backupper Standard again. Switch to the Restore tab, click Select Task and select the disk image.

- Select the way to restore disk image - restore entire disk or a partition
- Select new hard drive and click Start Restore to restore disk image to new hard drive and fix the Windows detected a hard disk problem in Windows 11, 10, 8, or 7.

Way 2: Directly replace the disk having a problem with the cloned disk and boot from it. If you clone a hard disk, you could try this method.
Disable Windows Detected A Hard Disk Problem to Prevent This Prompt
Sometimes, you will find there is no hard disk error after receiving the Windows detected a hard disk problem in Windows 11, 10, 8, and 7, so you could choose to disable it. Please follow the steps below.
1. Please input the gpedit.msc in the Windows search box and press Enter.
2. Expand Computer Configuration and choose Administrative Templates > System > Troubleshooting and Diagnostics > Disk Diagnostics.
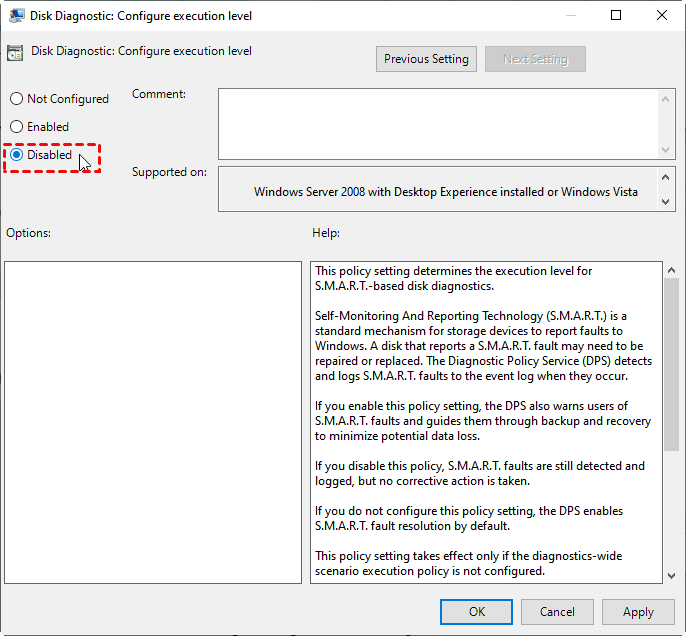
3. Double click the Disk Diagnostic: Configure execution level settings.

4. Tick Disable option, and click Apply and OK.
The Epilogue
No matter what are the causes, you may already know how to fix Windows detected a hard disk problem error in Windows 11/10/8/7. You could consider using quick fixes or the ultimate way. To prevent this error without losing any data, the best way is to create a backup on a regular basis, such as, daily, weekly or monthly.
In AOMEI Backupper, you can choose the items you want to backup, entire disk, system, partition or files and folders, and how to create an exact copy of them. To backup disk, you can use backup or clone method. To backup files, you can use the backup (eg: backup files to Google Drive) or sync method. For unlimited computers or servers, please try AOMEI Backupper Technician Plus.